TM-246193 Page 30 Invision 352 MPa
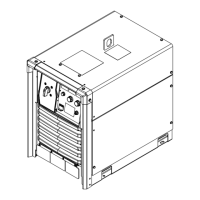
Theory Of Operation Components
1 Primary Input Power
Single or Three-Phase AC primary
power supply.
2 Power Switch S1
Provides on/off control of primary in-
put power to welding power source.
3 Power Interconnect Board PC2
Provides electrical connections for
L1, L2, MOD1, MOD2, RM1, C12 &
C13. Precharge and bleeder resis-
tors and snubber capacitors are
mounted on PC2.
4 Boost Input Inductor L1
Required to boost input rectifier volt-
age to bus voltage.
5 Boost Snubber Inductor L2
Required to ensure soft−switching of
the boost IGBT located in MOD1.
6 Inverter Module MOD2
Contains the main inverter IGBTs,
snubber IGBTs, main boost diode,
and two boost snubber diodes.
7 Input Pre−Regulator Module
MOD1
Contains the input rectifier diodes,
boost IGBT, and one boost snubber
diode.
8 Snubber Resistor Module RM1
Contains one boost snubber resistor
and one inverter snubber resistor.
9 Bus Capacitors C12 & C13
Stores energy and filters the DC bus
voltage for input boost and inverter.
10 Current Transformer CT1
Provides T1 current feedback to
PC1. Used to protect inverter IGBTs
in case of T1 primary overcurrent.
11 Series Capacitor C15
Provides protection against T1 satu-
ration. Saturation occurs when the
voltage across the transformer is not
balanced. The unbalanced voltage
appears as a DC offset voltage
across the transformer and can
cause a T1 primary overcurrent. The
capacitor protects against this condi-
tion by blocking the DC offset.
12 Main Transformer T1
Switching action of IGBTs in MOD2
creates the AC voltage source for T1
primary. T1 secondary outputs sup-
ply power to the weld circuit.
13 Output Diodes D1, D2
Rectifies the main secondary output
of T1.
14 Output Current Sensor HD1
Provides weld output current feed-
back to PC1.
15 Positive (+) and Negative (−)
Weld Output Receptacles
Provide weld output and allow chang-
ing of output polarity.
16 Output Stabilizer L3
Filters or smooths the DC weld output
current.
17 User Interface Board PC3
Consists of Voltmeter V, Ammeter A,
Arc Control, Voltage/Amperage Ad-
just, Remote 14−pin receptacle, Pro-
cess Selector Switch, and Weld Pro-
cess Control.
18 Voltmeter V, Ammeter A
See Section 5-1, Front Panel.
19 Arc Control
Controls Dig in Stick process or In-
ductance in MIG process. See Sec-
tion 5-1 Front Panel.
20 Voltage/Amperage Adjust
Selects weld output voltage or am-
perage level. See Section 5-1.
21 Remote 14-Pin Receptacle
RC50
Provides connection for accessory
equipment.
See Sections 5-1, Front
Panel, and 4-4, Remote 14 Recep-
tacle Information.
22 Weld Process Control
Controls weld output by automatically
adjusting output current command
signal to Inverter Control.
23 Optional Auxiliary Power 115
VAC Receptacle
Provides connection for auxiliary
equipment to welding power source.
24 Control Board PC1
Contains the boost control, control
power module, and inverter control.
25 Boost Control
Controls switching of boost IGBT in
MOD1 to regulate L1 current and the
DC bus voltage.
26 Control Power Module
Contains power supply for boost con-
trol power, and inverter IGBTs to
create AC voltage source for T2 pri-
mary.
27 Inverter Control
Controls the main inverter and snub-
ber IGBTs within MOD2. Regulates
the weld output current to the value
received from weld process control-
ler. Provides power to PC3. Drives
fan motor and gas valve. Provides in-
terface between primary and secon-
dary thermistors and PC3.
115 Volts AC at RC50 was re-
moved Eff w/ME224001U.
28 Supplementary Protector CB1
Provides overload protection for re-
mote 14-pin 115 VAC power, and op-
tional 115 VAC receptacle.
29 Supplementary Protector CB2
Provides overload protection for re-
mote 14-pin 24 VAC power.
30 Control Transformer T2
Provides power to inverter control on
PC1, remote 14-pin receptacle, and
optional 115 VAC receptacle.
31 Fan Motor FM1
Provides cooling of heatsinks and
components mounted inside wind
tunnel. The fan motor is thermostati-
cally controlled and only runs when
cooling is needed. Once unit is
cooled to proper temperature, fan will
continue to run for ten minutes.
32 Secondary Heatsink Thermistor
RT-1
Monitors temperature of secondary
heatsink for fan motor control and
overtemperature
shutdown.
33 Primary Heatsink Thermistor
RT-2
Monitors temperature of primary
heatsink for fan motor control and
overtemperature
shutdown.
 Loading...