L
Mndeh:
104.
125.
2to.
215,
220.
225.
315
&
J!O
tDuple! Lensest:
1. Rt:mnv\' Ihl! front
etch
pliltC':
Pry
ont:
I:dgC'
fn.'!..'
u:>lng
J fine bl;;de tool.
lhen
pcel
tlu.'
pM~'
fn:\.'
u.sin~
pliers. Discard
the
plate,
'1
Remon'
the
lens retainer using
tool
#CR-
1000
(FIEur,;- 5-161. Position
the
tool
over
tilL'
~t.:.liner
and twist ltenl1y
until
it
is
free.
Th
..
'
kns
may
now
b~
removed.
Repl:K'ement
Models 100,
101,102,240.250.350'"
360:
I, Insert
the
rear
element
lens
assembly
jn
the
casting using
tool
fll
69446 .
..,
Loosely assemble
the
front
eJement
lens
to
the
rear
eiernent.
3.
Collimate the lens
as
instructed
in
Section
m.
Modds
103.
135.230,330.335'"
340:
I. Position
the
lens retainer in
the
housing
so
that
the
howed
side is
toward
the
housing.
Hand
tighten
the
rear element lens assembly
into
the
lens retainer. Secure it in place
lIsing
tool
#!
69446.
Loosely assemble
the
front
element
tens
to
the rear element. Assemble
the
front
shutter
housing
to
the
shutter
assembly.
(Refer
to
procedure
"Shutter
Housing
Replacement")
3.
Collimate the lens as indicated in
Section
III.
$>..·cifon
iiI.
Models 104. 125.
210,215.
220, 225.
315
&
320
t Duplel
tell~~t:
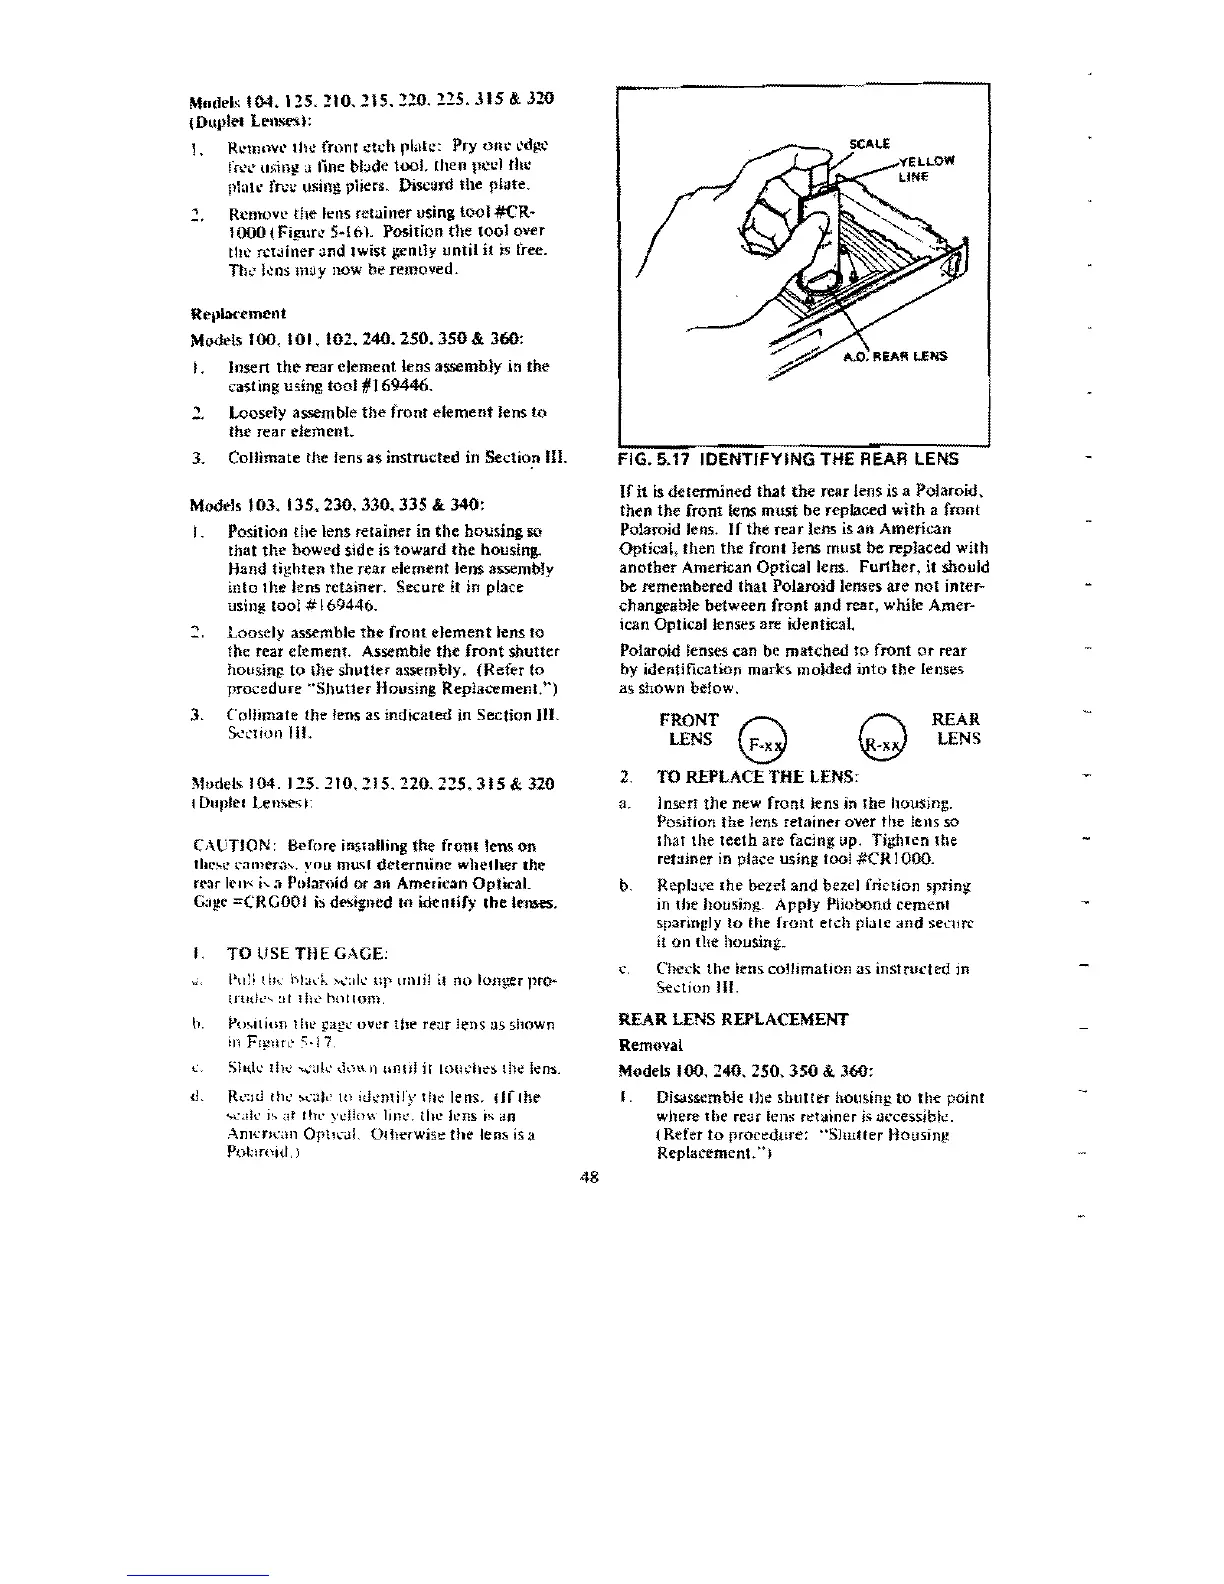
CAuTJON: Before ins-tailing
the
from
tms
on
'11I:~e
l'alner;b·. you
mo.'"
determine
whelher
the
rear
1I."Il"
j"
a Pularoid or
an
American
Optical.
G:I.!!t'
=CRGOOI b dt'Stgned In
idenlify
the lenses.
I.
TO
LISE
THE
GAGE:
Pll~:
tb~
hb,l"
,
..
':ill.'
up
lInlil
il
110
longer
pr<r-
inH.k~:1I
Ill<'
h(lllum.
b.
/>o"lIi,ln 1
hI.'
~ag..:
oVl.'r
the
rear
lens
us shown
in
F!!!lIrl'
).!
7.
Slll,k
IllI.' ,,:<tk
d,H\
n
lIuol
it
low:ile-s the
Ie-ns.
{L
R
..
';u..!
th~'
....
·ak
to ith:nlify
th~
lens.
nf
lhe
",
...
de
i":lt
rtll'
ydltH.\· linl.'. t!ie h:ns
is
an
Am
..
'n
..
';lIl
OphLJL OlherwiSl!
the
lens
is
a
Pobwl(J,
)
48
FIG. 5.17
IDENTIFYING
THE REAR LENS
If
it
is
determined
that
the
rear lens is a
Polaroid,
then the
front
(ens
must
be replaced
with
a front
Polaroid lens,
If
the
rear
lens is an
American
Optical.
then
the
front
lens must
be
replaced with
another
American Optical lens.
Further,
it should
be
remembered
that
Polaroid lenses are
not
inter-
changeable
between
front
and
rear, while Amer-
ican Optical lenses are
identical
Polaroid lenses
can
be
matched
to
front
or
rear
by identlfication
marks
molded
into
the
lenses
as
shown below,
REAl<
F~~ST
Q Q
LENS
2.
TO
REPLACE THE LENS:
a.
lnsert
the
new
front
lens in
the
Ilousins.
Position
the
lens
retainer
oYer
the
lens
so
th.at
the
teeth
are facing up.
Tighten
the
ret.:.liner in place using tool
#CR
I
000.
b
ReplJce
[he
bent
and
bezel friction spring:
in
the
housing.
Apply
Pliobond
cement
sparingly
to
the (rDltt etch plale
dnd
set:llfC
it
on
the
housing:.
Check the lens collimation:.ls instru,:ted in
Se.;tion IU.
REAR
LENS REPLACEMENT
Removal
Mode~
100. 240.
250.
350
& 360:
I. Disassemble
the
Shtlt1er housing
to
the
point
where
the
rear Icns re-talner
is
til..'cessibk.
(Refer
to
procedure:
"Shutter
Housing:
Replacement.H
J

 Loading...