r;.u:ing:
away from
the
bellows ,tnd
halld-pre~s
il
ill pl:ll:'..'.
5. In1'I"lIlllI.' haseplate
into
the
shutler
housing
:lilt!
then
install
the
shutter
housing as
roJ-
lows;
a.
01'1
shunen
with C'opper-colored
mylar
printed circuits:
Route
the
battery
c.lble
through
the
opening in the rear
shutter
and
reinstall
the
rubber
strain
reUef coliar using
Pliohond
(or
equivalent). Using an
Unpr
Princess so)dering iron
(or
.:quivalentJ. cart?
fully
solder the
battery
wires
to
their
wn~
tai:lS
on
the
printed
circuit.
On
shutters
wilh
dear
teflon
printed
citcuits
folder
Model
100
cameras): Position
the
shutter
in
the
rear
shutter
housing,
routing
the
battery
C"Jble
through
the
opening
in
the
housing
and
then
through
the
bellows tabs. Replace
the metal banding clip
and
solder
the
black
lead
to
the
shutter
interlock,
Strip
the
insu~
lation from
the
cut
ends
of
the
white
wire
and slide
a piece
of
heat--shrink
tubing
down
OJl~
length
of
the
white
wire.
Solder
the
two
ends
or
the
white
wire
together
and
slide
the
heat-shrlnk
tubing
over
the
splice,
Apply
beal
to
tighten
the
tubing, On
other
shut~
lets: Draw the
battery
cable
through
the
opening
in
the
shutter
housing
and
reinstall
Ihe
rubber
strJin-relief collar using
Piiobond.
Solder the banery' cable leads
to
their
con~
l:.Io.;ls
on
the
electronic module.
b. Se.:ure
the
bnsc
block
and
electronic
module
to
Ill..;
froill
shutter
hOllsing with
the
mount~
ing s..;rews.
IOn
~me
cameras
the
shutter
is
positioned over plastic
posts
on
the
front
!iillllfCr
housing.)
c.
fock
rhe
shutter
and
move
the
slide
block
on
the rt.'ar
shutter
housing
aU
the
way
down.
Vt.'ry
carefully position
the
shutter
11110
the
f\.'ar
housing. Be
sure
the
shutter
tmsket is in pia!:\:
01\
the
rcar housin{!.
SL'-
I..'ure
the
front
housing
to
the n:ar
hOllsing
with
the
shuner
housing screws,
Usc
screw~
driver 111040.
Do
not
lighten
th
..
, housing
screw
loe;ned at the top
of
the
cabk
release
cOVt,'T,
(On
Cltmeras
where
applicabJe, instan
the
lOP
etch
plalt:.)
6. PosUion
the
cable release in its cover
O'n
the
rear
sJ1Utter
housing and
tighten
the
three
screws.
7.
Check
the
action
of
the
shutter
release
but~
ton
according
to
procedures
in
Section
111.
8. PerfO'rm the lens
and
rangefinder/viewfinder
checks described in
Section
Ill.
BELl.OWS
REPI.ACEMENT
Removal
I.
Carefully peel
the
battery
cable tabs free
of
the
bellows.
2. Loosen
the
cable release cover, freeing
the
cable from
the
rear
shutter
housing,
3. Remove
the
beUows from the rear
shutter
housing
as follows:
(Retain
the
light seal if
Jt
is
in
good
condition).
Models
100.240.250.350&
360:
Remove
the
four
beUows screws.
All OIlier Models:
Carefully remove
the
four
bellows
fasteners using
tool #CR1OO6 (Figure 5-8).
If
any
of
the
plastic
pOSlS
on
the
housing break.
repair
them
as
fonows:
a. File
the
broken
post untH
it
is flush with
the
bellows plate.
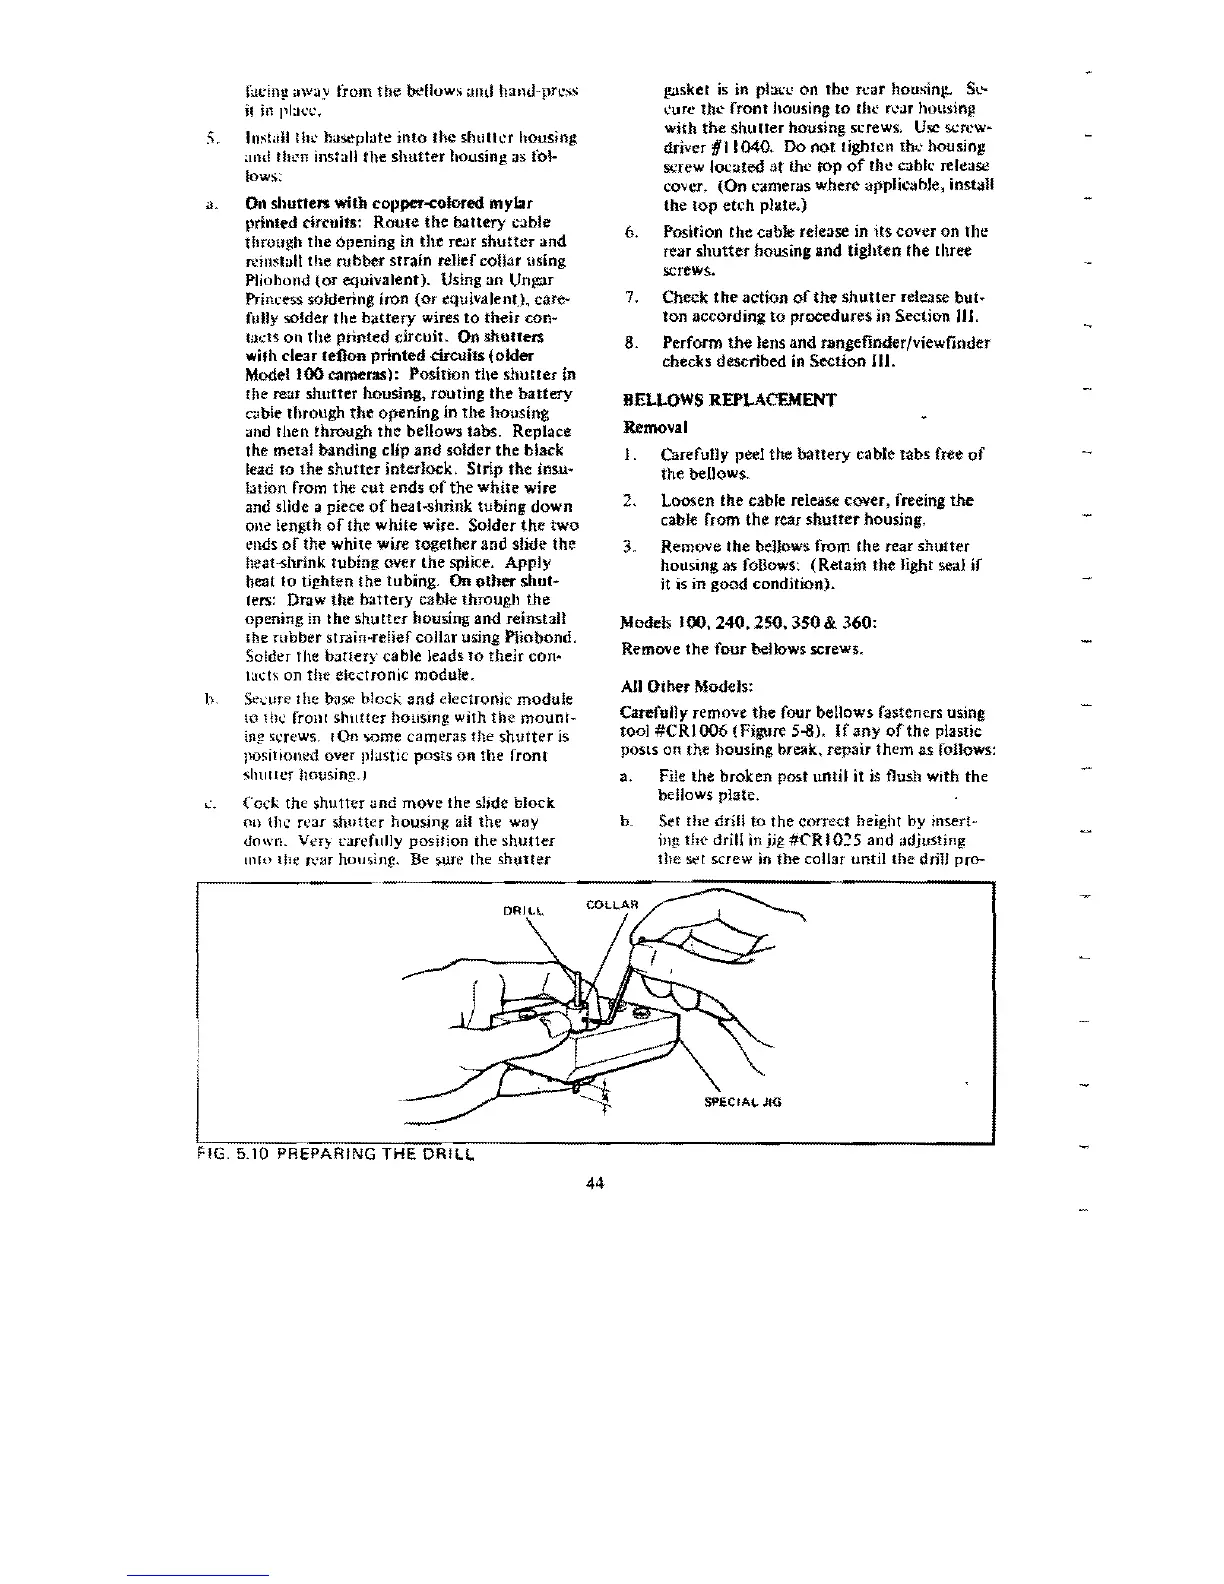
b. Set
the
drill
to
the
corre<:t height
by
insert~
illg
the
drill
in
jig
#CR
I
025
and
adjusting
the
~t
screw in
the
collar
until
the
drill pro-
SPECIA4- JIG
L
-4
F ,G. 5.10 P
RE"'PC;A"R'"',"'N"'G-oT"'H""E;:-;;O'"'R'"";-L;-L
______________________
..J
44
COLLAR

 Loading...