-
All cameras:
R~·tlH)v(,
the haUery (Model" 335.
O.
CIIECKING TilE
SHUTTER
RElUSE
.'5:0,'
,Iflll
_~{lO
ha'Yc
two
b'lth..'ricsi from
rh\,'
BUTTON
buril.:ry holdc:r. The h:.IUt.'ry should
fit
!>nup.ly
in
Tht..'
#::
':'\hulh.'f
rl.'ll'il'>t..'
!l\!ll\m "holdd
th."
.....
·t
to
it:, ",'mdk.
B~
$lIr~~
fhat
!loth,'
of
thl' Illusrk
p;lrts
,In:
bmken.
Cardully
dll.'t'k th(' b.llh:ry win.'s
to
bl'
(l"r1<lIo
they arl' propl'rly
soldo:r.,,:t,I
to
fh
...
-
knlltn:.lIs. The terminal
sock~t
should SOUl) over
thl'
....
ml
ofthl..' bath.'fY.
Be
certain there are no
signs
of
corrosion
on
Ihe terminals
or
in
ahe
bantry
cable,
If
corrosion is present. replace
.iwm,
B.
CHECKING
SHUTTER
BATTERY
VOLTAGE
Using a Camera Repair
Battery
Tester. check
the
- voltage
of
the
~huner
battery.
The
tester
places
lJ
27
ohm
load ueres:; jJ 3 volt buttery and
an
80
ohm
IO<id
across. a
4.5
volt battery,
The-
minimum
-
readings are:
Minimum
-
Battery
under Test Acceptable Reading
3 volt shuTter battery
~.6
volts
4.5 volt shutter oottery 4.1 volts
-
If
the
reading
IS
less than
that
specified, replace
the battery.
-
C.
CHECKING
TIlE SHUTTER
INTERLOCK
(METAl-BOOY
CAMERAS)
After checking
shutter
battery
voltage, check
the
-
operation
of
the
shutter
interlock
;)s
foUows
(Model, 100, 101, I
O~,
150. 240. 340, 350):
l,
Extend the camera bellows
to
detent
lock~in
and
cock
the
shutter.
.,
Cover the photocelJ
and
trip the shutter.
The
second blade should stay
open
as long as
the
-
pholOcelJ is covered,
If
the
blades. close
together
after having deter-
mined
that
the s.hutter
batlery
is OK. check the
interlock. Fjrst, clean
the
interlock contacts as
thoroughly as possible. Be sure the wiring is
-
properly soldered
to
the
confacK
There should
be tension evident
when
the
top
contact
is
lirred
(with a pencil point). After making these
checks.
re-perrorm steps J and 2 above.
If
the blades
-
slill close tOgether check the continuity between
the interlock contact
and
the contact on the
handi!uard.
If this is
OK
and
the
problem
re-.
mainS:.
consult the
"Repair
Manual
on
Models
-
36~.
366,
and
374
Automatic
Shutters."
(If
li
Model
360.
consult
the
"Repair
Manual on
the
Model
360
Camera. ")'"
-
• Available only
to
authorized
repair SQiJons"
IS
,I
!low
t:;I:o.Y
IriPllilll!
;h:fiUi)
;1Ilt!
>,,'1
...
hu\llti
h~'
rroh:dL'd against
~J\,:\:itll.."nl;ll
trippinE!.
To
d
...
·ll·r·
mine tlwt the buHon
i~
a1
[h.:
fi,!!hl
hdghl.
r'l'r~
form
the
following lest:
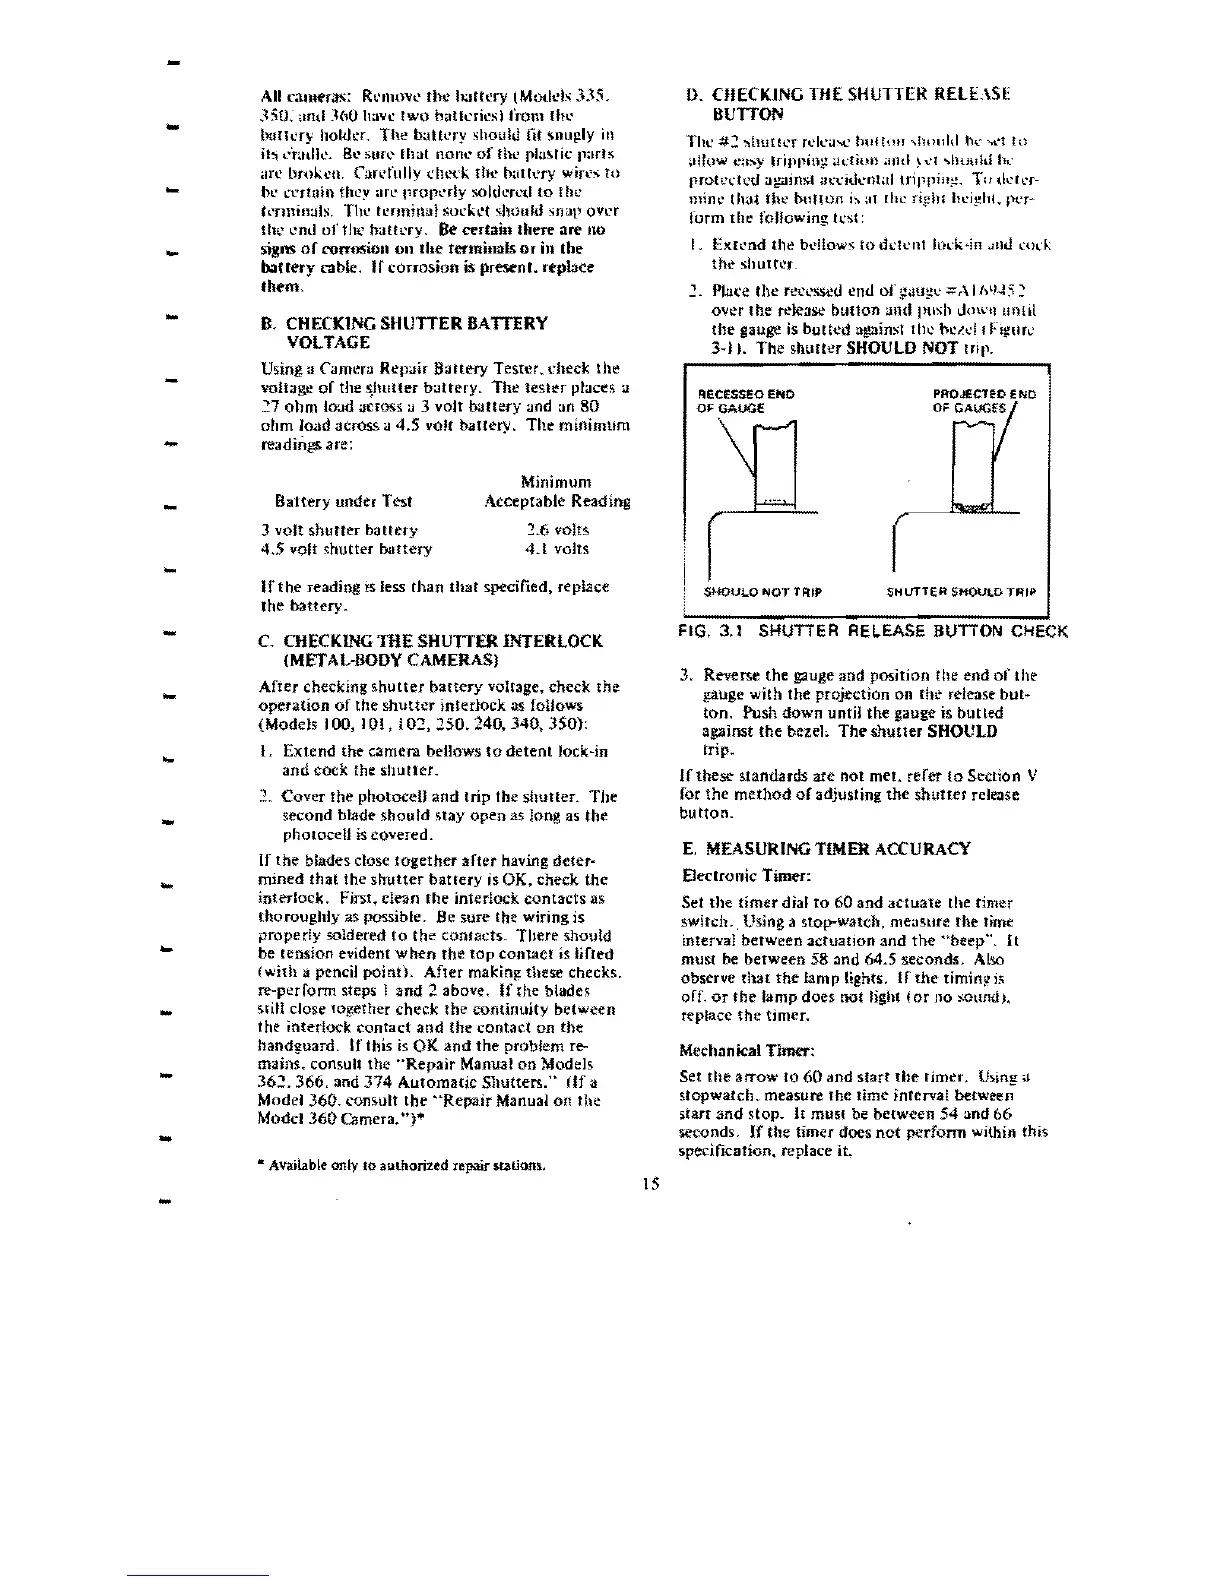
I. EX[l'nd the
bdlows
to
dl..'ll..'nt
IOl"k-in
,lni.l.:od;.
the
shuHl!r_
"l
Plat'e
the
re('l'sscd
eJUl
of
gotH;!\,.'
~ r\
16\),J:-;
~
over the release
button
and push
dowl1
unlit
the
gauge
is
butted
against
till'
h':ld
I
Flgtlrl.'
3-)).
The
shutter
SHOULD NOT
trip.
RECESSEO
Ef04C
OF GAuGE
SHQULOt-,lOTTFlIP
SHUTTER
SHOULD
TRIP
FIG.
3.1
SHUTTER
REL.EASE
BUTTON CHECK
3. Reverse the gauge and position the end
of
the
gauge with the projection on
fhe release but-
ton. Push down until the gauge is bulled
against
the
bezeh
The
shutter
SHOULD
trip.
If
these standards
are
not
met. refer
to
Section V
for
the
method
or
adjusting
the
shutter
release
button.
E.
MEASURING
TIMER
ACCURACY
EJeclronic Timer:
Set the timer dial
to
60
and
actuate
the timer
switch .. Using a stop-watch, measure the time
interval between actuatIon and
the
"beep'".
It
must be between 58
:and
64.5 seconds. Also
observe rhat
the
bmp
tights.
If
the-
timin!!
is
orr.
or
the
lamp does not light i
or
no sound).
replace
the
timer.
Mechanical TImer:
Set
the
arrow
1060
and start
the
rimer.
Ulolng
a
stopwatch. measure
the
time interval betweell
start
and
stop.
It
musl
be
between
54
and
66
seconds.
If
the timer does
not
perform within this
specification. replace
it
.

 Loading...