13-2
Operator Panel OP3
Edition 11/99
13.1 Mechanical Installation
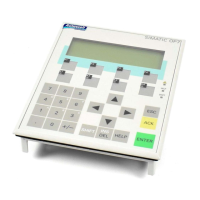
Insert the OP3 from the front into the prepared cutout. To do this, proceed as
follows:
1. Remove three screws on the rear of the housing (Figure 13-1).
2. Pull the two sections of the housing carefully apart.
3. Stick the three enclosed self-adhesive spacing rings onto the appropriate
screw drill holes in the interior of the housing back panel:
Use for Metal Thickness
No ring
One ring
Two rings
To 0.3 mm
0.3 mm to 1,5 mm
1.5 mm to 4 mm
4. Push the enclosed seal over the front part of the housing.
5. Push the parts of the housing on both sides of the mounting cutout back
over one another.
6. Screw both sections of the housing together with three screws. Make sure
the gasket on the front panel fits properly.
3
2
1
1
1
Screws
Contrast
control
Interface
1
2
3
Figure 13-1 Rear of the OP3 Showing Screw Connections
After mounting, the contrast control should remain accessible for adjusting
the contrast of the display.
The whole area of the OP3 is covered with a protective foil. You can remove
the foil once the OP3 has been installed. OP3 functionality is also guaranteed
with the foil left on, however; further, the foil protects the device from
contamination.
Installing the OP3
Installation
 Loading...