Rev.B Troubleshooting Guide 2-3
TM-L90 Service Manual
Confidential
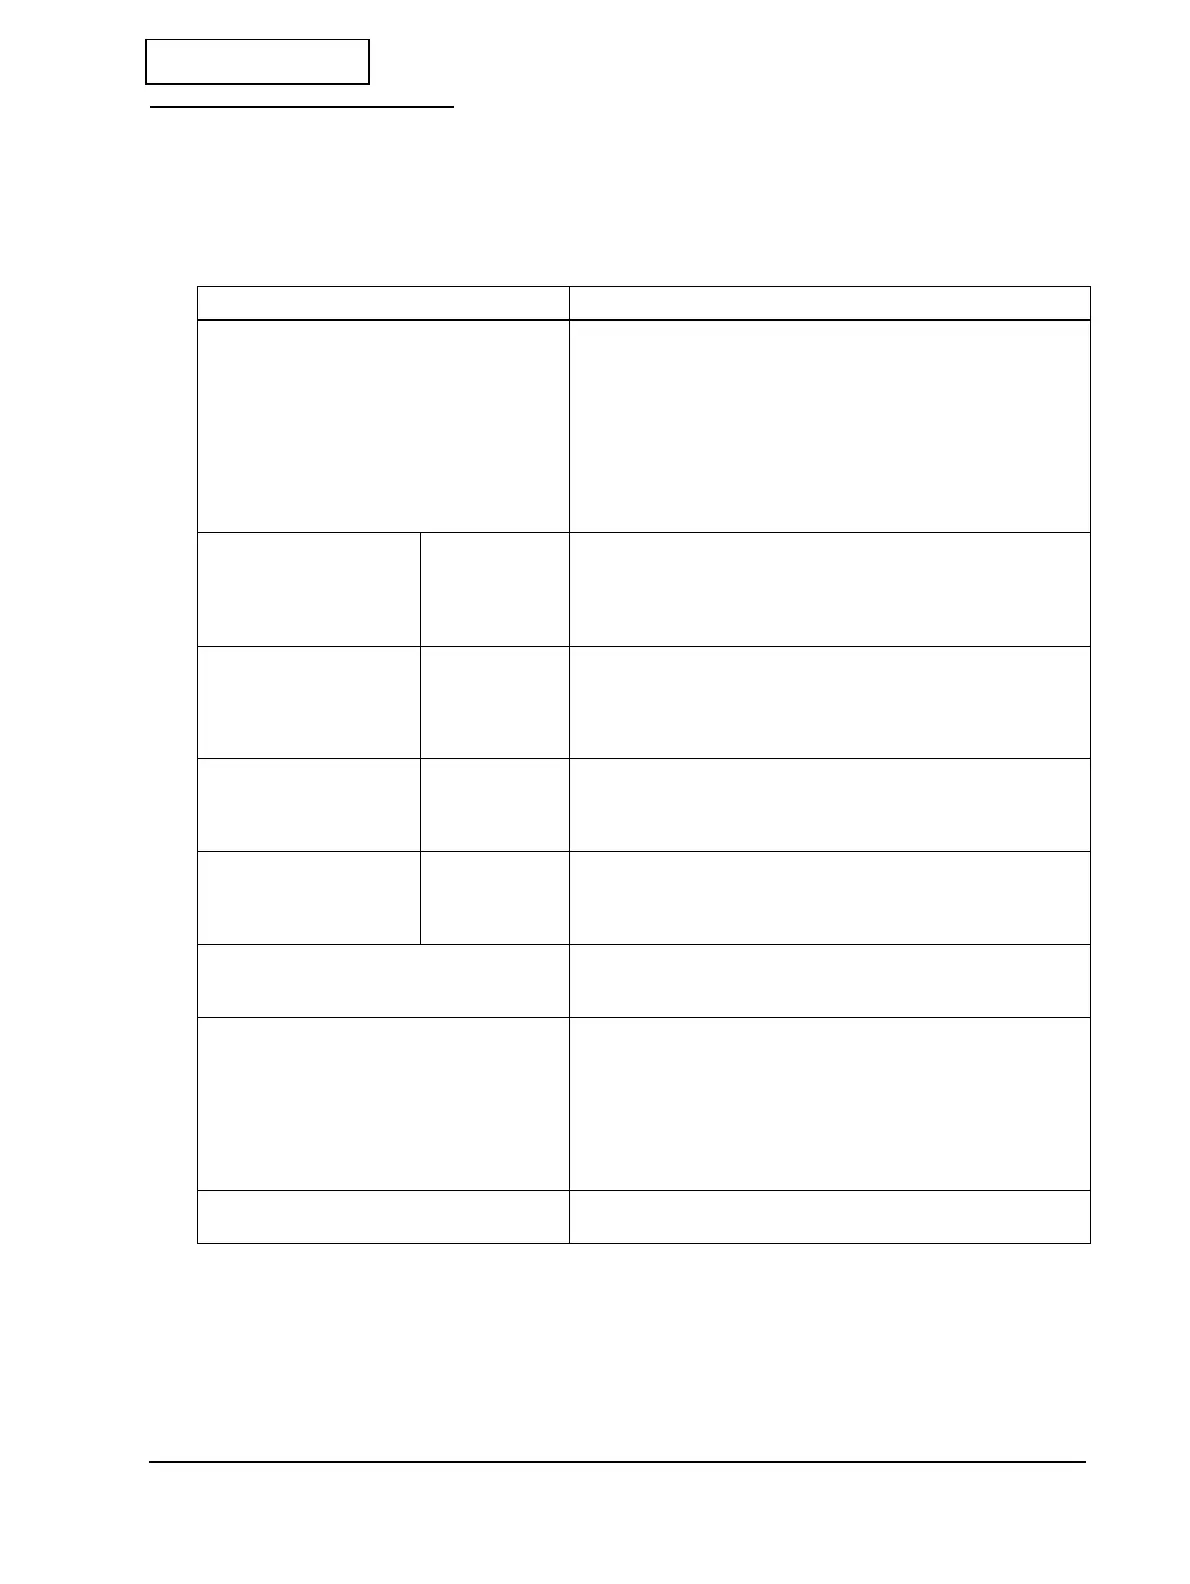
Symptoms and Solutions
This explains how to find the source of a problem using the symptom. The numbers in the
“Checkpoints” column indicate the order to use to check the problem. If you cannot determine
the cause of the problem after checking the first item, proceed to the next number.
Table 2-1 Symptoms and Checkpoints
Symptom Checkpoints (by Priority)
Power does not turn on.
Power on self check is not completed.
Or, POWER LED does not light.
1. Check the power supply unit. Check that 24V is coming out of
the power supply. (See page F-6.)
2. Check the main circuit board unit. (See page F-6.)
3. Unplug the printer. Then unplug each motor or head or FFC’s
connector from the main board one by one; plug the printer
back in, and power it on. This will let you know if any motor has
burned out and is pulling down the power. (See page 3-13.)
4. Replace the I/F circuit board. (See page 3-11.)
5. Replace the Sub circuit board assembly. (See page 3-20.)
There are missing dots
in the print.
ThermallPrinting
Label printing
1. Clean the thermal print head assembly. (See page 5-2.)
2. Replace the thermal print head assembly. (See page 3-4.)
3. Replace the main circuit board unit. (See page 3-13.)
4. Replace the Head FFC. (See page 3-13.)
The print is thin. Receipt Printing
Label printing
1. Clean the thermal print head assembly. (See page 5-2.)
2. Setting the memory switch. (See page 6-12.)
3. Replace the thermal print head assembly. (See page 3-4.)
4. Replace the main circuit board unit. (See page 3-13.)
Unevenness occurs in the
concentration of the print.
Receipt Printing
Label printing
1. Clean the thermal print head assembly. (See page 5-2.)
2. Replace the thermal print head assembly. (See page 3-4.)
3. Replace the main circuit board unit. (See page 3-13.)
Paper feed failure. Thermal Printing
Label Printing
1. Check that the roll paper is properly loaded. (See page 7-6.)
2. Replace the main circuit board unit. (See page 3-13.)
3. Replace the receipt paper feed motor. (See page 3-34.)
Drawer kick operation failure. 1. Replace the main circuit board unit. (See page 3-13.)
2. Replace the Sub circuit board assembly. (See page 3-20.)
Missing characters/misprinted characters/font
breakdown.
1. Check the setting for serial communication conditions by Self-
test. (See page 2-4.) You can change the setting with the DIP
switch 2 or memory switch (See page 6-10.). Also you can set with
the ’Printer Status’ function in the TM Printer Service & Support
Utility. (See the TM Printer Service & Support Utility Operatation
Guide.)
2. Replace the interface cable. (See page 6-11.)
ERROR LED is lit.
(When it is flashing, see page 2-5.)
Close the roll paper cover secure.
 Loading...