80
NOTE!
If the MMA welding mode is selected, the welding voltage will only be available after
a 3-second delay.
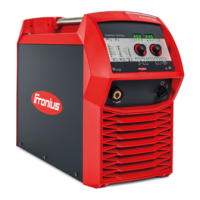
Only for MagicWave: press the process button to select the required welding process:
MMA AC welding process
MMA DC- welding process
MMA DC+ welding process
NOTE!
The TransTig power source has no switchover facility between the MMA DC- and
MMA DC+ welding processes.
Procedure with TransTig power source for switching from MMA DC- welding to MMA
DC+ welding:
a) Move the mains switch to the "O" position
b) Disconnect the mains plug
c) Reconnect the electrode holder and the grounding cable to the opposite current
sockets (i.e. swap them over)
d) Plug in the mains plug
CAUTION!
Risk of injury and damage from electric shock.
As soon as the mains switch is in the "I" position, the rod electrode in the electrode holder
is live.
► Make sure that the rod electrode does not touch any persons or electrically conductive
or earthed parts (e.g. the housing, etc.)
e) Move the mains switch to the "I" position
All the indicators on the control panel will briefly light up
Select the desired welding current with the adjusting dial
The welding current value is displayed on the left-hand digital display.
NOTE!
All welding parameter set values that have been set using the adjusting dial remain
stored until the next time they are changed.
This applies even if the power source was switched off and on again in the interim.
Start welding
Hotstart function To obtain optimum welding results, it will sometimes be necessary to adjust the hotstart
function.
Benefits
- Improved ignition, even when using electrodes with poor ignition properties
- Better fusion of the base material in the start-up phase, meaning fewer cold-shut de-
fects
- Largely prevents slag inclusions
See the "Set-up menu: level 2" section for details on setting the available welding param-
eters.
2
3
4
 Loading...