Home
Ricoh
All in One Printer
SP 310DN
Ricoh SP 310DN User Manual
4
of 1
of 1 rating
184 pages
Give review
Manual
Specs
To Next Page
To Next Page
To Previous Page
To Previous Page
Loading...
Fus
i
ng
and Exi
t
SM
4
-
33
M
154/M155/
M174/
M175/A0A7/M287/
M0BB
Repl
acement
and A
djus
tme
nt
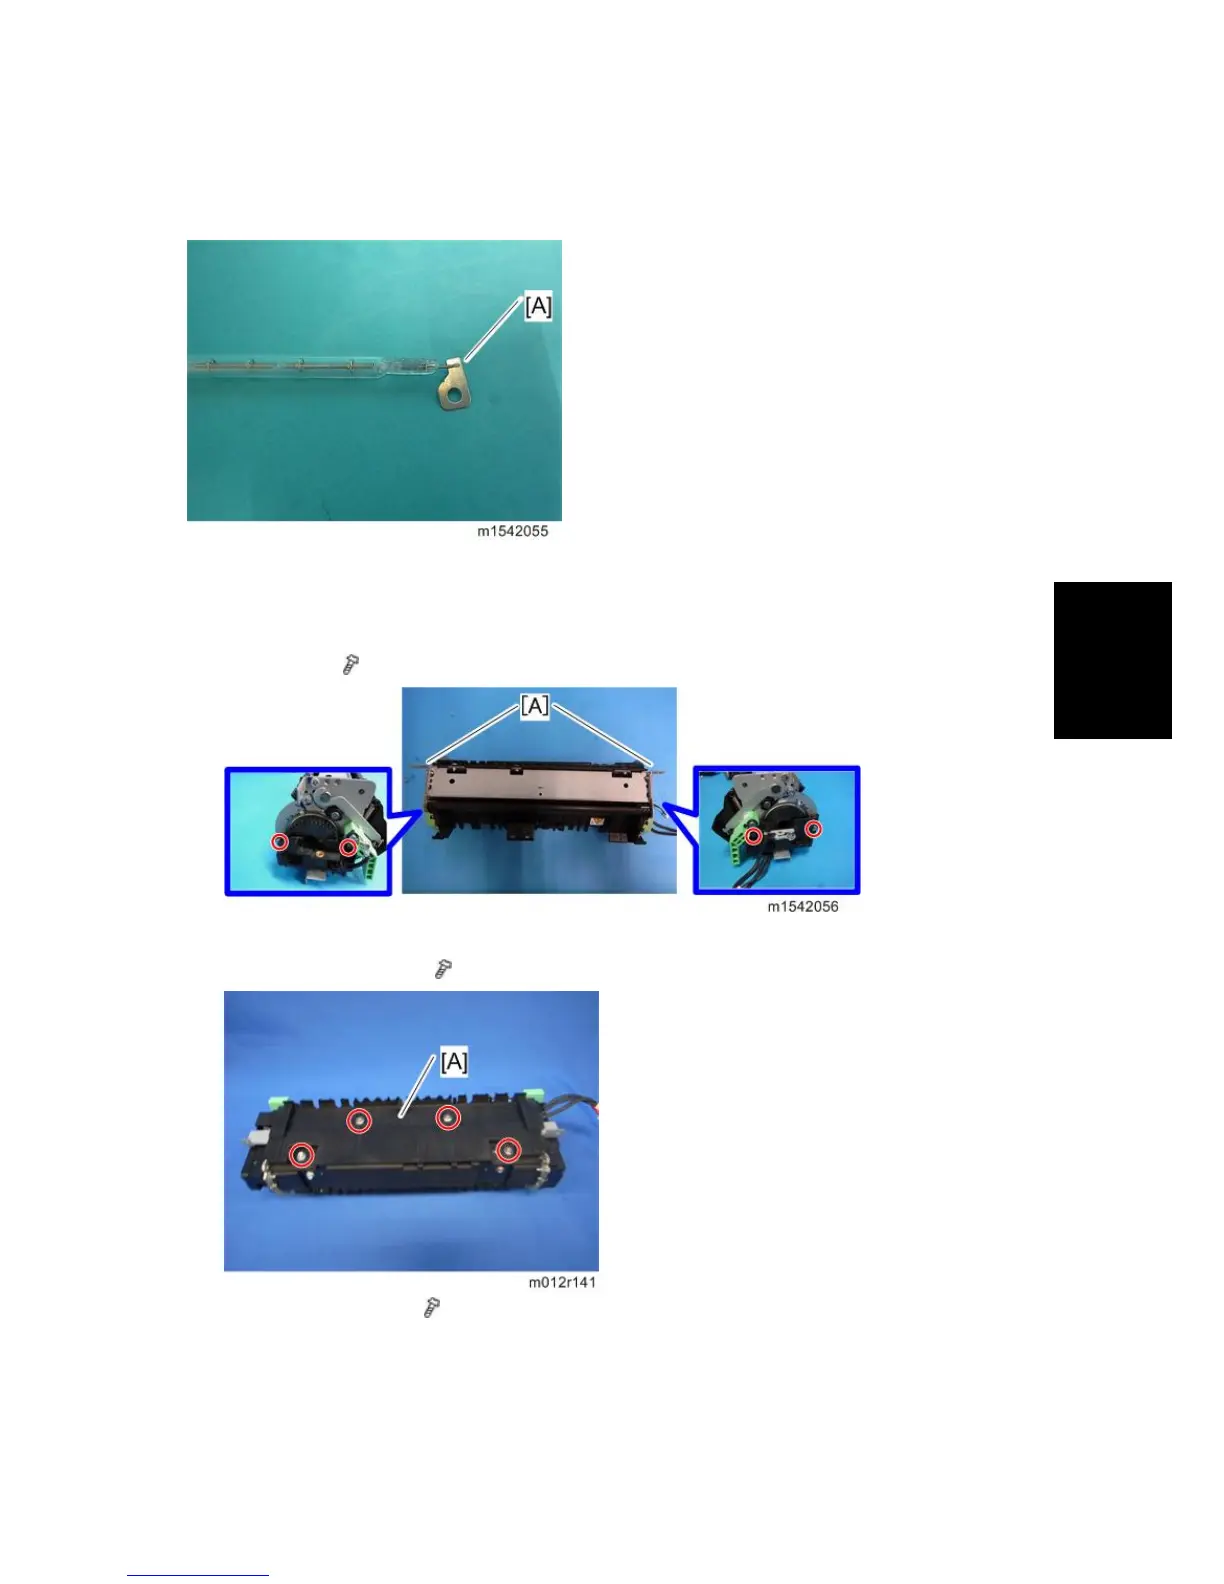
When
rein
sta
lling
the
f
using
la
m
p
The
f
lat
term
inal
[A]
m
ust
be
plac
ed
on
the
r
ig
ht
si
de
of
the
fus
ing
unit
(f
usi
ng
c
ab
l
e
si
de).
4.7.
5
HOT
R
OL
LER
1.
Fusi
ng
l
am
p
(
pag
e
4-
32
"F
us
ing
Lamp
")
2.
Brac
kets
[A]
(
x 2
each)
3.
Tu
r
n
ov
er
the
f
usi
ng
unit.
4.
Fusi
ng
upper
c
o
v
er
[A]
(
x
4)
5.
Fusi
ng
front
cov
er
[A]
(
x
2)
70
72
Table of Contents
Default Chapter
1
Service Manual
1
Table of Contents
5
Important Safety Notices
11
Read this First
11
Safety Notices
11
Laser Safety
12
1 Product Information
15
Product Overview
17
Component Layout
17
Paper Path
18
Drive Layout
18
Machine Codes and Peripherals Configuration
19
Main Frame
19
2 Installation
21
Installation Requirements
23
Check Image Quality / Settings
23
Environment
23
Moving and Transporting the Machine
24
3 Preventive Maintenance
27
Preventive Maintenance Tables
29
Image Quality Standards
30
Paper Transfer Quality Standards
31
Pm Parts Settings
32
Pm Parts
32
Preparation for Pm
33
Yield Counter
33
Counter Reset
34
4 Replacement and Adjustment
37
General Cautions
39
Special Tools
40
Exterior Covers
41
Front Cover
41
Left Cover
43
Rear Cover
45
Right Cover
46
Top Cover
48
When Installing the Top Cover
49
Sm M154/M155/M174/M175/A0A7/M287/M0Bb
49
Laser Unit
50
Caution Decal Locations
50
Laser Unit
51
Polygon Mirror Motor
52
Paper Feed
53
Paper Feed Roller
53
After Installing a New Paper Feed Roller
53
Friction Pad
54
When Reinstalling the Friction Pad, Do It in this Order
54
Paper End Sensor
54
By-Pass Feed Roller
55
By-Pass Feed Roller Friction Pad
56
By-Pass Feed Sensor
57
Paper Feed Clutch
57
Relay Clutch
58
Registration Clutch
58
Registration Roller
59
Registration Sensor
62
Image Transfer
63
Transfer Roller
63
After Installing a New Transfer Roller
63
Toner End Sensor
64
Quenching Lamp
65
Fusing and Exit
66
Fusing Unit
66
Reinstallation
67
After Installing a New Fusing Unit
68
Thermostat
68
Thermistor
69
Fusing Lamp
70
When Reinstalling the Fusing Lamp
71
Hot Roller
71
Pressure Roller
73
Hot Roller Stripper Pawls
74
Paper Exit Sensor
74
Drive
75
Main Motor
75
Drive Unit
75
Duplex Motor
76
Electrical Components
77
Layout of Pc Boards
77
Main Board
78
When Installing the New Main Board
79
Eeprom
79
Psu
80
Replacement Procedure M154/M155/M147/M175
81
Replacement Procedure M287/M289
85
Hvp
86
Charge Terminal Case
88
Cooling Fan
89
Wireless Lan Board (for M155, M175)
90
Duplex
91
Relay Sensor
91
Inverter Sensor
91
5 Service Tables
93
Smart Organizing Monitor
95
Overview
95
Printer Driver Installation (Usb Connection)
95
Entering the Printer Configuration
96
Printer Configuration Menu List
98
Paper Input
99
Maintenance
101
System
103
Ipv6
106
Network 1
107
Network 2
110
Network 3
112
Wireless
113
Printer
115
SP Mode 1
117
SP Mode 2
120
SP Mode 3
122
Reports
125
Configuration Page
125
To Print the Configuration Page
125
Total Counter
126
Other Types of Reports
127
Test Page
127
Sm M154/M155/M174/M175/A0A7/M287/M0Bb
127
To Print the Test Page
127
Test Pattern Printing
128
To Print the Test Pattern
128
Updating the Firmware
130
Checking the Machine Firmware Version
130
Updating the Main Firmware
130
Procedure
130
Updating the Boot Loader Firmware
131
Updating Failure
131
Fw Update Tool Messages
132
FW Update Tool Messages: Information
132
FW Update Tool Messages: Error
134
6 Troubleshooting
137
Self-Diagnostic Mode
139
Self-Diagnostic Mode at Power on
139
Service Call
140
Fusing Related Scs
140
Engine Sc
141
SC 2Xx (Laser Optics Error)
141
SC 4Xx (Image Transfer and Transfer Error)
143
SC 5Xx (Motor and Fusing Error)
144
SC 6Xx (Communication and Other Errors)
148
Jam Detection
149
Jam Sensor Layout
149
Paper Jam
149
Jam Message List
149
Paper Jam
150
Image Adjustment
151
Registration Adjustment
151
User Adjustment
151
Service Adjustment
151
Image Quality
154
Overview
154
Other Problems
155
Dark Lines in Halftone Areas at 75Mm Intervals
155
Troubleshooting
156
Jam/Paper Feed Problem
156
Image Quality Problem
158
7 Energy Save
159
Energy Saver Modes
161
Timer Settings
161
Return to Stand-By Mode
162
Recommendation
162
Paper Save
163
Effectiveness of Duplex/Combine Function
163
Duplex
163
Combine Mode
163
Total Counter
164
Specifications
171
Appendices: Specifications
173
General Specifications
173
Printer
175
Supported Paper Sizes
176
Error Messages
179
Overview
181
Error Messages List
181
Error and Status Messages Appear on Smart Organizing Monitor
181
Error and Status Indicate on the Control Panel
183
Other manuals for Ricoh SP 310DN
Installation Guide
2 pages
4
Based on 1 rating
Ask a question
Give review
Questions and Answers:
Need help?
Do you have a question about the Ricoh SP 310DN and is the answer not in the manual?
Ask a question
Ricoh SP 310DN Specifications
General
Brand
Ricoh
Model
SP 310DN
Category
All in One Printer
Language
English
Related product manuals
Ricoh SP 311DN
184 pages
Ricoh SP 311DNW
120 pages
Ricoh SP 311SFNw
272 pages
Ricoh SP 330SN
492 pages
Ricoh SP 3500SF
20 pages
Ricoh SP 330SFN
492 pages
Ricoh SP 3510SF
476 pages
Ricoh SP 3710SF
492 pages
Ricoh SP 377SFNWX
380 pages
Ricoh Aficio SP 3510SF
476 pages
Ricoh Aficio SP 3400SF
362 pages
Ricoh Aficio SP 320 Series
272 pages

 Loading...