 Loading...


Do you have a question about the Toshiba e-STUDIO 257 and is the answer not in the manual?
| Scan Resolution | 600 x 600 dpi |
|---|---|
| Duplex Printing | Yes |
| Print Technology | Laser |
| Copy Resolution | 600 x 600 dpi |
| Connectivity | USB, Ethernet |
| Functions | Print, Copy, Scan |
| Paper Size | A4, A5, B5 |
| Fax Transmission Speed | 33.6 kbps |
| Operating System Compatibility | Windows |
| Print Speed | 25 ppm (A4) |
Guidance on understanding manual symbols and conventions for easier navigation and operation.
Overview of the main copier interface, explaining key buttons and indicators for basic operations.
Instructions and guidelines for loading various types of paper into the machine's drawers and trays.
Step-by-step guide on how to correctly insert paper into the machine's paper drawers.
Procedure for registering custom or non-standard paper sizes into the machine's memory.
Guide to setting paper attributes like thickness and type for optimal copying performance.
Instructions for loading paper into the optional large capacity feeder for extended use.
Details on how to place various types of originals, including glass and RADF usage.
Step-by-step guide for performing basic copying tasks and setting copy modes.
Instructions for using the bypass tray for various paper types and sizes.
Information on default settings and how to confirm or clear current copy function settings.
Methods for selecting paper, including automatic and manual options for different needs.
How to select original modes (Text/Photo) for optimal image quality.
Adjusting the lightness or darkness of the copied image automatically or manually.
Options for changing the reproduction ratio, including automatic and manual zoom settings.
Details on various finishing options like sorting, stapling, and hole punching.
Instructions for performing 1-sided and 2-sided copying, including book-type originals.
How to store copied data to network folders or the machine's hard disk.
How to access and navigate the various editing functions available on the touch panel.
Creating binding margins by shifting the image position for punching or stapling.
Whiten edges of copied images to remove shadow-like dark parts for a cleaner look.
Whiten the center of copied images from book-type originals to improve clarity.
Copying two facing pages side-by-side onto separate sheets or both sides of one sheet.
Shrinking multiple originals onto a single sheet for paper saving and consolidation.
Copying originals in a book-type page order, with options for folding and stapling.
Applying various image manipulations like trimming, masking, and mirroring.
Adjusting reproduction ratio separately in vertical and horizontal directions.
Adding special paper as front or back cover sheets to copied documents.
Inserting copied or blank sheets at specified pages within a document.
Adding date and time information onto the copied paper.
Automatically adding page numbers to copied documents in specified positions.
Scanning and copying multiple sets of originals with different settings in one operation.
Controlling the orientation of copied pages for portrait or landscape originals.
Switching between 'book' (open to left) and 'tablet' (open to top) orientations for copies.
Switching the paper feeding mode between continuous and single feed for the RADF.
Automatically removing blank pages from scanned originals before copying.
Whiten shadow-like dark parts appearing outside the copied image area.
How to access the IMAGE menu to adjust various image properties.
Adjusting image characteristics like background density and sharpness.
Adjusting the original's background density to avoid show-through from the back side.
Enhancing or softening the outline of images for better clarity or reduced moiré.
Overview of creating and using templates for frequently used function settings.
Steps for saving custom settings as templates in public or private groups.
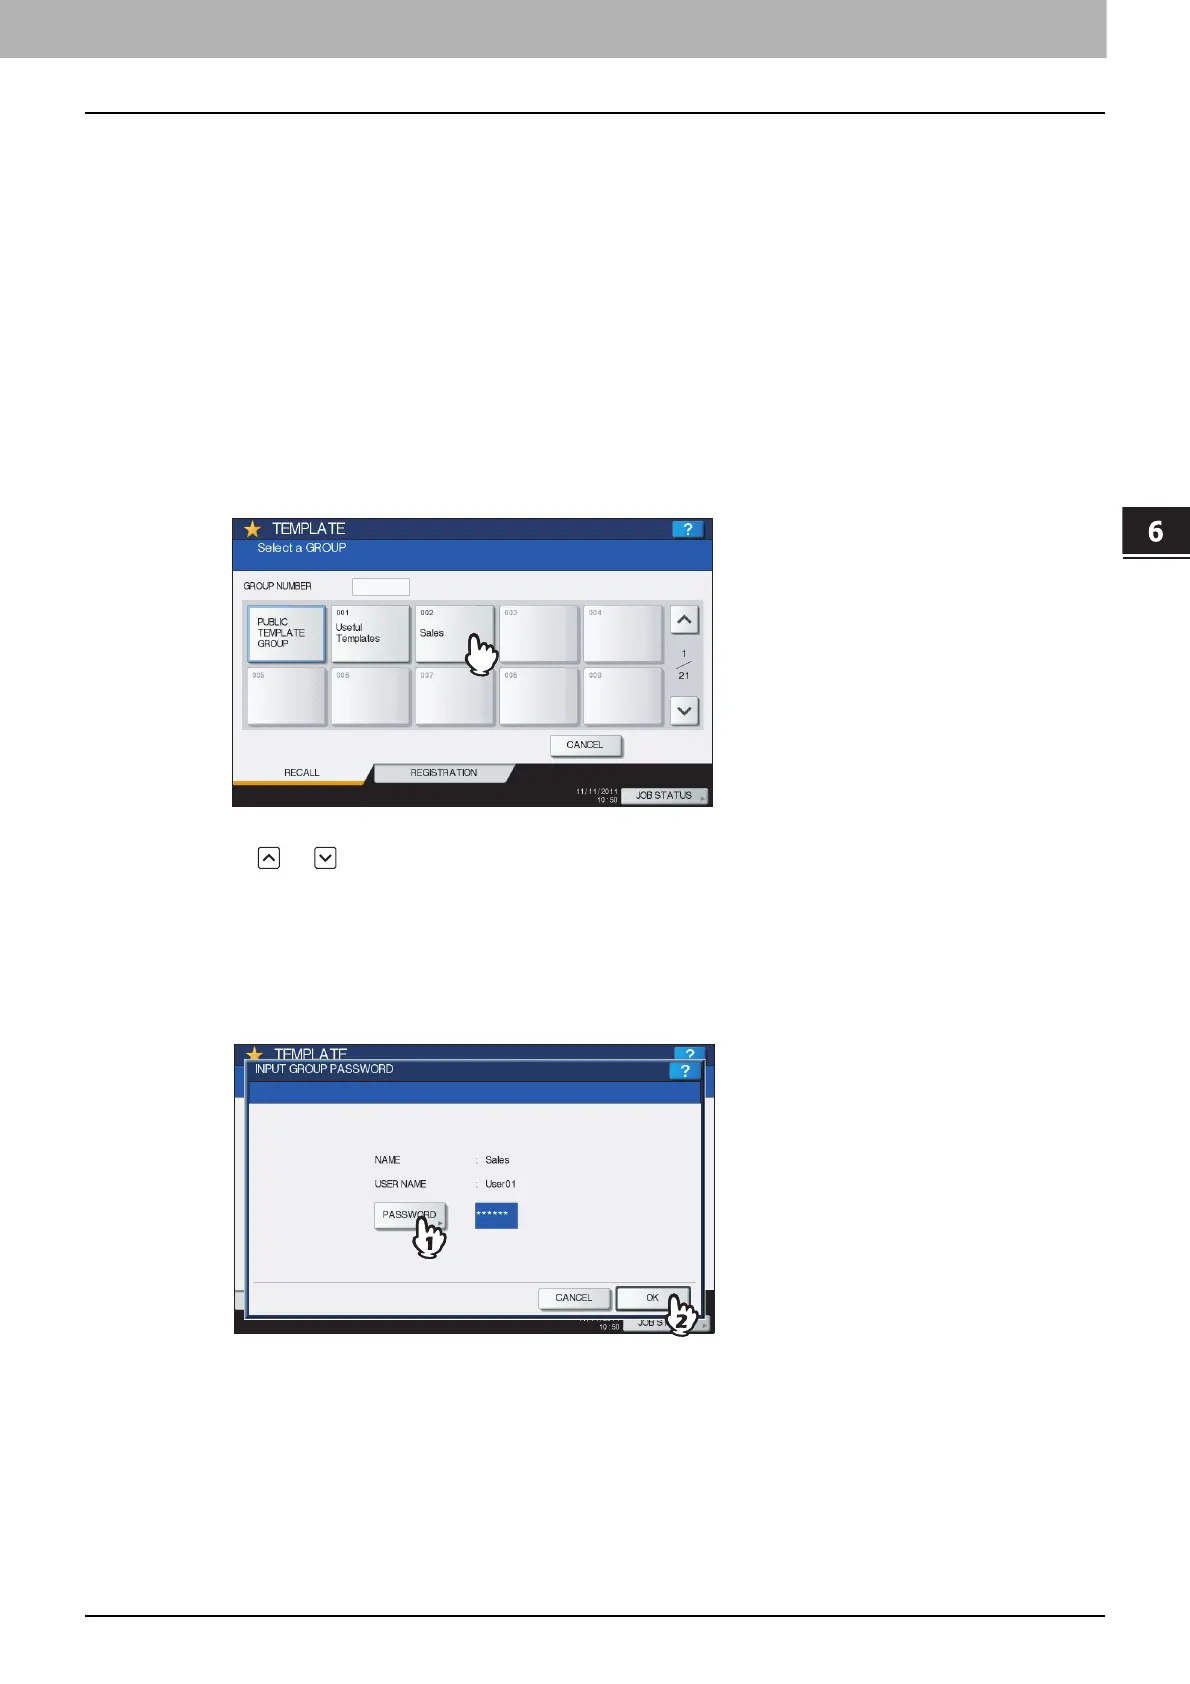
How to retrieve and apply saved templates for quick setup of copy jobs.
Modifying existing template names, passwords, or automatic start settings.
Procedures for removing unwanted template groups or individual templates.
Viewing current, waiting, and completed copy jobs, including options to manage them.
Accessing logs of previously performed copy jobs for review and auditing.
Checking paper status, type, and amount remaining in each paper drawer.
Monitoring the approximate toner level in the cartridges for proactive replacement.
Table showing copy speeds for different paper sizes, types, feeders, and models.
Matrix indicating which copying functions can be used together, and which cannot.