●
Controls, Connectors, and LCD
●
7
4
Controls, Connectors,
and LCD
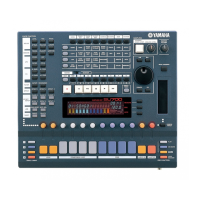
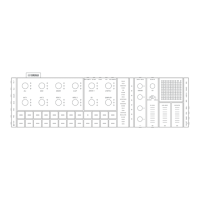
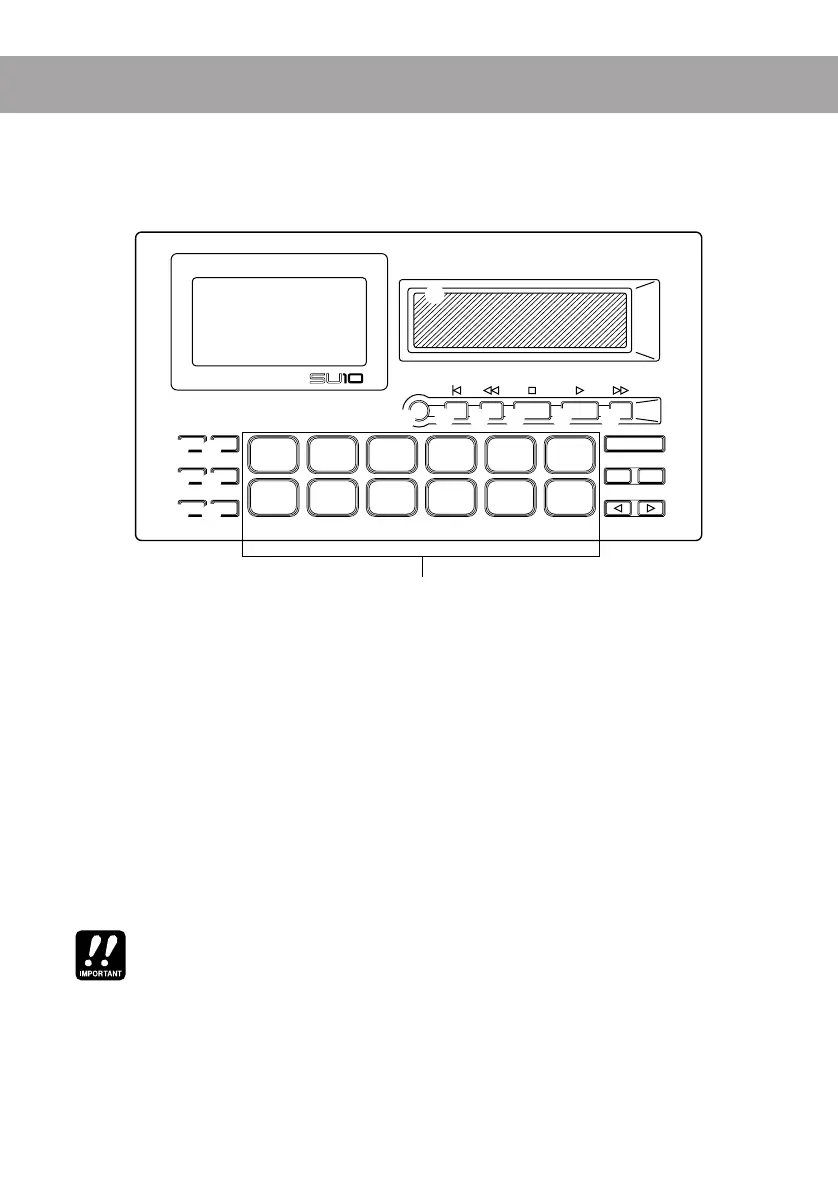
Top Panel
SAMPLING UNIT
REC TOP BWD STOP PLAY FWD
HOLD EXIT
REV SCRATCH
SHIFT BANK
–1 +1
ENTER
SONG 1
EDIT
SONG 4SONG 3SONG 2 UTILITY
EXTERNAL
FILTER
EXTERNAL
SCRATCH
PITCHCROSS
FADER
FILTER
SCALE
1
5
4326
1211
10
987
1
3
F
G
H
0 C
A
D
B
E
2
4
5
67
8
9
1 LCD (Liquid Crystal Display)
You refer to the LCD for all information about current operating status, and
during interactive input of all editing and utility parameters. A description of
the various indications appears on page 11 and 12.
2 Ribbon Controller
During playback, you can run your finger over the ribbon to apply a dramatic
scratch or filter effect or to vary the pitch or line/pad crossfade. During
exter-
nal scratch
and
external filter
play, you use the ribbon to apply realtime scratch-
ing or filtering to a straight audio signal as it feeds through the SU10. Finally,
you can use the ribbon during EDIT operation to change pad volume and
start, loop, and end point settings.
Use light pressure when rubbing your finger over the controller. Excessive force can cause the
ribbon to heat up, reducing its life. Also note that the ribbon may lose sensitivity after prolonged
uninterrupted use; if this occurs, allow the ribbon some time to recover.
3 Pads
Use to start or stop playback of a sample, to change the operating mode, or to
select various functions. Pad operation depends on whether the [SHIFT] button
is ON (pressed) or OFF (not pressed).
 Loading...