●
Recording Samples, and Creating Songs
●
31
7
Recording Samples,
and Creating Songs
This chapter explains how to record samples and how to create songs.
(Explanation of song creation begins on page 35.)
Sample Recording Overview
To record a sample, you must (1) connect up the input source, (2) enter REC mode
and select the destination pad, (3) set the recording parameters, (4) start the re-
cording, and (5) stop the recording. Each of these steps will be described in turn.
Connecting the Input Source
Connect a line input to the LINE IN jack, or a microphone to the MIC INPUT.
Entering REC Mode and Selecting
the Pad
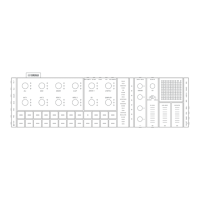
1. Check that the SU10 is in PLAY mode, then press [REC] to enter RECORDING
mode. The LCD displays the REC indicator and prompts you to select the pad
to be recorded. The LCD’s meter area indicates the available recording time.
Remaining recording time
▼ Available recording time depends on (a) the amount of memory already used by other pads, and
(b) the current settings for the Grade, Pitch, and Format recording parameters.
▼ Once you have entered RECORDING mode, you can return to PLAY mode at any time by
pressing [EXIT].
 Loading...