1. Control must be in Manual Mode. Refer to How to Enter the
Manual Mode.
2. Press the DELICATES (∧) or the COLD (∨) keypad until
Prog appears in the display. Press the START (enter) keypad,
and AtS 1 will appear in the display.
3. Press the DELICATES (∧) or the COLD (∨) keypad to scroll
through the programmable options until PLSNod appears in
the display.
4.
When PLSNod appears in the display, press the START (en-
ter) keypad. oFF or a number will appear in the display. This
number corresponds to the current Start Pulse Mode Program-
ming Value.
5. Locate the desired number in the first column of Table 1 be-
low.
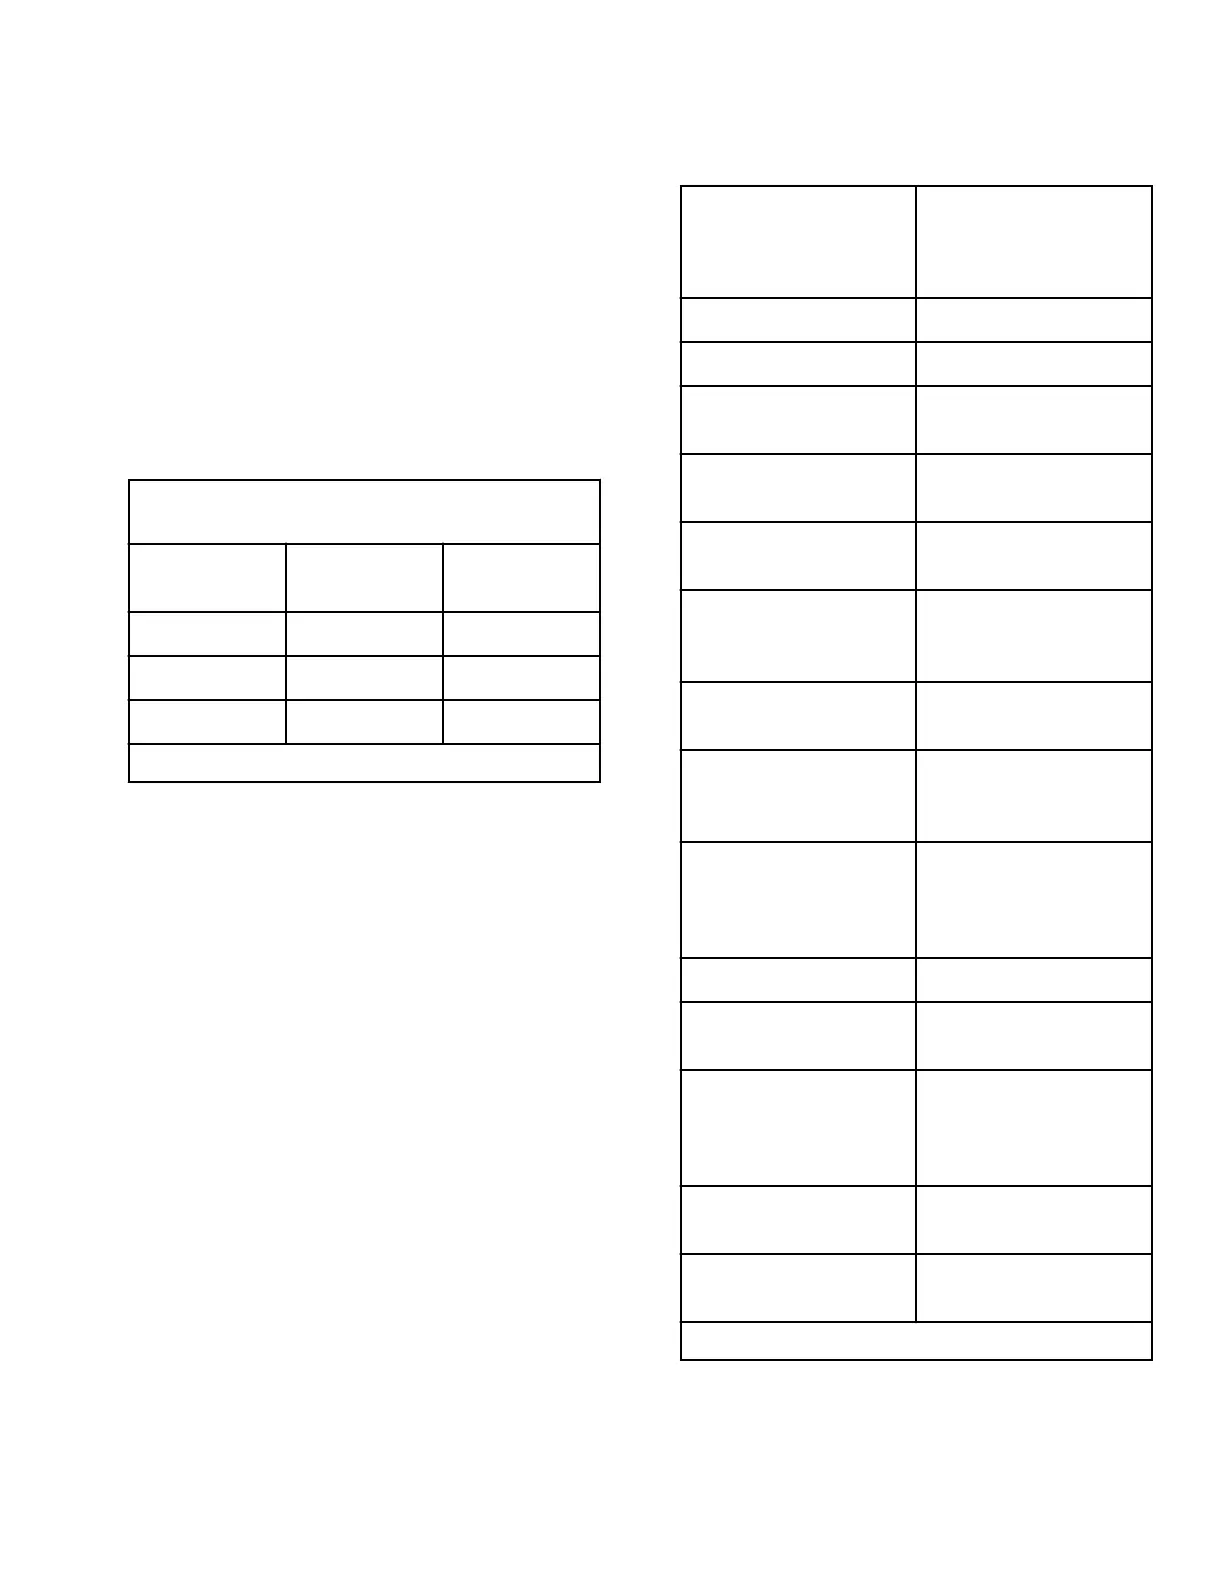
PLSNod
Start Pulse
Mode Value
Start Pulse
ON/OFF
Single Pulse/
Multiple Pulses
0 OFF OFF
128 * ON Single Pulse
192 ON Multiple Pulses
* Factory default setting.
Table 1
6. Press the DELICATES (∧) or the COLD (∨) keypad to in-
crease or decrease the current number until correct.
NOTE: To go back to the current programmable op-
tion without changing the current value, press the
WARM (<) keypad.
7. Press the START (enter) keypad when the correct value ap-
pears in the display. The new value is saved and the next op-
tion will appear in the display.
Programmable Output Type AtyPE
This option allows the owner to program when the control pro-
vides an output that can be used for variety of reasons.
1. Control must be in Manual Mode. Refer to How to Enter the
Manual Mode.
2. Press the DELICATES (∧) or the COLD (∨) keypad until
Prog appears in the display. Press the START (enter) keypad,
and AtS 1 will appear in the display.
3. Press the DELICATES (∧) or the COLD (∨) keypad to scroll
through the programmable options until AtyPE appears in the
display.
4.
When AtyPE appears in the display, press the START (enter)
keypad. A number will appear in the display. This number
corresponds to the current Output Type Value.
5. Press the DELICATES (∧) or the COLD (∨) keypad to in-
crease or decrease the current number to the desired number
selected from Table 2 .
Programmable Out-
put Type Value
Mode(s) in Which
Available Signal is
Active
0* - Available Ready Mode only
1 - Available with Start Ready Mode, Start Mode
2 - Available with End of
Cycle
Ready Mode, End of Cy-
cle Mode
3 - Available with Start
and End of Cycle
Ready Mode, End of Cy-
cle Mode, Start Mode
4 - Vend is Not Satisfied Ready Mode, Partial
Vend Mode
5 - Vend is Not Satisfied
with End of Cycle
Ready Mode, Partial
Vend Mode, End of Cycle
Mode
6 - Available with Vend Ready Mode, Partial
Vend Mode, Start Mode
7 - Available with Vend
and End of Cycle
Ready Mode, End of Cy-
cle Mode, Partial Vend
Mode, Start Mode
8 - Machine is In Use Door Locking, Door/Lid
Unlocking, Overflow
Mode, Pause Mode, Run
Mode
9 - Cycle is Complete End of Cycle
10 - Lucky Cycle For 10 seconds when
Start Mode is entered
11 - Break in Alarm For 15 seconds when
Break in Alarm is trig-
gered at same time as au-
dio output tone
12 - End of Cycle is En-
tered
For 3 seconds when End
of Cycle Mode is entered
13 - Motor Running Whenever Motor is run-
ning
*Factory default setting.
Table 2
Programming Control
©
Copyright, Alliance Laundry Systems LLC -
DO NOT COPY or TRANSMIT
41 Part No. 204370ENR1
 Loading...