MNL-00008 [5] Proprietary and Confidential Page 33 of 55
Note: Be sure to remove all of the accessories such as the manual, time chart, power
cord, eyewear, and stability feet before discarding the box.
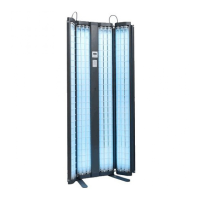
2. Set the unit on a table so that the lamps are facing up and the end farthest from the
controller is hanging off the table.
3. On each side of the unit, you will find four thumb screws. Remove them. These thumb
screws will be used to attach the two stability feet to the sides of the unit.
4. Take one of the feet and align the four precut holes with the four holes created by
removing the thumb screws.
Note: The feet will only fit one way. Be sure that the widest part of the foot is placed
near the ground and that lip of the foot is facing away from the unit. For a picture of the
proper foot alignment please see the cover of this manual.
5. To secure the foot simply reinsert the four thumb screws through the holes in the foot and
back into the unit. Be sure to insert all the thumb screws before fully tightening them.
Note: Tighten the thumb screws using your thumb and pointer finger. If necessary, the
screws can be tightened with a flat head screwdriver.
6. Repeat steps 4-5 to install the other foot.
7. Stand the unit up vertically and check all the screws to be sure they are tight.
8. Insert the “D” shaped male plug into the corresponding receptacle on the lower left side
of the device. Plug the unit into any standard, 120-volt three prong electrical outlet. The
unit is now ready for use.
21.3 How to Position the Patient
The recommended distance from the lamps for treatment is 9 inches (22cm). We also
recommend that you mark that distance on the floor in some manner. The patient’s torso should
not be closer to the lamps than this line. Standing closer to the lamps will cause localized
streaking or erythema. Greater distances will increase the time necessary to receive a therapeutic
dose.
 Loading...