Privacy Mask Setting
1
Select the [PRIVACY MASK] item on the [MENU] screen, and
press the [SET] button.
The [PRIVACY MASK] screen appears.
2
Move the cross key up/down to select [MASK No.*], move the cross key
to the left/right to select “ON”, followed by pressing the [SET] button.
The [MASK EDIT (MASK No.*)] screen appears.
3
Use the cross key to edit the left/upper margin of the mask.
4
Press the [SET] button.
The screen to edit the right/lower margin of the mask appears.
5
Use the cross key to edit the right/bottom margin of the mask.
Memo
Press the [SET] button to switch between the screen to edit
the left/upper margin of the mask and the screen to edit the
right/lower margin of the mask.
6
Press the [MENU] button.
The mask boundary of the selected number is saved, and the screen
returns to the [PRIVACY MASK] screen.
7
Repeat steps 2 to 6 to set all desired masks (MASK No.1 to
MASK No.4).
8
Press the [MENU] button to exit.
Returns to the [MENU] screen.
.
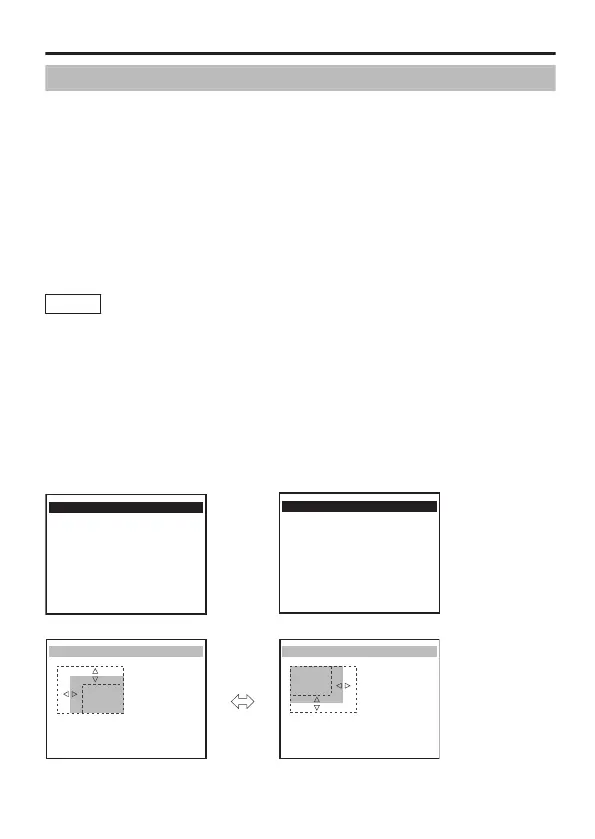
MENU
SCENE FILE.. A:GENERAL
BASIC SETTINGS
VIDEO SETTINGS..
VIDEO EFECT..
MOTION DETECT OFF
MAINTENANCE..
E PRIVACY MASK
AUX FUNCTION..
<MENU>RETURN <SET>SUB MENU
PRIVACY MASK
BRIGHTNESS 10
E MASK No.1 OFF
MASK No.2 OFF
MASK No.3 OFF
MASK No.4 OFF
<MENU>RETURN <SET>SUB MENU
[MENU] Screen
[PRIVACY MASK] Screen
.
MASK EDIT (MASK No.1)
<MENU> RETURN <SET> D-R
<SET> U-L<MENU> RETURN
(MASK No.1)
(MASK No.1)
MASK EDIT (MASK No.1)
Detailed Settings
E-65
 Loading...