Introduction Getting Ready
Taking Pictures
Playback Set Up
GB-137
Viewing Still Images | Viewing Movies | [o] Viewing Images Automatically as a Slideshow (slideshow) | [O] Viewing Multiple Images | [INFORMATION] Viewing Image Information | [J]/[I] Erasing Unwanted
Images | [U] Protecting Images from Accidental Erasing (PROTECT) | [p] Adding Voice Messages to Still Images (POSTRECORDING) | [V] Resizing and Trimming Images (RESIZE) | [W] Rotating an Image |
[T] Using DPOF to specify print settings | [G] Printing by Connecting the Camera Directly to a Printer (PictBridge) | Connecting to a Windows PC | Connecting to a Macintosh
NEXTBACK
Contents (Top page) Detailed Contents Index Nomenclature Menus and Settings Troubleshooting
Viewing images on a Windows PC
1
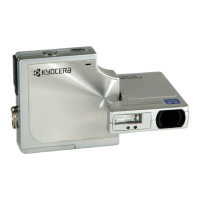
Insert the memory card into the camera.
(Æ
p.21)
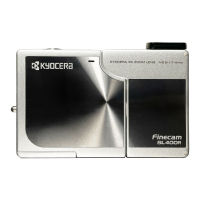
2
Load batteries into the camera.
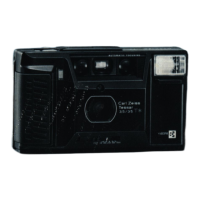
3
Connect the camera to your PC using the USB cable provided
and then start up the PC.
A Important
• If you are using Windows 98 or Windows 98SE, install the USB drivers before
connecting the USB cable. (Æ
p.135)
• If you are using Windows Me, Windows 2000 or Windows XP, no USB driver installation
is needed. Connect the USB cable without installing the drivers.
• To view images on your PC, you must have image-viewing software already installed.
(To play movies, QuickTime 4.1 or later must be installed.)
A Important
You cannot check images on your PC unless there
is a memory card in the camera.
A Important
Check the size of the USB connectors. Plug the small connector into the camera and
the large connector into the USB port on your PC.
 Loading...