E
E
7
7
-
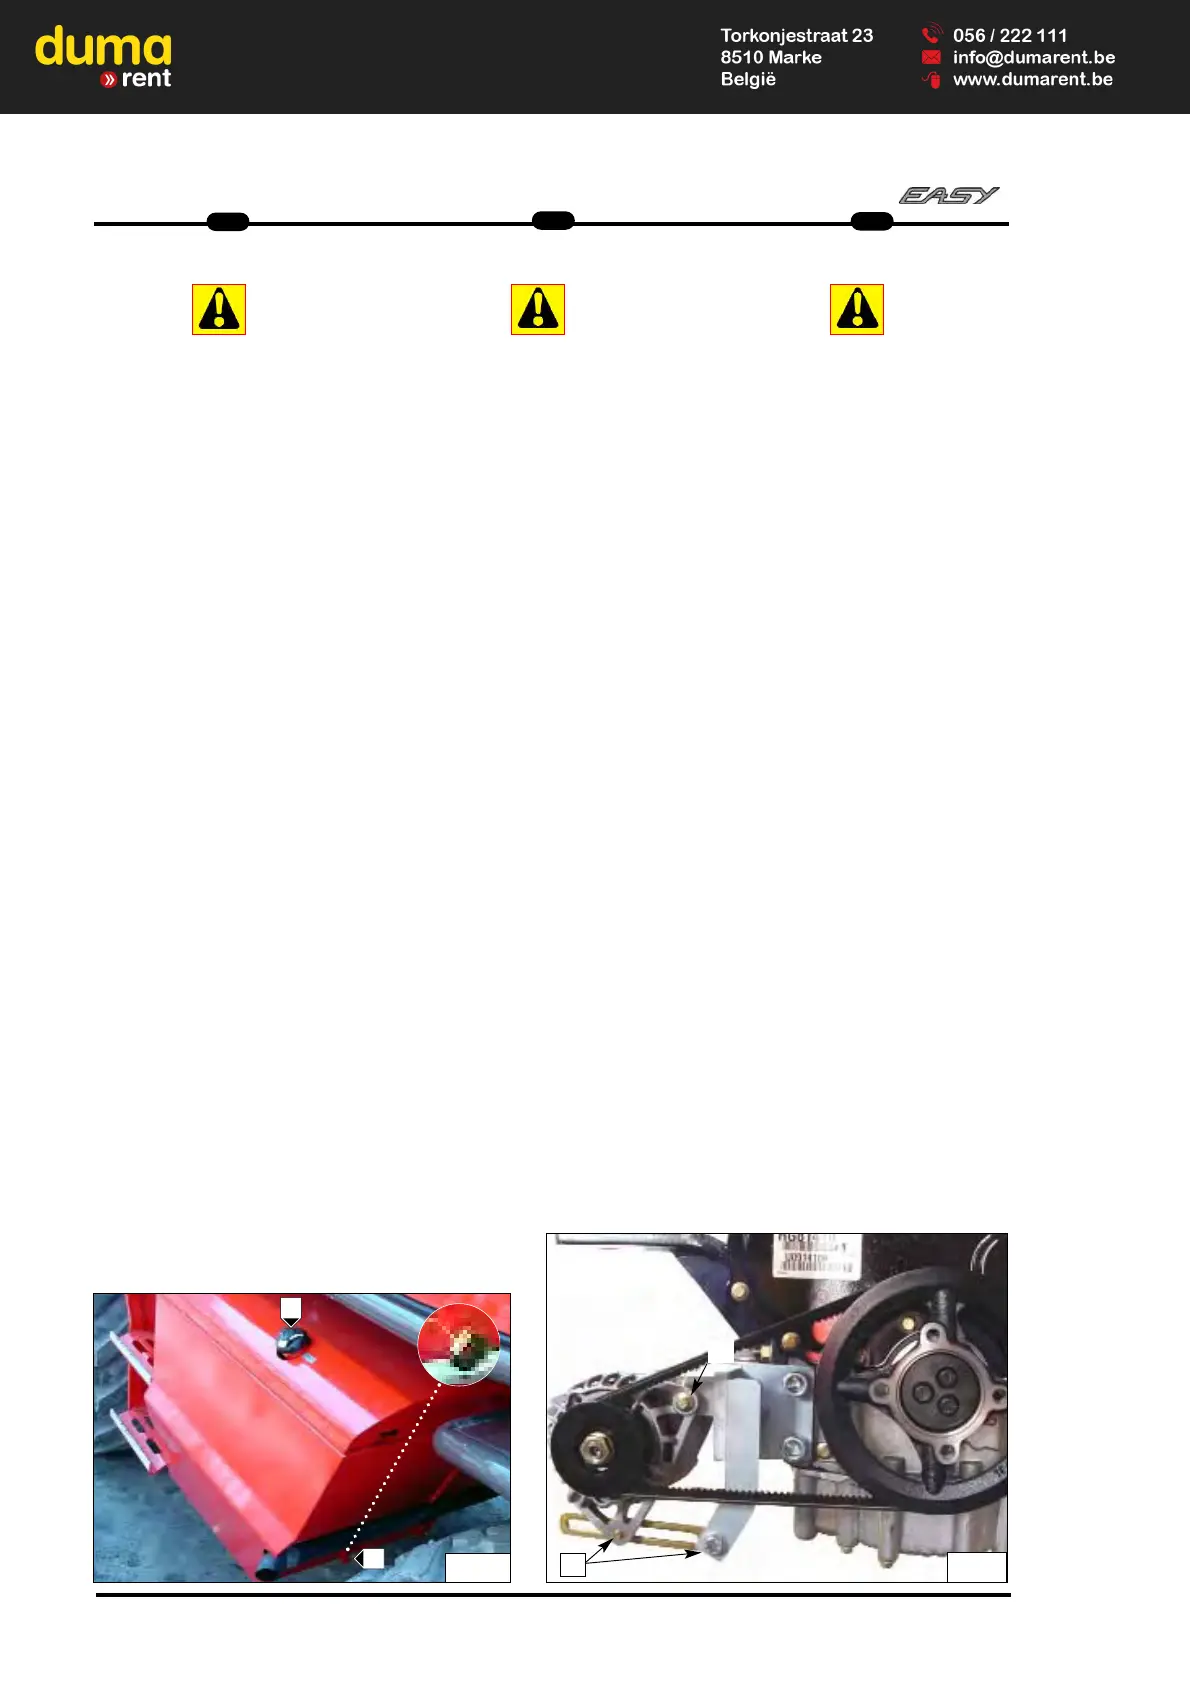
- Clean fuel tank
Never smoke or work near a flame
during this operation.
Position the truck on level ground with
the engine off.
Unscrew tank fill plug 2 (Fig. E7/1) and
place a suitable container under drain
plug 1 (Fig. E7/1). Unscrew the cap.
Allow the fuel to drain out and then clean
the tank with 10 liters of clean fuel poured
through fill hole 2 (Fig. E7/1).
Refit and tighten drain plug 1 (Fig. E7/1).
Fill the tank with clean fuel and refit plug
2 (Fig. E7/1).
E
E
8
8
-
- Changing the alternator
belt/crankshaft
Place the truck on a flat surface with the
engine off.
Loosen the connection screw of alterna-
tor 1 and the set screw of the belt ten-
sioner lever 2 (Fig. E8) by 2 or 3 thread
turns and rotate the position of the alter-
nator to loosen the tension of the belt so
that it can be removed from the pulleys.
Replace the belt with another one with
similar features (see “FILTERING ELE-
MENT AND BELT TABLE”) and rotate
the position of the alternator to apply the
correct tension to the belt.
Tighten the set screw of the belt tensio-
ner 2 (Fig. E8) and the alternator con-
nection screws 1(Fig. E8).
Check the belt tension again to make
sure it is still correct.
It is recommended to check the belt ten-
sion again after 20 hours of service from
when the belt was replaced (see opera-
tion no. C1).
E
E
7
7
-
- Kraftstoffbehälter reinigen
Während dieses Vorgangs
nicht rauchen und kein
offenes Feuer in der Nähe halten.
Den Teleskoplader mit abgestelltem
Motor auf einer ebenen Fläche
abstellen.
Den Stopfen 2 (Abb. E7/1) zum
Tankfüllen abdrehen und dann einen
angemessenen Auffangbehälter unter
den Ablassstopfen 1 (Abb. E7/1) stellen
und den Stopfen abdrehen.
Den Kraftstoff auslaufen lassen und 10
Liter sauberen Kraftstoff durch die
Einfüllöffnung 2 (Abb. E7/1) eingießen,
um etwaige Ablagerungen aus dem
Tank zu entfernen.
Den Ablassstopfen 1 (Abb. E7/1) wieder
aufsetzen und anziehen.
Den Tank mit sauberem Kraftstoff füllen
und den Stopfen 2 (Abb. E7/1) wieder
aufsetzen.
E
E
8
8
-
- Keilriemen wechseln.
Den Teleskoplader auf ebenenr Fläche
abstellen.
Motor abstellen.
Die Befestigungsschrauben der
Lichtmaschine 1 und die Spannschraube
des Spannerhebels 2 (Abb. E8) ca. 2
oder 3 Umdrehungen lösen.
Keilriemen entfernen und durch einen
neuen Keilriemen ersetzen.
(siehe “FILTER UND
KEILRIEMENTABELLE”), die
Lichtmaschinenposition ausrichten, um
dem Keilriemen die korrkete Spannung
zugeben.Die Spannschraube
2 (Abb. E8) und die
Befestigungsschrauben der
Lichtmaschine 1 (Abb. E8) festziehen.
Nochmals die Spannung des
Keilriemens prüfen, um sicherzustellen,
daß sie korrektist.
Nach ca.20 Betriebsstunden, die
Keilriemenspannung erneut überprüfen
(siehe Vorgang Nr. C1).
E
E
7
7
-
- Pulire serbatoio combustibile
Non fumare o avvicinarsi con una
fiamma durante questa operazione.
Posizionare il carrello su di una superficie
orizzontale e con il motore fermo.
Svitare il tappo 2 (fig. E7/1) di
riempimento serbatoio poi collocare un
recipiente adeguato sotto il tappo di
svuotamento 1 (fig. E7/1) e svitare il
tappo.
Lasciare defluire il carburante ed
introdurre 10 litri di carburante pulito
attraverso il foro di riempimento
2 (fig. E7/1) per eliminare eventuali
impurità.
Rimontare e serrare il tappo di
svuotamento1 (fig. E7/1).
Riempire il serbatoio con carburante
pulito e rimettere il tappo 2 (fig. E7/1).
E
E
8
8
-
- Sostituire cinghia alternatore
Posizionare il carrello su di una superficie
piana e con il motore fermo.
Svitare la vite di fissaggio dell'alternato-
re 1 e la vite di fermo della leva
tendicinghia 2 (Fig. E8) di 2 o 3 giri di
filetto e ruotare la posizione
dell'alternatore in modo da allentare la
tensione della cinghia per estrarla dalle
pulegge. Sostituire la cinghia con una di
uguali caratteristiche,(vedi "TABELLA
ELEMENTI FILTRANTI E CINHIE"), ruo-
tare la posizione dell'alternatore per
dare alla cinghia la tensione corretta.
Serrare la vite di fermo del tendicinghia
2 (Fig. E8) e le viti di fissaggio dell'alter-
natore 1(Fig. E8). Controllare nuova-
mente la tensione della cinghia per assi-
curarsi che sia ancora
corretta. E' consigliato un ulteriore
controllo della tensione della cinghia
dopo 20 ore di lavoro dalla sostituzione
(vedere operazione n°C1).
E7/1
2
1
2
E8
1
3
42
MRT 1440-1640-1840
IT
EN
DE
 Loading...