80224_MHW_650 L - 1250 L_07-2018_ENG - 1
CONTENTS ..........................................................................1
Introduction .........................................................................3
Device data ......................................................................................3
Warnings and safety .........................................................................3
Symbols used in this manual ...........................................................4
Glossary ...........................................................................................4
Disclaimer .........................................................................................5
Copyright ..........................................................................................5
1. General description .................................................. 6
1.1. Profile .....................................................................................6
1.2. Differences between models ..................................................7
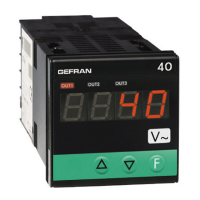
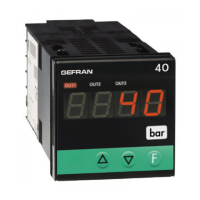
1.3. Indicator 650 L .......................................................................8
1.3.1. Display and keys 650 L ...........................................................8
1.3.2. Cutout and mounting dimensions .......................................... 9
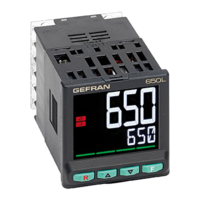
1.4. Indicator 1250 L ...................................................................10
1.4.1. Display and keys 1250 L .......................................................10
1.4.2. Cutout and mounting Dimensions .......................................11
2. Installation ...............................................................12
2.1. Mounting the indicator .........................................................12
2.1.1. General considerations ......................................................... 12
2.1.2. Mounting dimensions ...........................................................12
2.1.3. Protection against infiltration of dust .......................................
and water ........................................................................12
2.1.4. Vibrations ...............................................................................13
2.1.5. Minimum space for ventilation .............................................13
2.1.6. Positioning ............................................................................. 13
2.1.7. Fastening to the panel ..........................................................13
2.2. Connections .........................................................................14
2.2.1. General considerations ......................................................... 14
2.2.2. Electromagnetic compatibility (EMC) ...................................14
2.2.3. Cables ...................................................................................14
2.2.4. Power supply ........................................................................14
2.2.5. Connecting inputs and outputs ............................................15
2.3. 650 L connection diagrams ..................................................16
2.3.1. General diagram....................................................................16
2.3.2. Power supply ........................................................................17
2.3.3. Inputs ..................................................................................... 17
2.3.4. Outputs ..................................................................................17
2.3.5. Options ..................................................................................18
2.4. 1250 L connection diagrams ................................................19
2.4.1. General diagram....................................................................19
2.4.2. Power supply ........................................................................20
2.4.3. Inputs ..................................................................................... 20
2.4.4. Outputs ..................................................................................20
2.4.5. Digital inputs ..........................................................................21
2.4.6. Serial line ...............................................................................21
2.4.7. Analog output ........................................................................ 21
2.5. RS485 serial connection diagram ........................................22
3. Commissioning .......................................................23
3.1. Information on displays and use of keys..............................23
3.1.1. Menu navigation ....................................................................23
3.1.2. Displays .................................................................................23
3.1.2.1. Display characters ...................................................23
3.2. Power-on sequence .............................................................24
3.1.2.2. Scrolling messages ..................................................24
3.3. First power-on ......................................................................25
3.3.1. Fast configuration .................................................................25
3.4. Setting up quick configuration .............................................29
3.4.1. Setting up the Alarm ............................................................29
CONTENTS
CONTENTS
4. Configuration .......................................................... 30
4.1. Programming/Configuration Menu .......................................30
4.1.1. First: know what you’re doing ..............................................30
4.1.2. Passwords ............................................................................. 30
4.1.3. Password in the User Menu .................................................30
4.2. Main menu ...........................................................................31
4.3. Legend for submenus and parameters ................................ 32
4.3.1. Submenu ...............................................................................32
4.3.2. Parameters ............................................................................32
4.4. INFO Submenu - information display ...................................33
4.4.1. SW.VER - Software Version ..................................................34
4.4.2. CODE - Serial address of the indicator ................................34
4.4.3. ERROR - Primary input error ................................................34
4.4.4. SAP.C - SAP code ................................................................. 34
4.4.5. SEr.n - Serial address of the indicator .................................. 34
4.4.6. xxxxx - Model of indicator ....................................................35
4.4.7. INDIC - Type of indicator ......................................................35
4.4.8. OUT.A1 - Analog output 1 available .....................................35
4.4.9. x.IN.DG - Digital input available ............................................35
4.4.10. RS485 - RS485 serial port available ....................................35
4.4.11. Out1 - Type of output ........................................................... 36
4.4.12. Out2 - Type of output .......................................................... 36
4.4.13. Out3 - Type of output .......................................................... 36
4.4.14. OUT1.S - Number of cycles output 1 .................................36
4.4.15. OUT2.S - Number of cycles output 2 .................................36
4.4.16. OUT3.S - Number of cycles output 3 .................................37
4.4.17. T.DAYS - Total working days ................................................37
4.4.18. P.DAYS - Partial working days ..............................................37
4.4.19. T.INT - Internal temperature of indicator ..............................37
4.4.20. T.MIN - Minimum internal temperature of the indicator .......37
4.4.21. T.MAX - Maximum internal temperature of the indicator ....38
4.5. I.MAIN Submenu - Configuration of main input ................... 39
4.5.1. tyPE - Selecting sensor type ................................................40
4.5.2. SBR.E - Enabling Sensor Break Alarm (SBR) ......................41
4.5.3. Lin - Linearization type ..........................................................42
4.5.4. Unit - Displayed engineering units .......................................42
4.5.5. FILT - Digital filter ..................................................................42
4.5.6. FILT.D - Digital filter on PV display........................................43
4.5.7. DEC.P - Number of decimals displayed ..............................43
4.5.8. LO.SCL - Lower limit of scale ............................................... 43
4.5.9. HI.SCL - Upper limit of scale ................................................ 44
4.5.10. OF.SCL - Scale offset correction ..........................................44
4.5.11. LO.AL - Lower limit for alarms .............................................. 44
4.5.12. HI.AL - Upper limit for alarms ...............................................44
4.6. ALARM Submenu - Configuration of alarms ........................45
4.6.1. ALARM - Selecting the alarm to be configured ...................46
4.6.2. d.i.x - Selecting direct or inverse alarm ................................ 46
4.6.3. A.r.x - Selecting absolute or deviation alarm .......................46
4.6.4. n.S.x - Selecting hysteresis type ..........................................46
4.6.5. PWON.E - Disabling the alarm at power-on ........................47
4.6.6. LATCH - Set alarm latching ..................................................47
4.6.7. HYSTE - Hysteresis ..............................................................47
4.6.8. DELAY - Alarm trip delay ......................................................48
4.6.9. MSG.AL - Alarm message ....................................................48
4.6.10. MSG.AN - Alarm reset message ..........................................48
4.6.11. BLK.AL - Flashing of PV display...........................................49
4.6.12. BLK.AN - PV display alarm flashing with alarm reset ..........49
4.7. I.DIGT Submenu – Configuring digital inputs .......................50
4.7.1. I.DIG.N - Selecting the digital input ......................................51
4.7.2. S.in.x - Defining the input state ............................................51
4.7.3. F.in.x - Selecting the assigned function................................51
4.7.4. MSG.IN - Selecting the digital input message ..................... 51
4.8. OUTPU Submenu – Configuring outputs ............................ 52
4.8.1. OUT.N - Selecting the output ...............................................53
4.8.2. S.ou.x - Defining the output state ........................................53
4.8.3. F.ou.x - Selecting the function assigned to relay, logic or
Triac output ...........................................................................53
 Loading...