7776
Description
Locking system for retaining the iron on the base - Lock-system
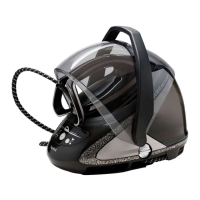
Your steam generator is tted with a retaining hoop to hold the iron onto the base with a locked position for easy
transport and storage - fig.1:
• Locking - fig.2
• Unlocking - fig.3.
To transport your steam generator using the handle of the iron:
- Put the iron on the steam generator iron rest and raise the retaining hoop over the iron until it locks into place (audible
click) - fig.2.
- Hold the iron by the handle to transport your steam generator - fig.1.
Preparation
What water may be used?
• Tap water:
Your appliance has been designed to function using untreated tap water. If your water is very hard, we recommend you
use a mix of 50% untreated tap water and 50% distilled water available in hardware stores.
• Types of water not to use:
Heat concentrates the elements contained in water during evaporation. The types of water listed below may contain
organic waste, mineral or chemical elements that can cause spitting, brown staining or premature wear of the
appliance: water from clothes dryers, scented or softened water, water from refrigerators, batteries, air conditioners,
rain water, boiled, ltered or bottled water. These types of water should not be used in your TEFAL iron. Also only use
distilled water as advised above.
Always remember:
Never use rainwater or water containing additives (like starch, fragrance or water from domestic appliances). Such
additives can affect the steam properties and at high temperature, form deposits in the steam generator chamber
which are likely to stain your washing.
Filling the water tank
• Put the steam generator on a at, stable, heat-resistant surface.
• When the red «Water tank empty» light is ashing - fig.4, there is no more steam. The water tank is empty.
• Unplug the steam generator. Open the water tank ller cover - fig.5.
• Fill the water tank using a jug and taking care not to exceed the MAX level - fig.6.
• Close the water tank ller cover - fig.7.
• Plug the steam generator in again. Press the «ON-OFF» restart button - fig.8 under the control panel until the light
goes out to continue ironing.
Switch the steam generator on
• Completely unwind the power cord - fig.9 and take the steam cord out of its storage space
- fig.10.
• Plug your steam generator into an earthed socket.
• Press the «ON-OFF» button - fig.8.
• The «ON-OFF» button light and the iron thermostat light remain ashing while the
appliance is warming up. When the light stops ashing (after approximately 2 minutes) the
steam generator is ready.
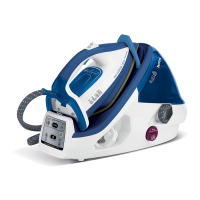
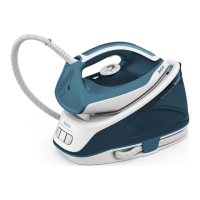
1. Comfort handle
2. Steam control
3. Thermostat light
4. Easycord power lead outlet
5. Iron rest
6. Power cord
7. Power cord storage space
8. Power Zone button
9. Retaining clip for locking iron on the base unit
10. Water tank ller cover
11. 1,7 L water tank
12. Boiler (in the base unit)
13. Steam cord
14. Sliding storage space for steam cord
15. Scale collector cap
16. Scale collector
17. Control panel
a. «Anti-scale» light
b. «Water tank empty» light
c. «OK» button
d. «ON-OFF» button with light
e. «ECO MIN» button with light
18. Ultra Gliss soleplate
The first time the
appliance is used, there
may be some fumes and
smell but this is not har-
mful. They will not affect
use and will disappear
rapidly.
PLEASE REFER TO SAFETY INSTRUCTIONS AT THE BEGINNING
OF THIS BOOKLET BEFORE USING YOUR APPLIANCE
Operating the control panel
• The blue light of the «ON-OFF» button is ashing - fig.11: the boiler is heating up. When the light stops ashing, the
steam generator is ready.
• The red «Water tank empty» button light is ashing - fig.4: the water tank is empty. Fill the tank and press the «OK»
button to switch the light off - fig.12. See paragraph «Filling the water tank during use»
• The orange «Anti-scale» light is ashing - fig.13: maintenance is required, see paragraph «Maintenance and
cleaning».
• Your steam generator comes with an automatic shut-off system after approximately 8 minutes without use. The
«ON-OFF» button light is ashing: the steam generator is on standby. Press the «ON-OFF» button or the steam shot
button to start ironing again - fig. 8-14. See paragraph «AUTO-OFF» System.
Use
Steam ironing
• To obtain steam, press the steam control button under the iron handle - fig.14. The
steam will stop when you release the button.
• After approximately one minute, and regularly while it is being used, your steam
generator’s electric pump injects water into the boiler. It makes a noise but this is
quite normal.
• If you are using starch, always spray it onto the reverse side of the fabric to be ironed.
Smart technology easy control
Your steam generator is tted with SMART TECHNOLOGY EASY CONTROL electronic regulation which offers you the
optimum temperature and steam combination allowing you to iron all your ironable fabrics without risk and without
having to sort them.
Settings Recommended use Labelling Examples
Optimum for all types of ironable fabrics
without any risk of burning.
Cotton, wool*, silk,
polyester, cashmere,
mohair, viscose and
synthetic/cotton mixes,
linen and mixed bres.
The ECO /Min function allows ironing at
the lowest temperature and low steam
ow suitable for ironing the most delicate
fabrics.
It also reduces energy consumption. Press
the ECO/ Min button to iron in ECO mode
and press the same button again to exit
this mode.
Acetate, elastane,
polyamide, acrylic and
synthetic mixes.
Note: do not use steam to
iron acrylic fabrics.
If you are in doubt about the type of fabric an item of clothing is made from, check the label.
*If you are ironing woollen garments, press repeatedly on the steam shot button - fig.14
without placing the iron on the garment. This will avoid it becoming shiny.
ECO MIN MODE: The ECOmin function reduces energy consumption. Press the ECO button to change to
ECO mode and press the same button again to exit this mode.
Dry ironing
• Do not press the steam control button under the iron handle.
1800129605 GV7550 E0.indd 76 22/02/13 14:16
 Loading...