Operation
STARTING
AND
STOPPING
THE
ENGINE
DANGER
To
Prevent
Personal
Injury
or
Property
Damage:
•
Cutting
blades
begin
to
ro-
tate
when
engine
starts
and
slow
down
gradually
after
en-
gine
is
shut
off.
Do
not
allow
hands
or
any
other
part
of
the
body
or
clothing inside
the
vacuum
inlet,
chipper
chute,
discharge
deflector,
or
near
any
moving
part.
•
Do
not
run
engine
in
an
en-
closed
area.
Engine
exhaust
contains
carbon
monoxide
gas,
a
deadly
poison
that
is
odorless, colorless,
and
tasteless.
Do
not
operate
this equipment
near
build-
ings,
windows,
or
air
condi-
tioners.
Pre-Starting
Procedures
IMPORTANT: Review "Section
1: Safety"
and
read this Section
in its entirety before starting the
engine.
With the spark plug wire discon-
nected from the spark plug, per-
form the following pre-starting
procedures
as
required before each
start up.
D Install a vacuuming attachment
or the Vacuum Inlet Cap (Page 21).
D Install the collection bag
(Page 20).
o Park the machine outdoors and
on level ground.
D Check the engine oil level. See
Page 35.
D Add gasoline to the fuel tank, if
needed. See Page
19.
o Be sure that all bystanders are
at least 25 feet away from the area
of
operation.
D Visually check the chipper
chute and the vacuum attachment
inlet to be sure that they're empty.
D
If
using a shredder screen, it
must be correctly and securely in-
stalled. See Page 23.
D
If
using the Vacuum Snout or
the Leaf Tray, adjust the vacuum
inlet height for the desired ground
clearance. See Page 22.
D Check that all screws, nuts,
bolts, and other fasteners are prop-
erly secured.
o Reattach the spark plug wire
before starting the engine.
Starting
the
Engine
1. Put on safety goggles, sturdy
work gloves and hearing protec-
tion. Do not wear loose-fitting
clothing or jewelry that can get
caught
in
moving parts.
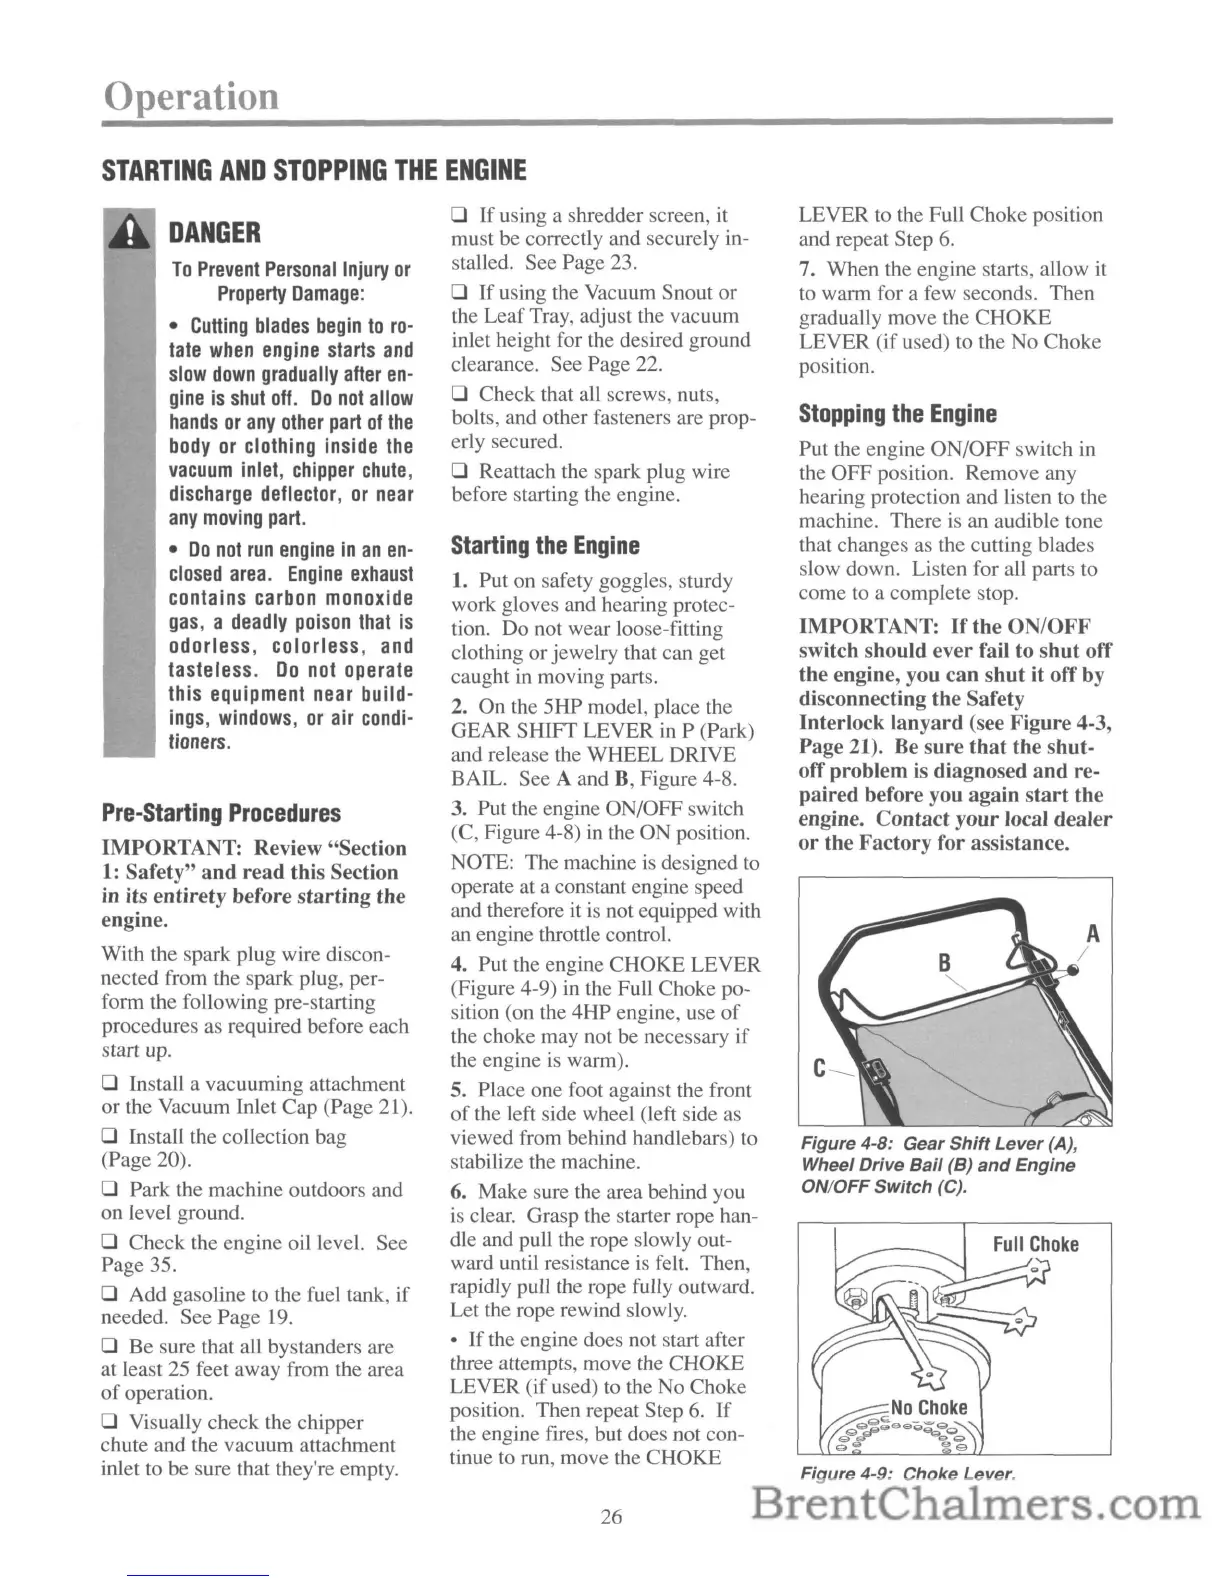
2.
On the 5HP model, place the
GEAR SHIFT LEVER
in
P (Park)
and release the WHEEL DRIVE
BAIL. See A and
B,
Figure 4-8.
3. Put the engine ON/OFF switch
(C, Figure 4-8) in the ON position.
NOTE: The machine
is
designed
to
operate at a constant engine speed
and therefore it
is
not equipped with
an
engine throttle control.
4. Put the engine CHOKE LEVER
(Figure 4-9)
in
the Full Choke po-
sition (on the 4HP engine, use
of
the choke may not be necessary
if
the engine
is
warm).
5. Place one foot against the front
of
the left side wheel (left side
as
viewed from behind handlebars) to
stabilize the machine.
6. Make sure the area behind you
is
clear. Grasp the starter rope han-
dle and pull the rope slowly out-
ward until resistance is felt. Then,
rapidly pull the rope fully outward.
Let the rope rewind slowly.
•
If
the engine does not start after
three attempts, move the CHOKE
LEVER (if used) to the No Choke
position. Then repeat Step
6.
If
the engine fires, but does not con-
tinue to run, move the CHOKE
26
LEVER to the Full Choke position
and repeat Step
6.
7. When the engine starts, allow it
to warm for a few seconds. Then
gradually move the CHOKE
LEVER (if used) to the No Choke
position.
Stopping
the
Engine
Put the engine ON/OFF switch
in
the OFF position. Remove any
hearing protection and listen to the
machine. There
is
an audible tone
that changes
as
the cutting blades
slow down. Listen for all parts to
come to a complete stop.
IMPORTANT:
If
the ON/OFF
switch should ever fail to
shut
off
the engine, you can
shut
it off by
disconnecting the Safety
Interlock lanyard (see Figure 4-3,
Page 21).
Be
sure
that
the shut-
off problem
is
diagnosed
and
re-
paired before you again
start
the
engine. Contact your local dealer
or
the Factory for assistance.
Figure 4-8: Gear
Shift
Lever
(A),
Wheel Drive
Bail
(B)
and
Engine
ON/OFF
Switch
(C).
Figure
4-9: Choke Lever.
 Loading...