Maintenance/Repairs
ADJUSTING
THE
GEAR
SHIFT
LEVER
CABLE
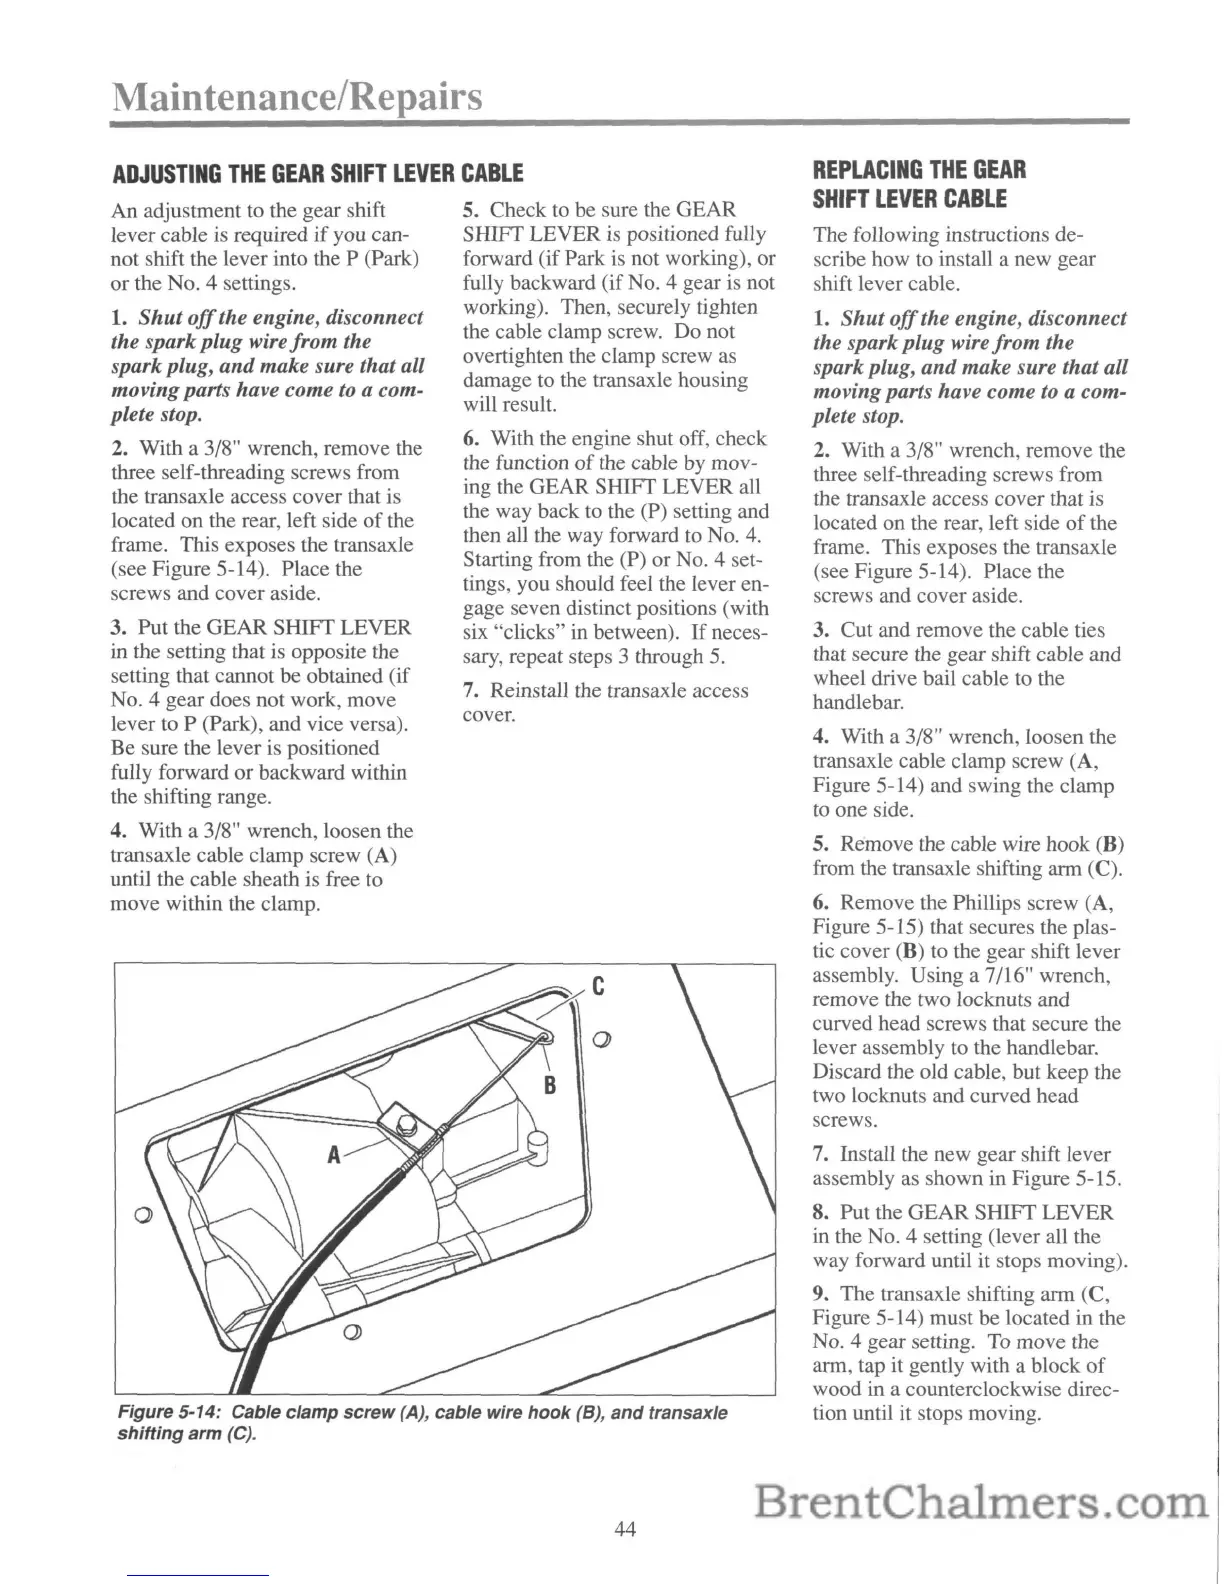
Figure 5-14: Cable clamp screw(A), cable wire
hook
(8),
and
transaxle
shifting
arm
(C).
An adjustment to the gear shift
lever cable is required
if
you can-
not shift the lever into the P (Park)
or the
No.4
settings.
1.
Shut
off
the engine, disconnect
the spark
plug
wire
from
the
spark plug, and make sure that all
movingparts have come to a com-
plete stop.
2. With a 3/8" wrench, remove the
three self-threading screws from
the transaxle access cover that is
located on the rear, left side
of
the
frame. This exposes the transaxle
(see Figure 5-14). Place the
screws and cover aside.
3. Put the GEAR
SHIFf
LEVER
in the setting that is opposite the
setting that cannot be obtained (if
No.4
gear does not work, move
lever to P (Park), and vice versa).
Be sure the lever is positioned
fully forward or backward within
the shifting range.
4.
With a 3/8" wrench, loosen the
transaxle cable clamp screw (A)
until the cable sheath is free to
move within the clamp.
5. Check to be sure the GEAR
SHIFf
LEVER is positioned fully
forward (if Park
is
not working), or
fully backward (if
No.4
gear is not
working). Then, securely tighten
the cable clamp screw. Do not
overtighten the clamp screw
as
damage to the transaxle housing
will result.
6. With the engine shut off, check
the function
of
the cable by mov-
ing the GEAR
SHIFf
LEVER all
the way back to the (P) setting and
then all the way forward to
No.4.
Starting from the (P) or
No.4
set-
tings, you should feel the lever en-
gage seven distinct positions (with
six "clicks" in between).
If
neces-
sary, repeat steps 3 through
5.
7.
Reinstall the transaxle access
cover.
REPLACING
THE
GEAR
SHIFT
LEVER
CABLE
The following instructions de-
scribe how to install a new gear
shift lever cable.
1.
Shut
off
the engine, disconnect
the spark plug wire
from
the
spark plug,
and
make sure that all
moving parts have come
to
a com-
plete stop.
2.
With a 3/8" wrench, remove the
three self-threading screws from
the transaxle access cover that is
located on the rear, left side
of
the
frame. This exposes the transaxle
(see Figure 5-14). Place the
screws and cover aside.
3. Cut and remove the cable ties
that secure the gear shift cable and
wheel drive bail cable to the
handlebar.
4. With a
3/8" wrench, loosen the
transaxle cable clamp screw (A,
Figure 5-14) and swing the clamp
to one side.
5. Remove the cable wire hook (B)
from the transaxle shifting arm
(C).
6. Remove the Phillips screw (A,
Figure 5-15) that secures the plas-
tic cover (B) to the gear shift lever
assembly. Using a 7/16" wrench,
remove the two locknuts and
curved head screws that secure the
lever assembly to the handlebar.
Discard the old cable, but keep the
two locknuts and curved head
screws.
7. Install the new gear shift lever
assembly
as
shown in Figure 5-15.
8. Put the GEAR
SHIFf
LEVER
in the
No.4
setting (lever all the
way forward until it stops moving).
9. The transaxle shifting arm (C,
Figure 5-14) must be located in the
No.4
gear setting.
To
move the
arm, tap it gently with a block
of
wood in a counterclockwise direc-
tion until it stops moving.
44
 Loading...