24
E1SL 31 532258 04 - Rev. B
ID9
ID1
S
S
E1AS
E1SL
SDK EVO
V G 01 02 02
1 2 3 4 5 6 7
(E1AS)
J1
(E1SL)
J22
V G 01 02 02
1 2 3 4 5 6 7
(E1AS)
J1
(E1SL)
J22
Translation of the original instructions
ENGLISH
9.2 AIRSLIDE
INTERCOM allows the operation of the AIRSLIDE to be synchronised
with the connected automation (refer to the AIRSLIDE instruc-
tions): it activates when the door is opening / closing / open (status
other than “closed”) and deactivates when the door is closed.
The fan speed can be adjusted automatically: the speed is decreased
when when people are detected (via safety detectors) in the access.
INSTALLING AIRSLIDE
1. Make the connections with the boards switched off:
- connect the boards together (connectors J18-E1SL and J2-E1AS)
using 3 cascade connected-wires
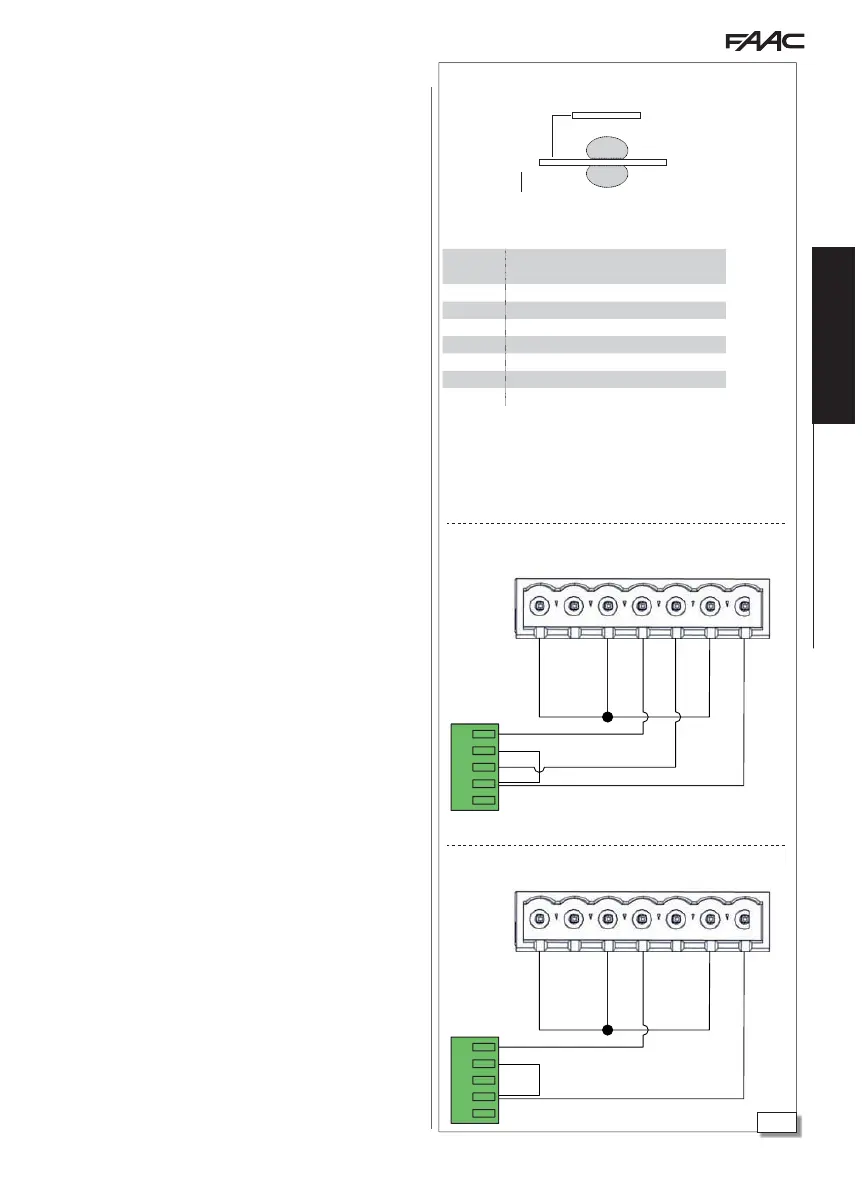
- connect the inputs of E1AS (J1) to the outputs of E1SL (J22) as in
Example 1 in the figure.
2. Turn power on to the boards.
3. Using SDK EVO on the E1SL board connected to AIRSLIDE, assign
the ID and then enable AIRSLIDE.
- /
PROGRAMMING/INTERCOM …
…
ID keep to the pre-set IDs (24)
… AIRSLIDE select
ENABLED (assign the associated AIRSLIDE ID)
Then program the outputs:
O2 activates operation at normal speed (V2) when the automation
is in any condition other than “closed”
O1 activates reduced speed (V1) when people are detected in the
access.
- /
PROGRAMMING/INPUTS/OUTPUTS/OUTPUTS O1/O2 …
…02 =
DOOR NOT CLOSED (6) with contact logic NORMALLY OPENED
…01 = CLOSING SAFETY (11) with contact logic NORMALLY OPENED
4. On AIRSLIDE, assign the pre-set ID using the DIP switches on board
E1AS (follow the instructions provided).
5. Register all the network IDs using the
MASTER board.
- /
PROGRAMMING/INTERCOM/NODES ENTRY
When finished NODE LIST appears (displays all the registered
IDs). Make sure that all the nodes have been registered. The data
of the AIRSLIDE that has been registered can be checked / modified:
…
NODE LIST select the ID AIRSLIDE and press OK
…
INFO displays the FW version on AIRSLIDE
…
FUNCTION enabled / disabled (modifiable)
Adjust the two speeds:
…
SPEED1 1…4 e.g. = 1 (reduced speed V1)
…
SPEED2 1…4 e.g. =3 (normal speed V2)
Lastly, press ESC repeatedly until you return to the main menu of
SDK EVO.
6. If you do not require a variable speed, connect the inputs to E1AS
(J1) to the outputs of E1SL (J22) as in Example 2 in the figure. In
this case, the programming of output O1 is not relevant for the
operation of the fan.
Internal
External
Pre-set
IDs for AIRSLIDE:
E1SL
ID
E1AS (AIRSLIDE)
Associated
ID
DIP switch SW4
1 2 3 4
1 9 1 0 0 1
2 10 1 0 1 0
3 11 1 0 1 1
412 1 1 0 0
5 13 1 1 0 1
6 14 1 1 1 0
7 15 1 1 1 1
With the SDK EVO connected to the E1SL:
- /
PROGRAMMING/INTERCOM…
…
ID 1
…AIRSLIDE
ENABLED (ID = 9)
On board E1AS, assign
ID = 9
Example of an automation with AIRSLIDE device.
Example 1: connection of AIRSLIDE inputs for operating automatically at 2 variable
speeds.
Example 2: connection of AIRSLIDE inputs for operating at 1 speed.

 Loading...