Checking/Adjusting the Track Tension
1 Prepare the Machine
a Position the machine on firm and level ground.
! WARNING
NEVER position yourself or any part of your body
under a raised machine which is not properly
supported. If the machine moves unexpectedly you
could become trapped and suffer serious injury or be
killed.
INT-3-3-7
b Raise the track to be measured off the ground
(see Cleaning the Tracks, steps 1 and 2). Block
the undercarriage.
c Rotate the track in forward direction only to
ensure that the track is able to rotate freely.
d Stop the engine and remove the starter key.
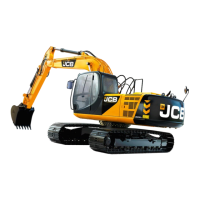
2 Check the Tension
Measure dimension A (see table below), between
track plate and undercarriage, at the third roller
counting from the idler wheel end.
Note: In certain ground conditions, e.g. soft sand and
sticky mud, the chain tension may increase as the machine
is operated and material is packed between the chain and
sprocket/idler wheel. In this case, the tension should be
checked again after approximately 5 minutes tracking.
Dimension A (mm)
Hard Ground (Metal Plates) 180 - 205
(Rubber Plates) 125 - 135
Soft Sand/Sticky Mud 250 - 275
3 Adjust the Track Tension
! WARNING
When opening the check valve always stand to one
side and loosen a little at a time until grease starts to
come out. It you over-loosen too much grease could
spurt out or the valve cover fly out and cause serious
injury.
8-3-4-5
! WARNING
Under no circumstances must the check valve be
dismantled or any attempt made to remove the grease
nipple from the check valve.
8-3-4-9
A
C
B
a If the track is too tight, release a small amount of
grease from the tension unit, by loosening the
check valve B on the tensioner.
Note: A maximum of 3 turns of the check valve should be
sufficient.
b If the track is too slack, pump grease into the
tensioner.
Note: If dimension C is (or becomes) zero before (or
during) tensioning, this indicates that the track and/or its
associated components require attention. Continued use
could cause further serious damage.
4 Lower the Track
Remove the blocks from beneath the undercarriage
and lower the track to the ground using the boom and
dipper controls.
5 Repeat for the Opposite Track
Swing the boom round to the other side and repeat
steps 1 to 4.
Note: The machine shown is typical. The track rollers must
be counted from the front, i.e. the idler end. The example
shows the measurement taken at track roller number three.
 Loading...