8
8-7. Timer Operation
• When setting the timer, make sure the current time on the remote control is accurate.
• The timer’s clock can only be set when the display of the remote control is ON.
• After setting the timer, put the remote control in a place where its signal will reach the
receiver of the indoor unit. (When the time set for the timer is reached, a signal is sent
from the remote control to Start/Stop the unit.)
Using the Timer
1. Press either
/ of the or , and while the time is being displayed,
if you press
/ again, a scheduled time can be set.
The time last set on the timer is displayed.
“--:--“ indicates time to change the batteries.
2. Press either
/ of the or and set the timer to the desired time.
Every time you press
/ , the time changes in 10 minutes increments.
If you press and hold the button, the time changes quickly.
3. After setting the timer, if you press
, the time you set changes to a steady display,
indicating settings are complete.
After the timer setting is displayed for three seconds, the display reverts to the current time.
Combining ON and OFF Timers
• Setting the ON and OFF timers, respectively.
Checking the timer setting
• If you press either
/ for the or the , the scheduled time is displayed for four seconds.
• When no timer setting has been made, it displays --:--. (Initial Setting)
Changing a timer setting
• Press
/ for the or the , and then when the timer setting is displayed, press / for the timer again.
Canceling a timer setting
• If you press [CANCEL], the timer setting is canceled.
• If you wish to cancel the setting for either the
or the timer, press / or the desired timer and when the scheduled
time is displayed, press [CANCEL].
Using the same timer setting every day
• If you press
for 2 or more seconds, “ ” is displayed and the ON timer or the OFF timer will operate the unit at the
same time every day.
• If you press
again for two seconds or more, “ ” goes off and the timer operates just once.
8-8. Adjusting the Wind Direction
• Never try to manually move the ap (up-down wind direction plate) that is operated by the remote control.
• When the unit stops, the ap (up-down wind direction plate) automatically faces downwards.
• When the unit is in heating standby, the ap (up-down wind direction plate) faces upward. Also, bear in mind that the ap
starts swinging after the heating standby mode is released, but the display on the remote control indicates
Auto Flap during standby heating as well.
RCS-SH80BG.WL / RCS-TRP80BG.WL / RCS-SS80BG.WL / RCS-XM18BG.WL / Indoor Unit (K type)
Setting the Wind Direction
While the unit is operating, every time you press
, the direction the ap faces
changes.
Setting Flap to Swing
If you press
to set the ap (up-down wind direction plate) in its most downward
facing position, and then press
again, is displayed and the ap swings
automatically up and down.
Stopping Flap Swing
If you press
again while the ap is swinging, you can stop the ap from swinging
and set it in place as desired. Thereafter, if you press
, you can set the wind direction
starting from the most upward position.
• When the unit is in the Cool or Dry modes, the ap cannot stop facing downwards.
If you try to stop the ap from swinging while it is facing downwards, it will continue
moving until it is in the third position from the top.
RCS-BH80BG.WL
The available functions differ depending on the indoor unit being used. The wind
direction cannot be set via remote control for any models other than those noted below.
For more information, please refer to the users’ manual that came with your indoor unit.
Four-direction Ceiling Cassette Models, Bi-directional Ceiling Cassette Models,
Unidirectional Cassette Models for High Ceilings, Ceiling Suspended Models, Wall Models
Please refer to
Setting the Wind Direction and Stopping Flap Swing.
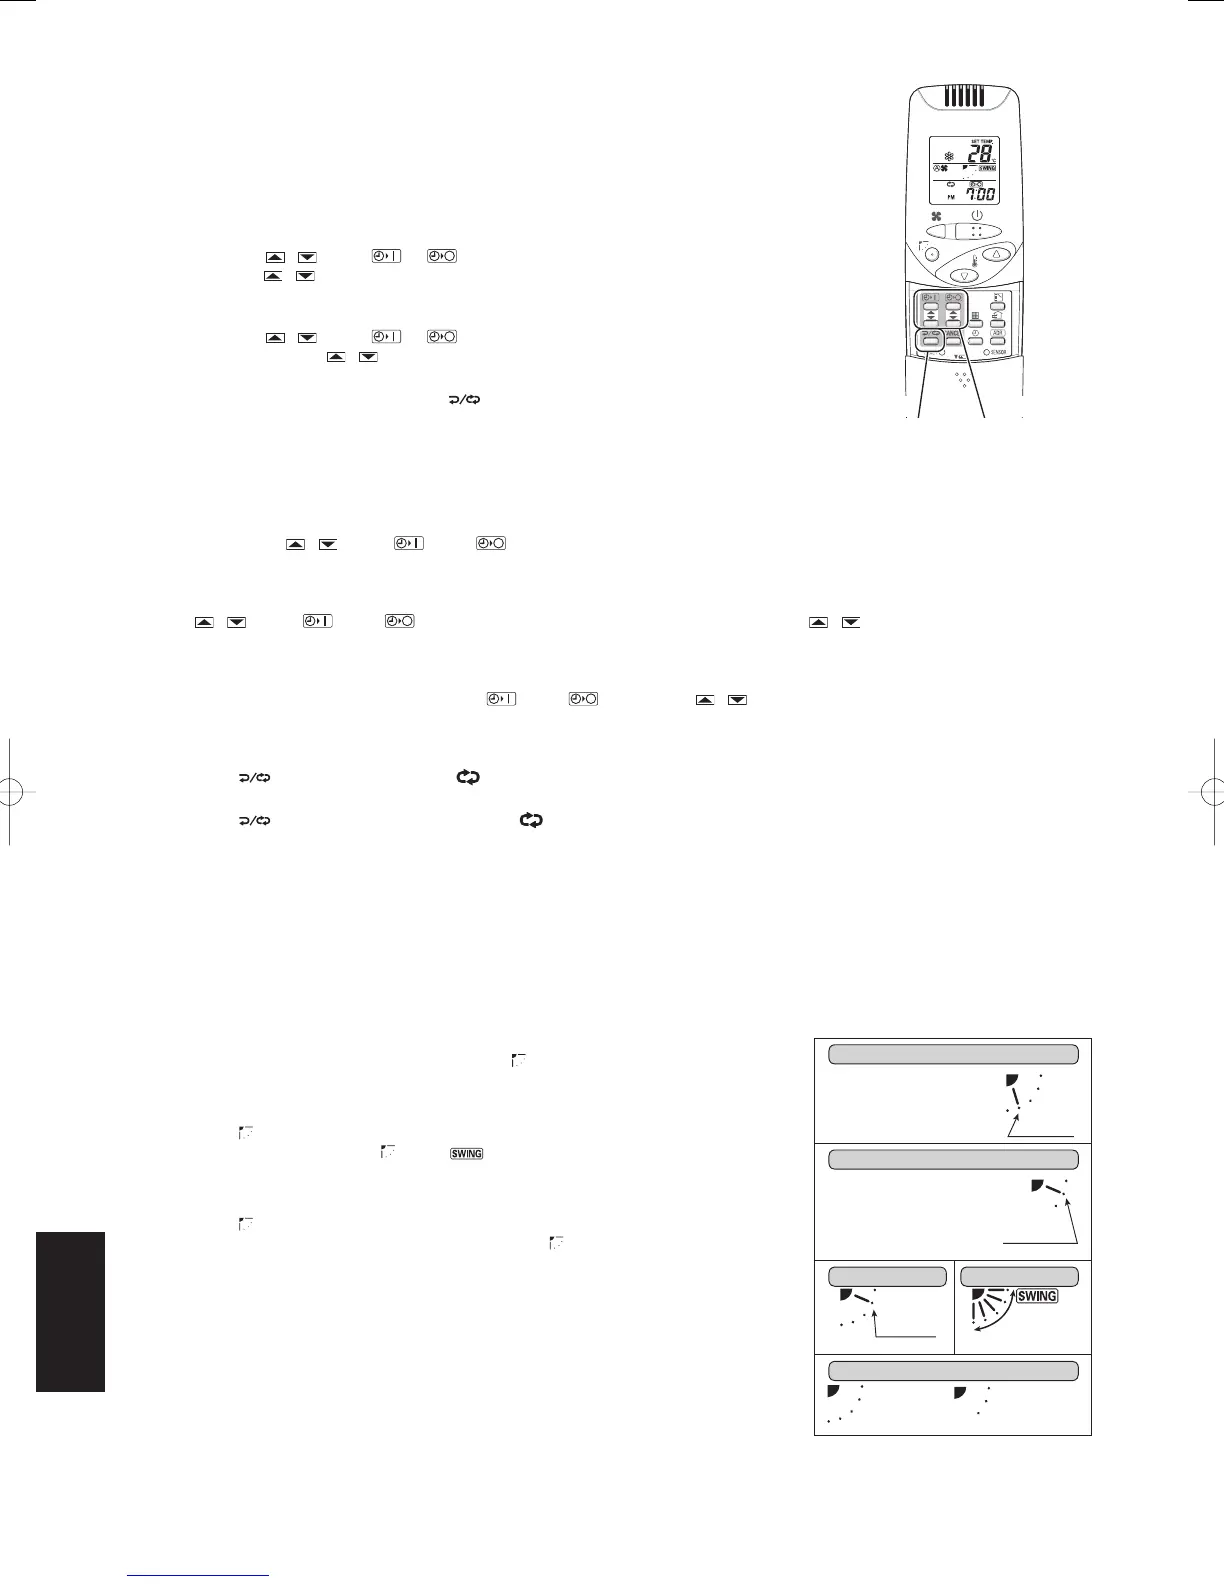
In the Heat Mode
In the Cool and Dry Modes
In the Fan Mode In All Modes
Displays with Swing Stopped
Please face the ap (up-down
wind direction plate) downwards.
If it faces upwards, the warm air
will not reach the oor level.
Initial Setting
Initial Setting
Initial Setting
Moves Constantly
Fan/Heat Modes Cool/Dry Modes
Please face the ap (up-down wind
direction plate) upwards. If the plate
faces downwards, condensation
may form and drip from around
the air outlet.
1,23
8-6
SM830160-03ClassicPAC-iA4.ind66SM830160-03ClassicPAC-iA4.ind66 2010/02/1610:31:152010/02/1610:31:15
 Loading...