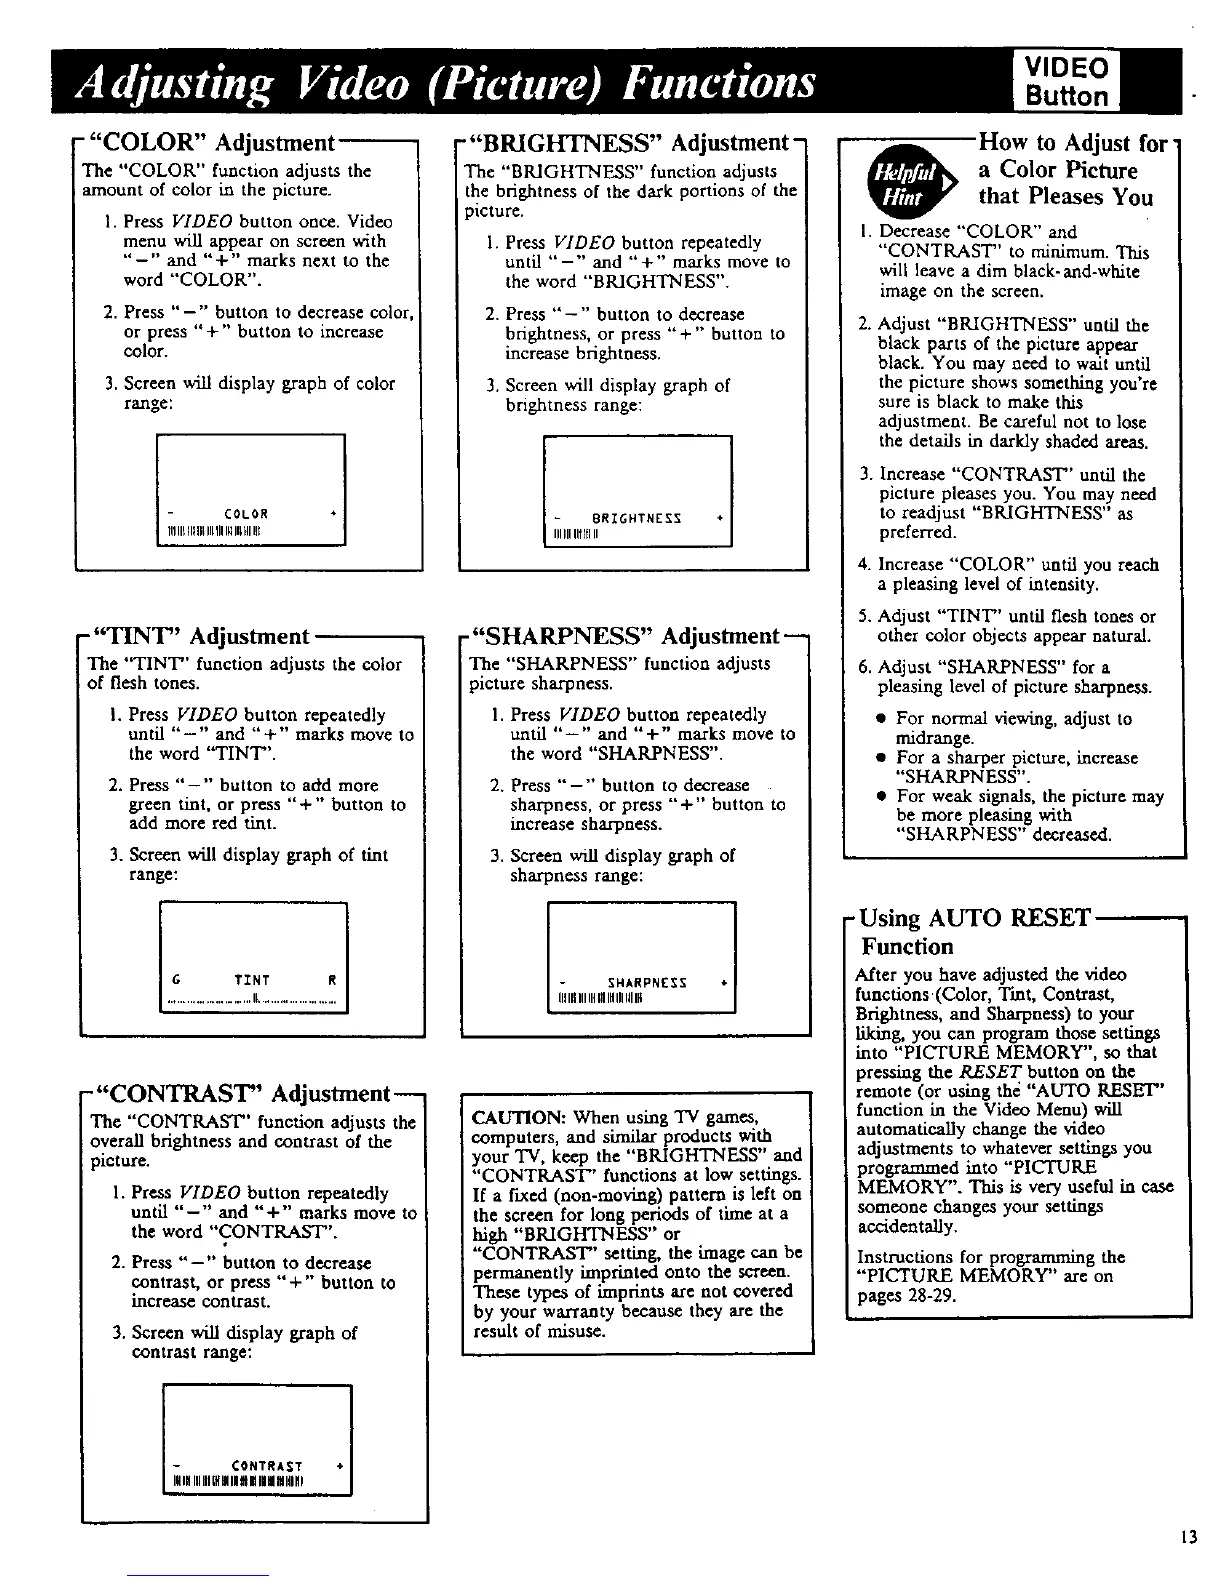
""COLOR" Adjustment
The "COLOR" function adjusts the
amount of color in the picture.
1. Press VIDEO button once. Video
menu will appear on screen with
"-'" and "+" marks next to the
word "'COLOR".
2. Press "-'' button to decrease color
or press "+" button to increase
color.
3. Screen will display graph of color
range:
-"TINT" Adjustment--
The "TINT" function adjusts the color
of flesh tones.
I. Press VIDEO button repeatedly
until "-" and "'+" marks move to
the word "TINT".
2. Press "-'" button to add more
green tint, or press "+" button to
add more red tint.
3. Screen will display graph of tint
range:
-"CONTRAST" Adjustment--
The "CONTRAST" function adjusts the
overall brightness and contrast of the
i picture.
1. Press VIDEO button repeatedly
until "-" and "+" marks move to
the word "CONTRAST".
2. Press "--" button to decrease
contrast, or press "+" button to
increase contrast.
3. Screen will display graph of
contrast range:
¢ONTRA_T ¢
_HIHlUIllUIIIINJt| IIIIIII HINI
-"BRIGHTNESS" Adjustment-
The "BRIGHTNESS" function adjusts
the brightness of the dark portions of the
ficture.
1. Press VIDEO button repeatedly
until "-" and "+'" marks move to
the word "'BRIGHTNESS".
2. Press "-" button to decrease
brightness, or press '"+'" button to
increase brightness.
3. Screen will display graph of
brightness range:
- BRIGHTNESS +1
IIIIIIlit$ II
-"SHARPNESS" Adjustment--
The "SHARPNESS" function adjusts
ficture sharpness.
1. Press VIDEO button repeatedly
until "--" and "+" marks move to
the word "SHARPNESS".
2. Press "--'" button to decrease
sharpness, or press + button o
increase sharpness.
3. Screen will display graph of
sharpness range:
CAUTION: When using TV games,
computers, and similar products with
)'our TV, keep the "BRIGHTNESS" and
"CONTRAST" functions at low settings.
If a fixed (non-moving) pattern is left on
the screen for long periods of time at a
high "BRIGHTNESS" or
"CONTRAST" setting, the image can be
permanently imprinted onto the screen.
These types of imprints are not covered
by your warranty because they are the
result of misuse.
VIDEO
BuRon
How to Adjust for
a Color Picturethat Pleases You
I. Decrease "COLOR" and
"CONTRAST" to minimum. This
will leave a dim black-and-white
image on the screen.
2. Adjust "BRIGHTNESS" until the
black parts of the picture appear
black. You may need to wait until
the picture shows something you're
sure is black to make this
adjustment. Be careful not to lose
the details in darkly shaded areas.
3. Increase "CONTRAST'' until the
picture pleases you. You may need
to readjust "BRIGHTNESS" as
preferred.
4. Increase "COLOR" until you reach
a pleasing level of intensiU.
5. Adjust "TINT" until flesh tones or
other color objects appear natural.
6. Adjust "SHARPNESS" for a
pleasing level of picture sharpness.
• For normal viewing, adjust to
midrange.
• For a sharper picture, increase
"SHARPNESS".
• For weak signals, the picture may
be more pleasing with
"SHARPNESS" decreased.
-Using AUTO RESET _-"
Function
After you have adjusted the video
functions(Color, T'mt, Contrast,
BrightneSs, and Sharpness) to your
liking, you can program those settings
into "PICTURE MEMORY", so that
pressing the RESET button on the
remote (or using thd "AUTO RESET"
function in the Video Menu) will
automatically change the video
adjustments to whatever settings you
programmed into "PIC'TUILE
MEMORY". This is very useful in case
someone changes your settings
accidentally.
Instructions for programming the
"PICTURE MEMORY" are on
pages 28-29.
13
 Loading...