Home
Ricoh
Printer
Aficio SP C811DN
Ricoh Aficio SP C811DN Hardware Guide
4
of 1
of 1 rating
252 pages
Give review
Manual
Specs
To Next Page
To Next Page
To Previous Page
To Previous Page
Loading...
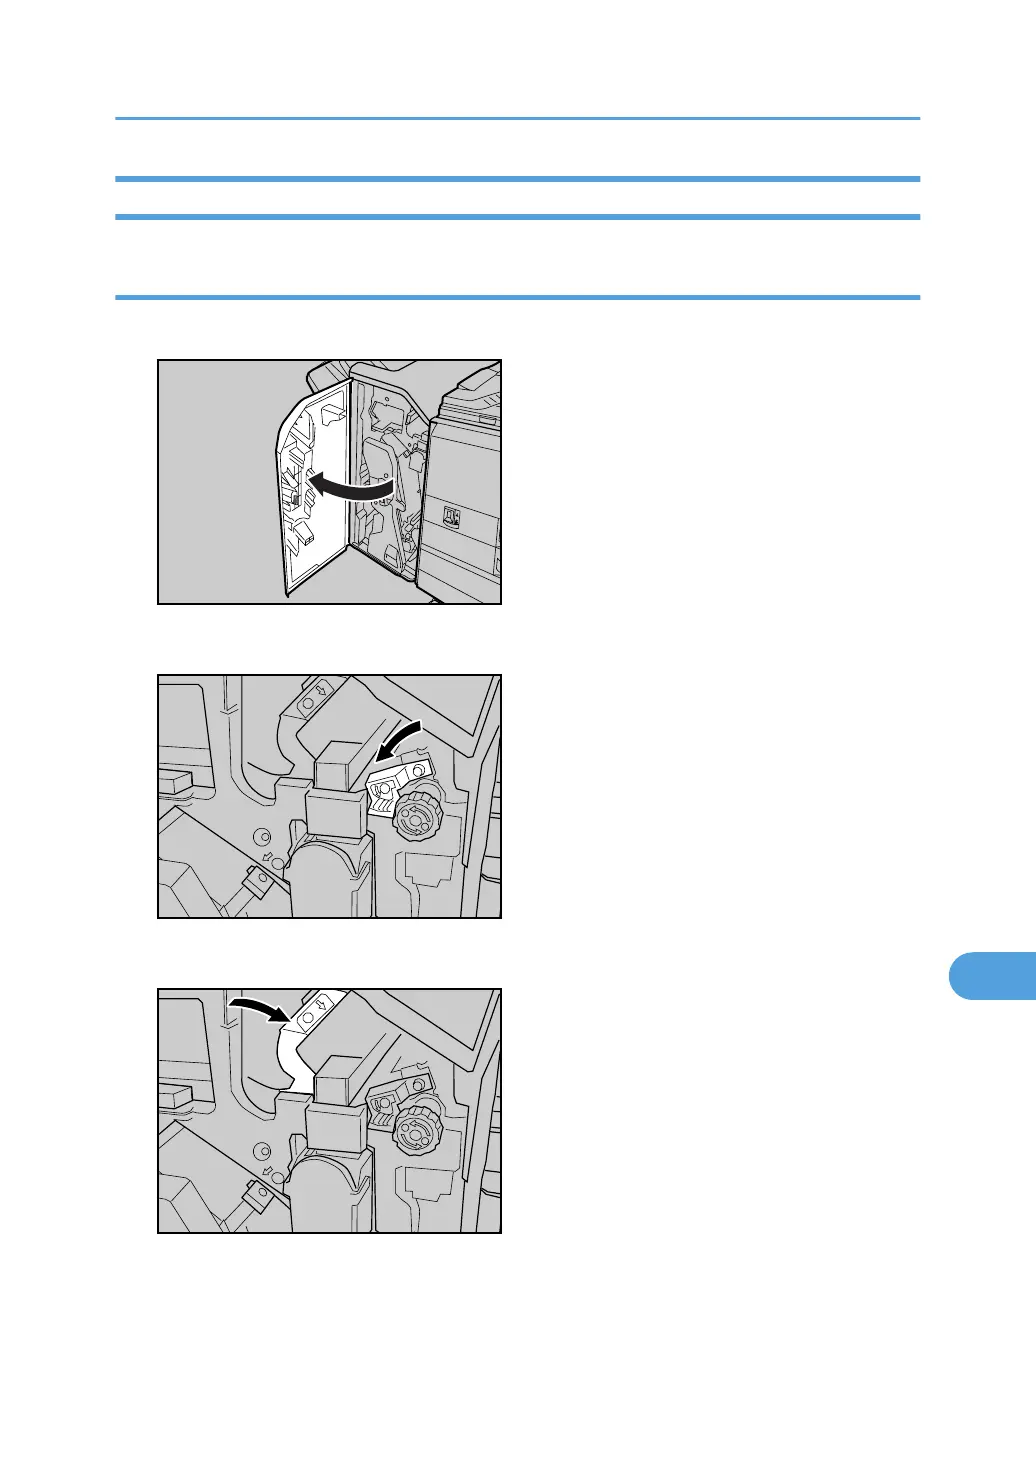
When the 2 Tray Finisher is Installed
When R1, R2, R3, or R4 is displayed.
1.
Open the front cover of the finisher.
ASZ272S
2.
Turn the R1 lever counterclockwise.
ASZ207S
3.
Open the R3 lever.
ASZ208S
Paper Misfeed Message (R)
213
10
214
216
Table of Contents
Default Chapter
1
Operating Instructions
1
Table of Contents
3
Positions of WARNING and CAUTION Labels
7
Manuals for this Printer
9
How to Read this Manual
10
Description for the Specified Model
11
Installing the Operating Instructions
12
1 Guide to the Printer
13
Exterior: Front View
13
Exterior: Rear View
15
Interior
17
Control Panel
19
Menu Key
19
Online Key
20
Display Panel
21
Reading the Display and Using Keys
22
Ok Key
22
2 Installing Options
23
Available Options
23
Order of Option Installation
24
Installing Options
25
Cautions When Re-Installing the Controller Board
28
Attaching the Optional Paper Feed Unit
29
Attaching the 500-Sheet Paper Feed Unit to the 1000-Sheet Paper Feed Unit
30
Attaching the Paper Feed Unit
32
Attaching the SDRAM Module
37
Installing the User Account Enhance Unit
41
Installing the Gigabit Ethernet Board
45
Installing the IEEE 802.11B Interface Unit
48
Installing the Bluetooth Interface Unit
51
Installing the IEEE 1284 Interface Board
54
Installing the USB Host Interface Board
56
Installing a Camera Direct Print Card or Security Card
58
3 Connecting the Printer Cables
61
Ethernet Cable Connection
61
Reading the LED Lamps
63
USB Cable Connection
64
Digital Camera Connection
65
Parallel Cable Connection
68
4 Configuration
69
Ethernet Configuration
69
Specifying an IP Address (no DHCP)
70
Receiving an IP Address Automatically (DHCP)
72
Configuring Network Settings When Using Netware
74
Setting the Ethernet Speed
75
IEEE 802.11B (Wireless LAN) Configuration
78
Setting the SSID
80
Setting a WEP Key
81
5 Paper and Other Media
83
Supported Paper for each Tray
83
Symbols
83
Tray 1
83
Tray 2, 500/1000-Sheet Paper Feed Unit (Tray 3 to 5)
83
2000-Sheet Paper Feed Unit (Tray 3)
85
Bypass Tray
85
Paper Recommendations
88
Loading Paper
88
Storing Paper
88
Types of Paper and Other Media
88
Plain Paper
89
Thick Paper
90
Thin Paper
91
Ohp Transparencies
91
Label Paper
93
Glossy Paper
93
Coated Paper
94
Special Paper
95
Paper Not Supported by this Printer
97
Print Area
97
Loading Paper
99
Loading Paper into the Paper Tray, 500/1000-Sheet Paper Feed Unit
99
Specifying a Paper Type
106
Loading Paper into the 2000-Sheet Paper Feed Unit
107
Loading Paper in the Bypass Tray
109
6 Replacing Consumables
115
Replacing Toner
115
Replacing the Photo Conductor Unit
119
Replacing the Intermediate Transfer Unit and Dustproof Filter
126
Replacing the Intermediate Transfer Unit
126
Replacing the Dustproof Filter
132
Replacing the Waste Toner Bottle
134
Replacing the Fusing Unit and Transfer Roller
139
Replacing the Fusing Unit
139
Replacing the Transfer Roller
142
Adding Staples
144
When the Booklet Finisher Is Installed
145
When the 2 Tray Finisher Is Installed
149
7 Cleaning the Printer
153
Cautions When Cleaning
153
Cleaning the Friction Pads
154
Paper Tray, 500/1000-Sheet Paper Feed Unit
154
2000-Sheet Paper Feed Unit
155
Cleaning the Registration Roller
157
Cleaning the Dustproof Glass
159
8 Adjusting the Printer
161
Adjusting the Color Registration
161
Correcting the Color Gradation
163
Setting the Gradation Correction Value
163
Viewing the Color Calibration Sample Sheet and Gradation Correction Sheet
165
Resetting the Gradation Correction Value to the Initial Value
167
Adjusting Printing Position
169
9 Troubleshooting
173
Error and Status Messages Appears on the Control Panel
173
Panel Tones
176
Printer Does Not Print
177
Checking the Port Connection
179
Printing Problems
180
Additional Troubleshooting
188
Removing Jammed Staples
190
When the Booklet Finisher Is Installed
190
When the 2 Tray Finisher Is Installed
193
Removing Punch Waste
196
When the Booklet Finisher Is Installed
196
When the 2 Tray Finisher Is Installed
197
10 Removing Misfed Paper
199
Paper Misfeed Message (A)
200
Paper Misfeed Message (B)
202
Paper Misfeed Message (C)
204
Paper Misfeed Message (D)
207
Paper Misfeed Message (R)
209
When the Booklet Finisher Is Installed
209
When the 2 Tray Finisher Is Installed
215
Paper Misfeed Message (Y)
219
Paper Misfeed Message (Z)
220
Duplex Print Always Misfeeds
222
11 Appendix
225
Moving and Transporting the Printer
225
Moving the Printer
225
Consumables
228
Toner
228
Photo Conductor Unit
229
Waste Toner Bottle
229
Staple Cartridge
229
Intermediate Transfer Unit
230
Fusing Unit
230
Specifications
231
Mainframe
231
Options
233
Index
245
Other manuals for Ricoh Aficio SP C811DN
Software Guide
384 pages
4
Based on 1 rating
Ask a question
Give review
Questions and Answers:
Need help?
Do you have a question about the Ricoh Aficio SP C811DN and is the answer not in the manual?
Ask a question
Ricoh Aficio SP C811DN Specifications
General
Brand
Ricoh
Model
Aficio SP C811DN
Category
Printer
Language
English
Related product manuals
Ricoh Aficio SP C840DN
328 pages
Ricoh Aficio SP C820DN
288 pages
Ricoh Aficio SP C311N
306 pages
Ricoh Aficio SP C231N
152 pages
Ricoh Aficio SP C430DN
260 pages
Ricoh Aficio SP C320DN
260 pages
Ricoh Aficio SP C242DN
172 pages
Ricoh Aficio SP C232DN
288 pages
Ricoh Aficio SP C440DN
654 pages
Ricoh Aficio SP C431DN
58 pages
Ricoh Aficio SP C730DN
100 pages
Ricoh Aficio SP 5200DN
824 pages