Workman 1100/1110/2100/2110 Page 6 – 25 Electrical System
Installation
IMPORTANT: To prevent possible electrical prob-
lems, install only a fully charged battery.
1. Make sure the ignition switch and all accessories are
off.
2. Make sure the battery base is clean and repainted if
necessary.
3. Make sure battery cables, battery connections, and
the battery hold down strap are in good condition.
4. Set battery on the battery base with its posts toward
the rear of the vehicle. Push the positive cable (red) con-
nector onto positive battery post. Do not hammer; this
will damage the battery. Tighten bolt and wing nut.
5. Secure battery to the base with rubber strap.
6. Connect a digital multimeter (set to amps) between
the negative battery post and the negative cable (black)
connector. The reading should be less than 0.1 amp. If
the reading is 0.1 amp or more, the unit’s electrical sys-
tem should be tested and repaired.
7. Connect negative cable (black) connector to the
negative battery post. Tighten bolt and wing nut.
8. Apply a light coat of grease on battery posts and
cable connectors to reduce corrosion after connections
are made.
Charging
To minimize possible damage to the battery and allow
the battery to be fully charged, the slow charging meth-
od is presented here. This charging method can be ac-
complished with a constant current battery charger
which is available in most shops.
CAUTION
Follow the manufacturer’s instructions when us-
ing a battery charger.
NOTE: Using specific gravity of the battery cells is the
most accurate method of determining battery condition.
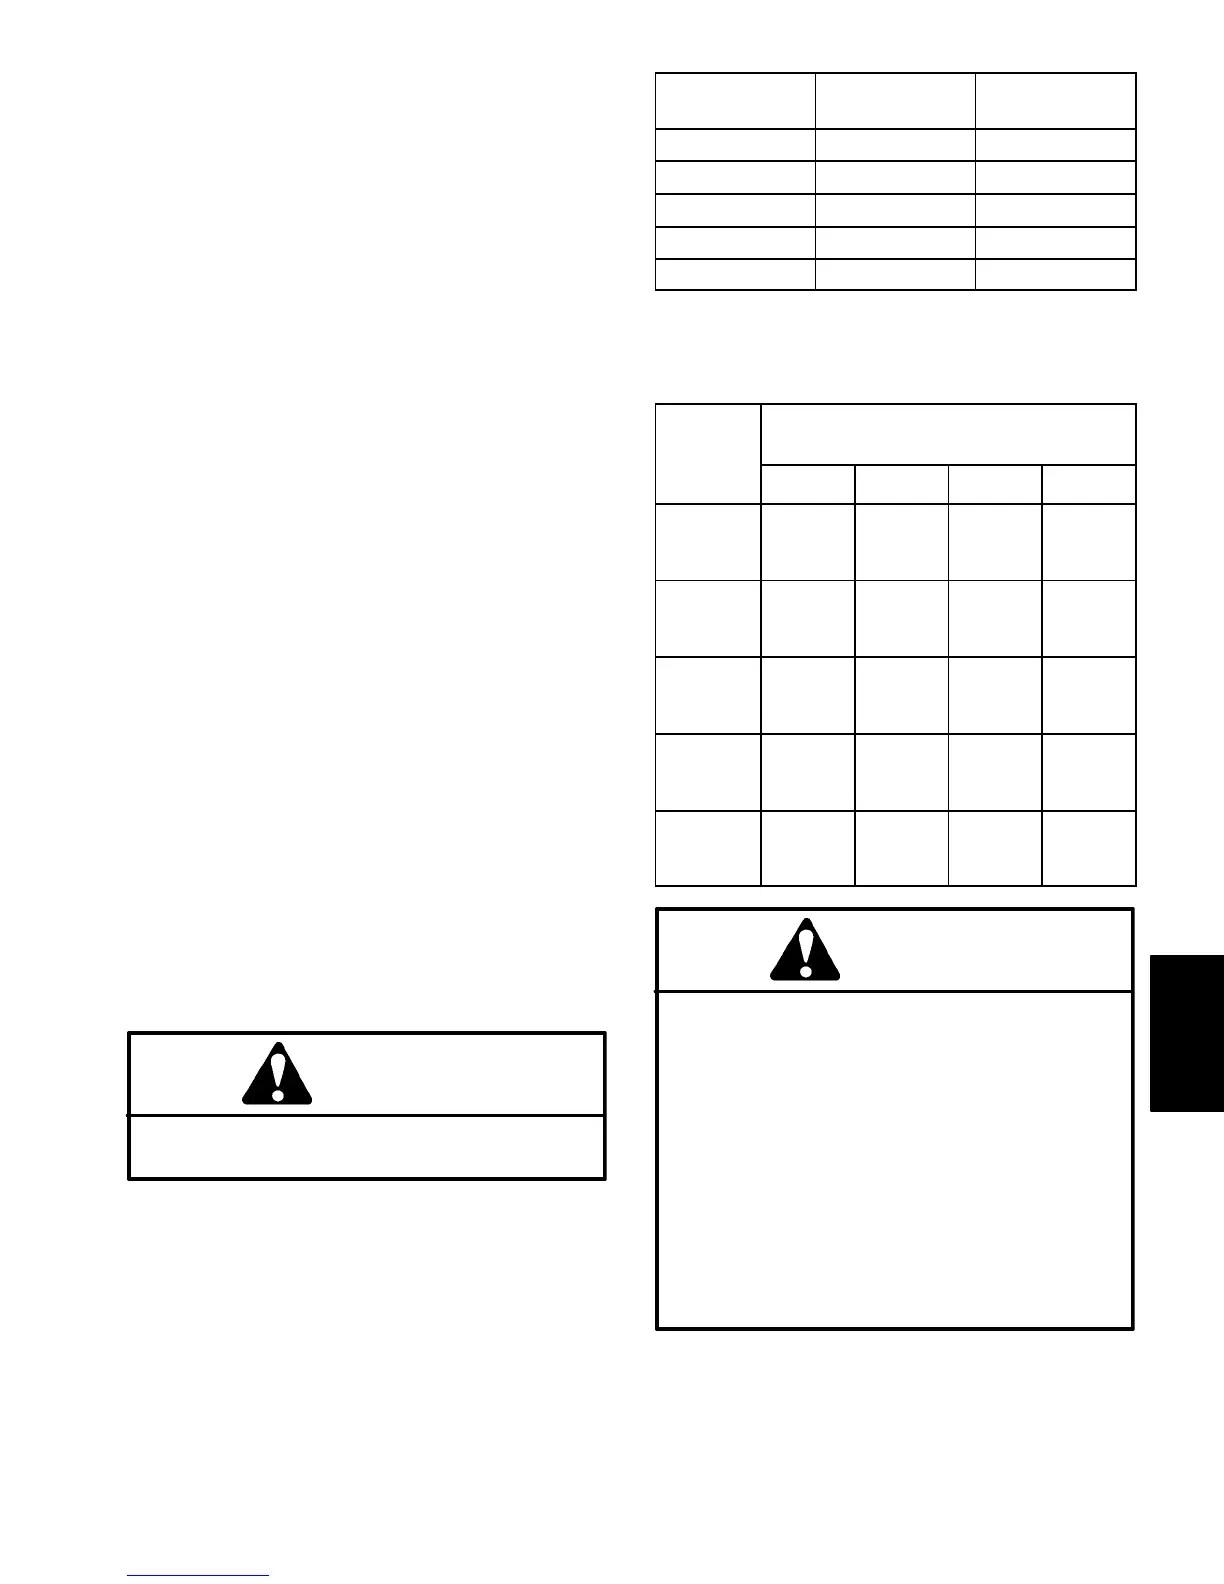
1. Determine the battery charge level from either its
open specific gravity or circuit voltage.
Battery Charge
Level
Specific
Gravity
Open Circuit
Voltage
100% 1.265 12.68
75% 1.225 12.45
50% 1.190 12.24
25% 1.155 12.06
0% 1.120 11.89
2. Determine the charging time and rate using the
manufacturer’s battery charger instructions or the
following table.
Battery
Reserve
(Minutes)
75% 50% 25% 0%
80 or less 3.8 hrs
@
3 amps
7.5 hrs
@
3 amps
11.3 hrs
@
3 amps
15 hrs
@
3 amps
81 to 125 5.3 hrs
@
4 amps
10.5 hrs
@
4 amps
15.8 hrs
@
4 amps
21 hrs
@
4 amps
126 to
170
5.5 hrs
@
5 amps
11 hrs
@
5 amps
16.5 hrs
@
5 amps
22 hrs
@
5 amps
171 to
250
5.8 hrs
@
6 amps
11.5 hrs
@
6 amps
17.3 hrs
@
6 amps
23 hrs
@
6 amps
above
250
6 hrs
@
10 amps
12 hrs
@
10 amps
18 hrs
@
10 amps
24 hrs
@
10 amps
CAUTION
Do not charge a frozen battery because it can ex-
plode and cause injury. Let the battery warm to
60
o
F (15.5
o
C) before connecting to a charger.
Charge battery in a well–ventilated place to dissi-
pate gases produced from charging. These
gases are explosive.
Keep open flame and electrical spark away from
the battery. Do not smoke. Unplug the charger
from the electrical outlet before connecting or
disconnecting the charger leads from the battery
posts.
Nausea may result if the gases are inhaled.
3. Follow the manufacturer’s instructions. Connect
charger cables to the battery. Make sure a good connec-
tion is made.
Electrical
System

 Loading...