™
Page 46 of 81
6 Loc3-10Tx Transmitter
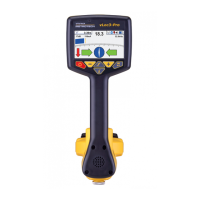
6.1.2 Pushbuttons
1 On/O control
2 Frequency select
3
Information (Volume, Volts, Ohms, Multi-frequencies
LCD contrast, Bluetooth menu, Frequency menu)
4 Output decrease/Navigate through menu
5 Output increase/Navigate through menu
6.1.3 Information Pushbutton
Volume
Voltage
Resistance
Multi Frequency
LCD Contrast
Bluetooth Menu
Frequency Menu
Pushbutton Pushbutton
Volume
Voltage
Resistance
Multi Frequency
LCD Contrast
Bluetooth Menu
Frequency Menu
Pushbutton Pushbutton
When the “i” (information) pushbutton is pressed, the display will show the volume level of the audio; use the “+” and “-”
pushbuttons to increase/reduce the volume or turn the beeper o (o – low – medium – high).
Keep pressing the “i” (information) pushbutton, the display can be toggled to show “voltage”, “resistance” or other functions as
shown in the drawing above. The display indicates mA, as the default, and volts or ohms when selected.
NOTE: The number of “i” button presses, and available sub-menus will vary with the mode the transmitter is.
6.1.4 Connections Block
1 Output connection
2 Output protection (Fuse)
3 Loudspeaker
4 Battery charging socket & DC input
All the connections made to the transmitter are made at the connection block except for a USB socket which is mounted inside
the battery compartment and is used for the transmitter’s software upgrade.
The connection block consists of:
● Output (XLR) socket – for the direct connection lead and clamp.
Charger socket (to charge rechargeable battery pack – the charging socket is present even if rechargeable batteries have
not been purchased).
1 3
4 5
2
1
2
3
4
FUSE
 Loading...