Service cases - hardware
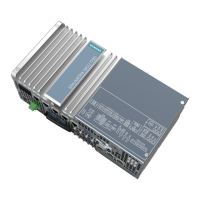
4.6 Expansion module NX10.3
Hardware and Software
Service Manual, 03/2011, 6FC5397-5DP40-0BA0
113
NOTICE
Electro-static discharge (ESD)
Before you touch the component, discharge yourself at the cabinet or at the ground
terminal.
Procedure:
1. Switch-off the control: Completely switch off the system. Check that the system is in a no-
voltage condition and is locked-out so that it cannot be switched on again without the
appropriate authorization.
2. Access the control cabinet where the NX10.3 is located.
3. Use a multimeter to check that the system really is in a no-voltage condition (isolated
from the supply).
4. Open the cover cap of the NX10.3 module.
5. If it has not already been done, label all connectors and cables that lead to the module
now. Only then, can it be ensured that the cables are not interchanged.
6. Withdraw the electronics power supply X124.
7. Withdraw the digital input/output terminal X122.
8. Withdraw any connected DRIVE-CLiQ cables X100 - X103.
9. Remove the protective conductor connection of the NX10.3.
10. Release the screws retaining the NX10.3 to the mounting plate.
– OR –
11. If the module is located to the left of the infeed, remove the module by first pulling it
upwards and then removing it towards the left.
4.6.4 This is how you install the NX10.3
Installing
Procedure:
1. Screw the new NX10 to the mounting plate.
– OR –
2. If the module was located to the left of the infeed, re-attach it here by first introducing the
NX10 into the holder to the right and then press it down slightly to retain it.
3. Reconnect the protective conductor connection of the NX10.
4. Insert the DRIVE-CLiQ cables that were previously withdrawn into sockets X100-X103.
5. Insert the digital input/output terminal X122 into the NX10.
6. Reconnect the electronics power supply X124.
 Loading...