58 Installation and maintenance instructions 0020308118_05
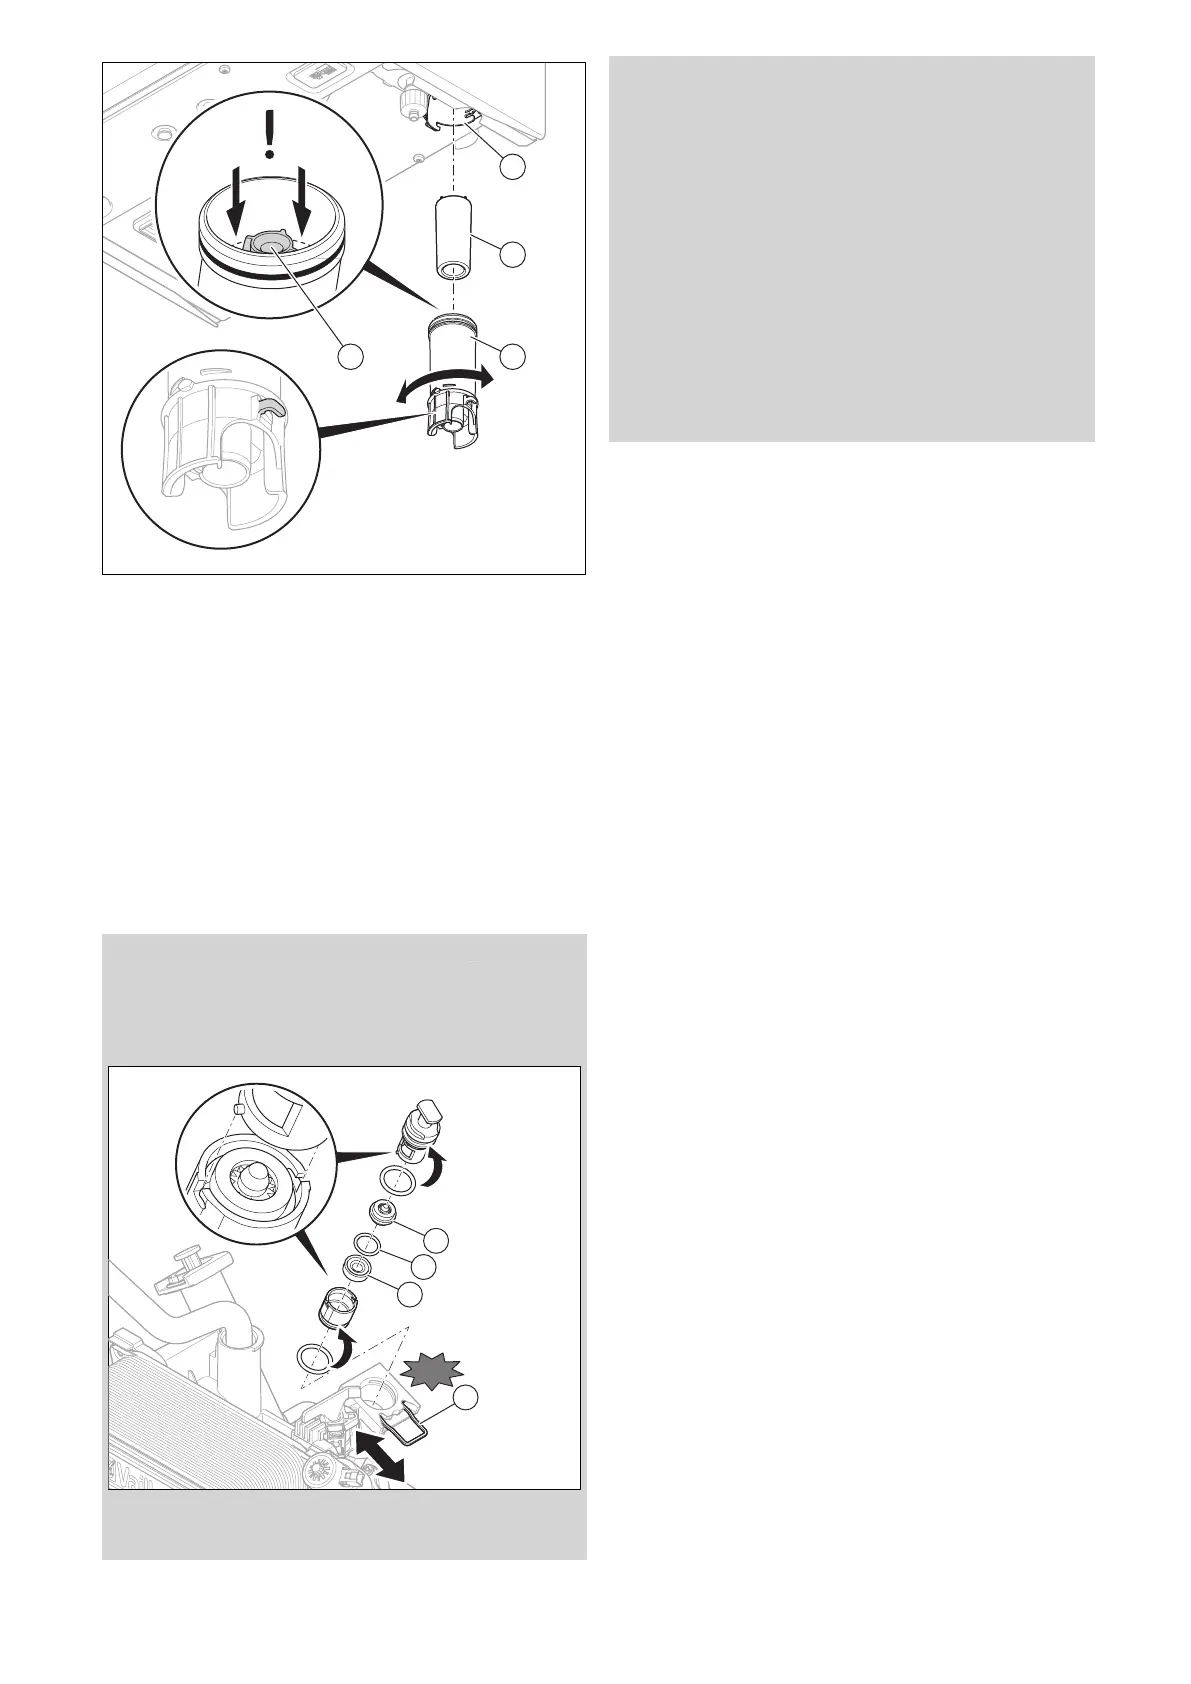
2. Loosen the lower section of the siphon (3) by turning
the upper section of the siphon (1) by a quarter turn
and pull it downwards and out.
3. Remove the float (2).
4. Flush out the lower section of the siphon with water.
5. Fill the lower section of the siphon with water up to a
filling level 10 mm below the condensate discharge (4).
6. Insert the float.
7. Install the lower section of the siphon on the condens-
ate siphon.
8. Reinstall the condensate adapter and check for tight-
ness.
12.8.6 Cleaning the strainer in the cold water inlet
Validity: Product with integrated hot water generation
1. Close the cold-water isolation valve.
2. Drain the product on the domestic hot water side.
3. Hinge the electronics box forwards.
4. Pull the clip (4) out to the maintenance position. The
clip is secured against falling out.
5. Pull the assembly straight out of the product without
any rotational movement.
6. Disconnect the lowest section of the assembly by
rotating the upper section.
7. Note the installation position. Remove the flow rate
limiter (1), O-ring (2) and strainer (3).
8. Rinse the strainer under a jet of water, holding it
against the direction of flow.
9. If the strainer is damaged or it can no longer be
cleaned sufficiently, you must replace the strainer.
10. Always use new O-rings. Reinsert the flow rate lim-
iter.
11. Reinsert the strainer, O-ring and flow rate limiter in
the correct installation position.
12. Slide the clip back in until you hear it click into place.
13. Open the cold-water isolation valve.
12.8.7 Completing cleaning and inspection work
1. Install the compact thermal module. (→ Section 12.7.2)
2. Hinge the electronics box upwards.
3. Open all service valves and the gas stopcock if this has
not yet been done.
4. Check the product for tightness. (→ Section 9.17)
5. Install the front casing. (→ Section 7.11)
6. Ensure that the front casing incl. front panel is com-
pletely installed below the display.
7. If required, install the modules below the product (→
Module installation instructions).
8. Establish the power supply if this has not yet been
done.
9. Switch the product back on if this has not yet been
done. (→ Section 9.4)
12.8.8 Checking the Protection kit, if available
▶ If a Protection kit is available, follow the instructions for
the Protection kit for the check.
12.8.9 Checking the filling pressure of the heating
installation
1. Check the filling pressure of the heating installation, top
it up with heating water, if necessary, and purge it.
2. Fill the heating installation. (→ Section 9.9)
3. Purge the heating installation. (→ Section 9.10)
12.8.10 Checking the quality of the heating water
▶ Check the quality of the heating water: Clarity (clouding),
correct inhibitor and pH value. (→ Section 9.3)
12.9 Draining the product
1. Temporarily decommission the product.
(→ Section 14.2)
2. Close the service valves of the product.
3. Close the gas stopcock.
4. Start up the product.
5. Start check programme P.008. (→ Section 8.4)
6. Open the drain valves.
◁ The product (heating circuit) is drained.
7. Close the drain valve.
8. Temporarily decommission the product.
(→ Section 14.2)
 Loading...