Home
GE
Medical Equipment
LOGIQ V1
GE LOGIQ V1 User Manual
5
of 1
of 1 rating
381 pages
Give review
Manual
Specs
To Next Page
To Next Page
To Previous Page
To Previous Page
Loading...
Scan Coach (Option)
LOGIQ V2/LOGI
Q V1
–
User Gui
de
2-33
Direction 5610736-
100
Rev. 9
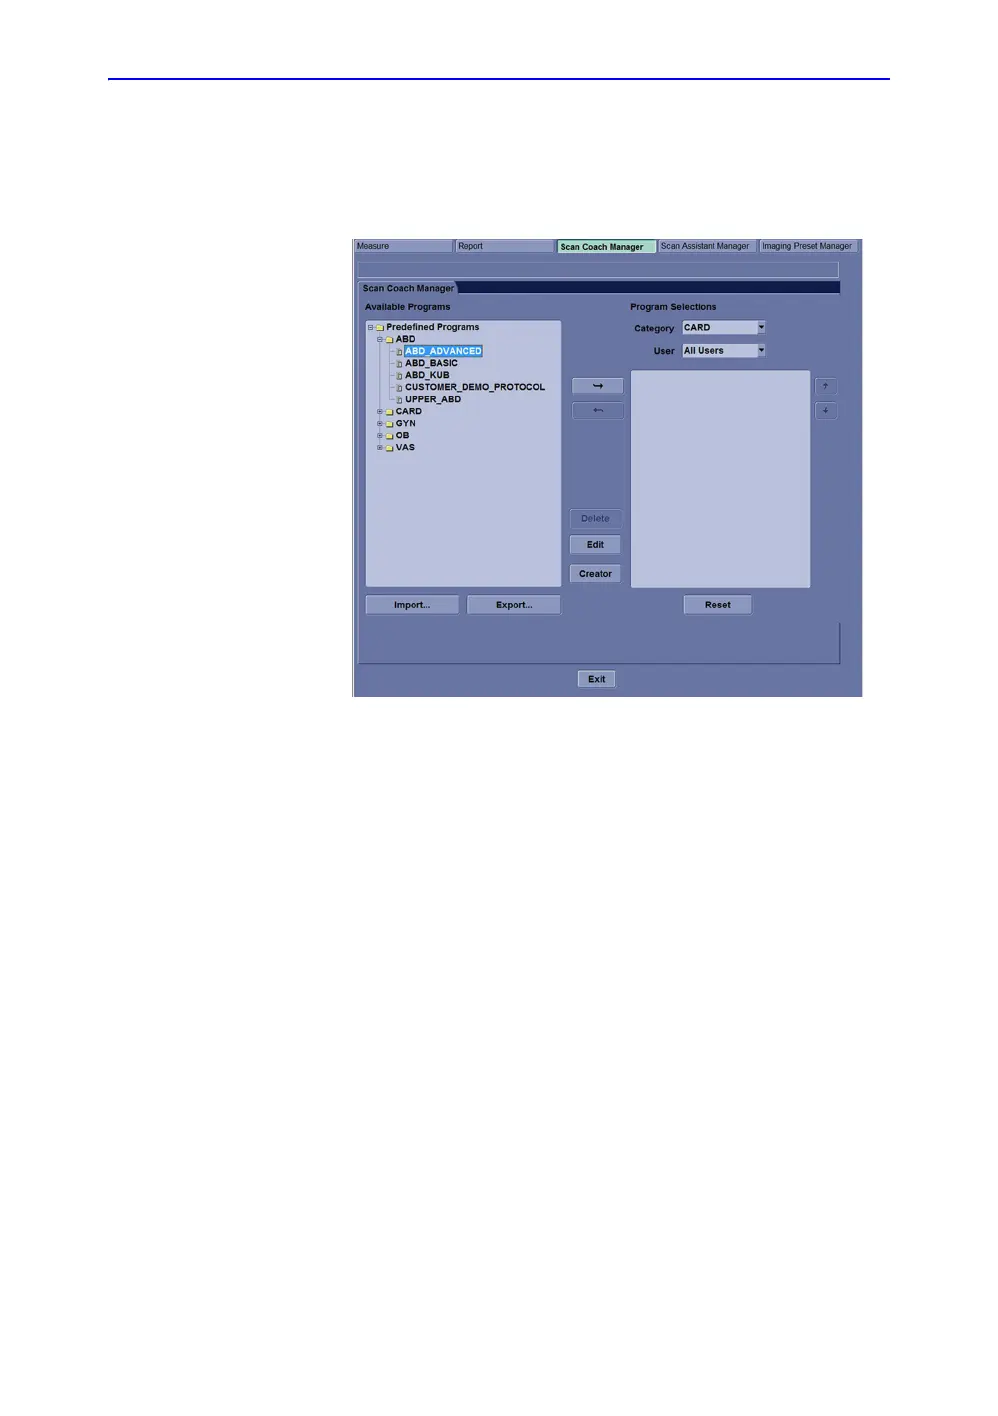
Setting up Scan Coach (For R1.1.x)
Go to Utility -> Scan Coach -> Scan Coac
h Mana
ger to create,
import/export and manage
the Scan Coach programs.
Figure
2-16.
Setting up scan coa
ch
124
126
Table of Contents
Default Chapter
5
Conformance Standards
5
Certifications
6
Original Documentation
6
Country-Specific Approval
7
Importer Information
7
Table of Contents
9
Getting Started
13
Regulatory Requirements
5
Chapter 1 - Getting Started
14
Overview
14
Attention
14
Principles of Operation
16
Intended Use
16
Indications for Use
17
Frequency of Use
17
Operator Profile
17
Clinical Applications
18
Contraindication
18
Prescription Device
18
Site Requirements
19
Introduction
19
Before the System Arrives
20
Power Requirements
20
Electromagnetic Interferences
20
Environmental Requirements
22
System Environmental Requirements
22
Operating Environment
22
Console Graphics
23
LOGIQ V2/LOGIQ V1 System - an Example
23
LOGIQ V2/LOGIQ V1 System
24
Battery
25
Temperature Requirements
25
Discharge/Charge Cycle
27
View Current Battery Status
28
Battery Icon
28
Low Power Battery Icon
28
Warning Battery Icon
28
Battery Power Low Warning
29
Low Battery Power Warning on Status Bar
29
System Shutdown Warning
29
Battery Error
30
Battery Error Icon
30
Battery Installation
31
Battery Removal
32
AC Adapter
33
Peripheral/Accessory Connector Panel
34
Peripherals Connection
36
Printers Connection
36
Other Peripheral Ports Connection
40
Attaching the Security Cable
42
Security Cable
42
LOGIQ V2/LOGIQ V1 with Security Cable
42
Set up Wired Footswitch
43
3-Footswitch Setting
43
1-Footswitch Setting
43
Control Panel Map
44
Keyboard
45
User Defined Keys
46
Primary Menu Keys
46
User Configurable Key Preset Menu
46
Button Description
47
Mode, Display and Record
47
Measurement and Annotation
48
Monitor Display
49
Monitor Display Tour
49
Using the Monitor Display Controls to Manage Images
50
Active Images
50
Delete
50
Next Clipboard Image
51
Clipboard Slide Show
51
Save as Menu
51
Number of Images in Exam
51
LCD Monitor
52
Locking/Unlocking the LCD Monitor
52
Adjusting the LCD Monitor
52
Brightness
53
Volume
54
Moving the System
55
Before Moving the System
55
When Moving the System
56
Transporting the System
56
System Start-Up
57
Connecting the System
57
Acclimation Time
58
Example Plug and Outlet Configurations
58
System Acclimation Time Chart
58
Connecting to the Electrical Outlet
59
Connect the System to the Electrical Supply
59
To Turn on the System
60
Power On/Off Switch Location
60
Power up Sequence
61
Led
62
LED Indicators
62
Keyboard Backlight
62
Login
62
Power off
63
Sleep Mode (for R1.1.X)
64
Check System Date and Time
65
Check System Date and Time Message
65
Connecting the Probe
66
Introduction
66
Probe Connection to LOGIQ V2/LOGIQ V1
67
Probe Connector Locking Lever
67
Cable Handling
68
Disconnecting the Probe
68
2-Probe Port Adapter (Option)
69
Mounting 2-Probe Port Adapter to LOGIQ V2/LOGIQ V1
69
Connecting Probes to the 2-Probe Port Adapter
71
Selecting the Probe
71
Beginning an Exam
72
Archive Screen (for R1.0.X)
72
Archive Screen (for R1.1.X)
74
Scanning a New Patient
74
Patient Screen (for R1.0.X)
76
Patient Screen (for R1.1.X)
77
Starting a New Exam on an Existing Patient
81
Exam View
81
Scanning Without Entering any Patient Data
82
Unsaved Exam Data
82
Changing Current Patient to Existing Patient (for R1.0.X)
84
Changing Current Patient to Existing Patient (Without Patient ID)
88
End Exam
89
Deleting the Existing Patient/Exam/Image
90
Delete Multiple Patients from the Patient List
90
Deleting the Existing Image
91
Performing an Exam
93
Chapter 2 - Performing an Exam
94
Optimizing the Image
94
B-Mode Controls
94
Color Flow Mode Controls
97
M-Mode Controls
99
M Color Flow Mode
99
Doppler Mode Controls
100
Acquiring a 3D Scan
102
3D Package Options
102
Easy 3D Mode (Option)
102
Other Controls
103
Zoom
103
Read Zoom
103
Using Read/Write Zoom
104
Write Zoom
105
Split Screen
106
Freezing an Image
106
Activating CINE
106
Body Patterns
107
Annotating an Image
108
Scan Coach (Option)
109
Statement
109
Introduction
111
Using Scan Coach (for R1.0.X)
112
Scan Coach Display Description
120
Setting up Scan Coach (for R1.0.X)
124
Setting up Scan Coach (for R1.1.X)
125
Edit Scan Coach Protocol
126
Sonobiometry (AFB) (Option)
131
Sonobiometry Checkboxes
132
Using Sonobiometry
132
Using the Fast Key
135
Create a Fast Key
135
Overview
135
Start a Fast Key
136
Backup and Restore the Fast Key
136
Quantitative Analysis (Qanalysis)
137
Activating Qanalysis
137
Exiting Qanalysis
137
Measurement and Analysis
138
Introduction
138
Location of Measurement Controls
139
B-Mode Measurements
140
Distance Measurement
141
Circumference and Area (Ellipse) Measurement
142
Before You Complete the Ellipse Measurement
142
Circumference and Area (Trace) Measurement
143
Trace
143
Open Trace
144
Circumference and Area (Spline Trace) Measurement
145
Edit the Spline Trace
146
Edit Spline Trace
146
Intensity (Echo Level) Measurement
147
To Make an Echo Level Measurement
147
Doppler Mode Measurements
148
Velocity
148
TAMAX and TAMEAN
149
Manual Trace
149
Auto Trace
150
To Auto Trace TAMAX
150
Slope (Velocity, Time Interval and Acceleration)
151
Time Interval
151
To Measure a Horizontal Time Interval
151
M-Mode Measurements
152
Tissue Depth
152
Wide Dual Screen Measurements (for R1.1.X)
154
Viewing and Editing Worksheets
155
To View a Worksheet
155
Worksheet Display Primary Menu
155
To Edit a Worksheet
157
To Change Data on a Worksheet
157
To Type a Comment on a Worksheet
157
Delete All Worksheet Values
158
Defining Hot Keys
159
Hot Keys for Measurements
159
Clinical Measurement Accuracy
160
Basic Measurements
160
System Measurements and Accuracies
161
Setting up the Off-Line Paper Printer
162
After the Exam Is over
163
Presets
164
Chapter 3 - after the Exam Is over
164
Overview
164
System Presets
165
Foreign Language and Keyboard Setup (for R1.0.X)
165
Foreign Language and Keyboard Setup (for R1.1.X)
169
Formats Selection
170
Data Backup
176
Backup and Restore
188
Backup Procedure
188
Restore Procedure
189
Backup and Restore Strategy: User-Defined Configurations
190
Preset Synchronization
190
Configuring Connectivity
191
Connectivity Functions
191
Anti-Virus Software Note
192
Electronic Documentation
193
Accessing Documentation Via a PC
193
System Data
194
Features/Specifications
194
Physical Attributes
194
System Overview
195
System Care and Maintenance
198
Overview
198
Inspecting the System
199
Weekly Maintenance
200
Cleaning the System
201
System Cabinet
201
Operator Control Panel
202
To Clean the Operator Control Panel
202
Footswitch
202
Trackball
203
Rotate the Retainer
203
Other Peripheral Maintenance
203
Other Maintenance
204
Replacing Illuminated Key Caps/Lamps
204
Battery Replacement and Disposal
204
Prevention of Static Electricity Interference
204
Disposal
205
Troubleshooting
206
System Software Updates (Software Download)
207
Software Download and Installation
208
Quality Assurance
215
Introduction
215
Typical Tests to Perform
216
Frequency of Tests
216
Phantoms
218
Baselines
219
Periodic Checks
219
Results
220
System Setup
221
Test Procedures
221
Axial Distance Measurements
222
Lateral Distance Measurements
223
Axial Resolution
224
Lateral Resolution
225
Penetration
226
Functional Resolution
227
Contrast Resolution
228
Gray Scale Photography
229
Setting up a Record Keeping System
230
Ultrasound Quality Assurance Checklist
231
Assistance
232
Supplies/Accessories
232
Contact Information
235
Contacting GE Ultrasound
235
Manufacturer
241
Safety
243
Chapter 4 - Safety
244
Owner Responsibility
244
Notice against User Modification
244
Safety Precautions
245
Precaution Levels
245
Icon Description
245
Hazard Symbols
246
Potential Hazards
246
Important Safety Considerations
247
Patient Safety
248
Related Hazards
248
Patient Identification
248
Diagnostic Information
249
Mechanical Hazards
250
Scanner and Electrosurgical Units
251
Equipment and Personnel Safety
252
Material Safe Data
256
Allergic Reactions to Latex-Containing Medical Devices
256
EMC (Electromagnetic Compatibility)
257
EMC Performance
258
General Notice
261
Peripheral Update for EC Countries
262
Peripherals Used in the Patient Environment
262
Declaration of Emissions
264
Declaration of Immunity
265
Essential Performance
266
Patient Environmental Devices
267
Acceptable Devices
268
Unapproved Devices
268
Accessories, Options, Supplies
268
Acoustic Output
269
Acoustic Output Display Specifications
269
Thermal Index
269
Mechanical Index
270
Changing the Thermal Index Type
270
TI and MI Display Accuracy
270
Controls Affecting Acoustic Output
270
Best Practices While Scanning
271
Acoustic Output Default Levels
271
Rohs LOGIQ V2/LOGIQ V1 Hazardous Substances
272
Name and Concentration of Hazardous Substances
273
Device Labels
274
Label Icon Description
274
LOGIQ V2/LOGIQ V1 - User Guide
274
Label Locations
280
LOGIQ V1 Label Location
280
LOGIQ V2 Label Location
281
LOGIQ V2/LOGIQ V1 Label Locations (for China)
282
AC Adapter Label
283
Probe Label Explanation
285
Probe Box Label
286
Probe Label UDI GTIN and Barcode Locations
286
Chapter 5 - Probes and Biopsy
289
Probe Overview
290
Ergonomics
290
Cable Handling
290
Probe Orientation
291
Labeling
291
Orientation Mark
291
Displayed Probe Information
291
Probe Naming Conventions
292
Probe Usage
292
Care and Maintenance
292
Probe Environmental Requirements
293
Probe Safety
294
Handling Precautions
294
Electrical Shock Hazard
294
Special Handling Instructions
296
Using Protective Sheaths
296
Endocavitary Probe Handling Precautions
297
Probe Handling and Infection Control
298
Probe Cleaning Process
299
Cleaning Probes
299
Probe Immersion Levels
300
Disinfecting Probes
301
Description of Pictogram on Probe Care Cards
301
Coupling Gels
305
Planned Maintenance
306
Returning/Shipping Probes and Repair Parts
306
Sterile Ultrasound Procedures
306
Probe Discussion
307
Introduction
307
Probe Indications for Use
308
Application
308
Probe Features
309
Specifications
309
Slice Thickness Specification
311
Probe Illustration
312
Convex Probe
312
Convex Probe Illustration
312
Linear Probe Illustration
312
Sector Probe Illustration
313
Biopsy Special Concerns
314
Precautions Concerning the Use of Biopsy Procedures
314
Preparing for a Biopsy
316
Displaying the Guidezone
316
Biopsy Guidezones Example
316
Biopsy Guide Availability
317
Preparing the Biopsy Guide Attachment
319
Fixed Needle Biopsy Guide Assembly
320
To Prepare the Endocavitary Probe for Use
320
Installing the Sheath
321
Endocavitary Probe with Sheath
321
Biopsy Guide Preparation
322
Disposable Biopsy Guide 5 Degree Angle
322
Reusable Biopsy Guide
322
Multi Angle Biopsy Guide Assembly
323
Pull up and Push down the Pin
323
Probe/Bracket Alignment
324
Applying Sanitary Sheath
325
Snap the Needle Guide
325
Releasing the Needle
328
Biopsy Needle Path Verification
328
Release the Needle from Assembly
328
The Biopsy Procedure
329
Post Biopsy
330
Surgery/Intra-Operative Use
331
Preparing for Surgery/Intra-Operative Procedures
331
Applying Sterile Sheath
332
Using Onboard Help
333
Overview
334
Chapter 6 - Using Onboard Help
339
Onboard Help
339
Getting Started
339
Power Cord Connection
339
Console Buttons
340
Probe Connection
340
Facility Name Set-Up
341
System Setting
341
Date/Time Set-Up
342
Enable Options
343
Language Selection (for R1.0.X)
344
Language Selection (for R1.1.X)
346
User Preset Set-Up (for R1.0.X)
352
User Preset Set-Up (for R1.1.X)
354
Back Panel Ports
357
Peripheral Connection
357
Connectivity - Wireless or Direct Connect
358
Connect to a Printer
363
Dicom Setting
365
Back-Up/Restore the Patient Information
368
Software Version
370
Maintenance
371
Contact GE Service
373
Insite
374
Index
377
Other manuals for GE LOGIQ V1
Basic Service Manual
317 pages
Technical Publication
127 pages
5
Based on 1 rating
Ask a question
Give review
Questions and Answers:
Need help?
Do you have a question about the GE LOGIQ V1 and is the answer not in the manual?
Ask a question
GE LOGIQ V1 Specifications
General
Brand
GE
Model
LOGIQ V1
Category
Medical Equipment
Language
English
Related product manuals
GE LOGIQ V3
305 pages
GE LOGIQ V2
317 pages
GE LOGIQ V5
305 pages
GE LOGIQ V5 Expert
305 pages
GE LOGIQ e Vet
127 pages
GE LOGIQ S8 Vet
418 pages
GE LOGIQ P3 VET
348 pages
GE LOGIQ 7
394 pages
GE LOGIQ 9
570 pages
GE LOGIQ P5
532 pages
GE LOGIQ F6
167 pages
GE LOGIQ E10
778 pages
 Loading...


