EasyManua.ls Logo

Ricoh Pentax K-3 II User Manual

Ricoh Pentax K-3 II
116 pages
To Next Page IconTo Next Page
To Previous Page IconTo Previous Page
Page #72 background imageLoading...
Page #72 background image
4
Playback
70
t Memo
You can change the [Display Duration], [Screen Effect],
[Repeat Playback], and [Auto Movie Playback] settings for
slideshow in [Slideshow] of the B1 menu. Slideshow can
also be started from the Slideshow setting screen.
When you take pictures with the camera held vertically, image
rotation information is saved when shooting. When [Auto Image
Rotation] in the B1 menu is set to T (On), the image is
automatically rotated based on the rotation information during
playback (default setting).
The rotation information of an image can be changed by
following the procedure below.
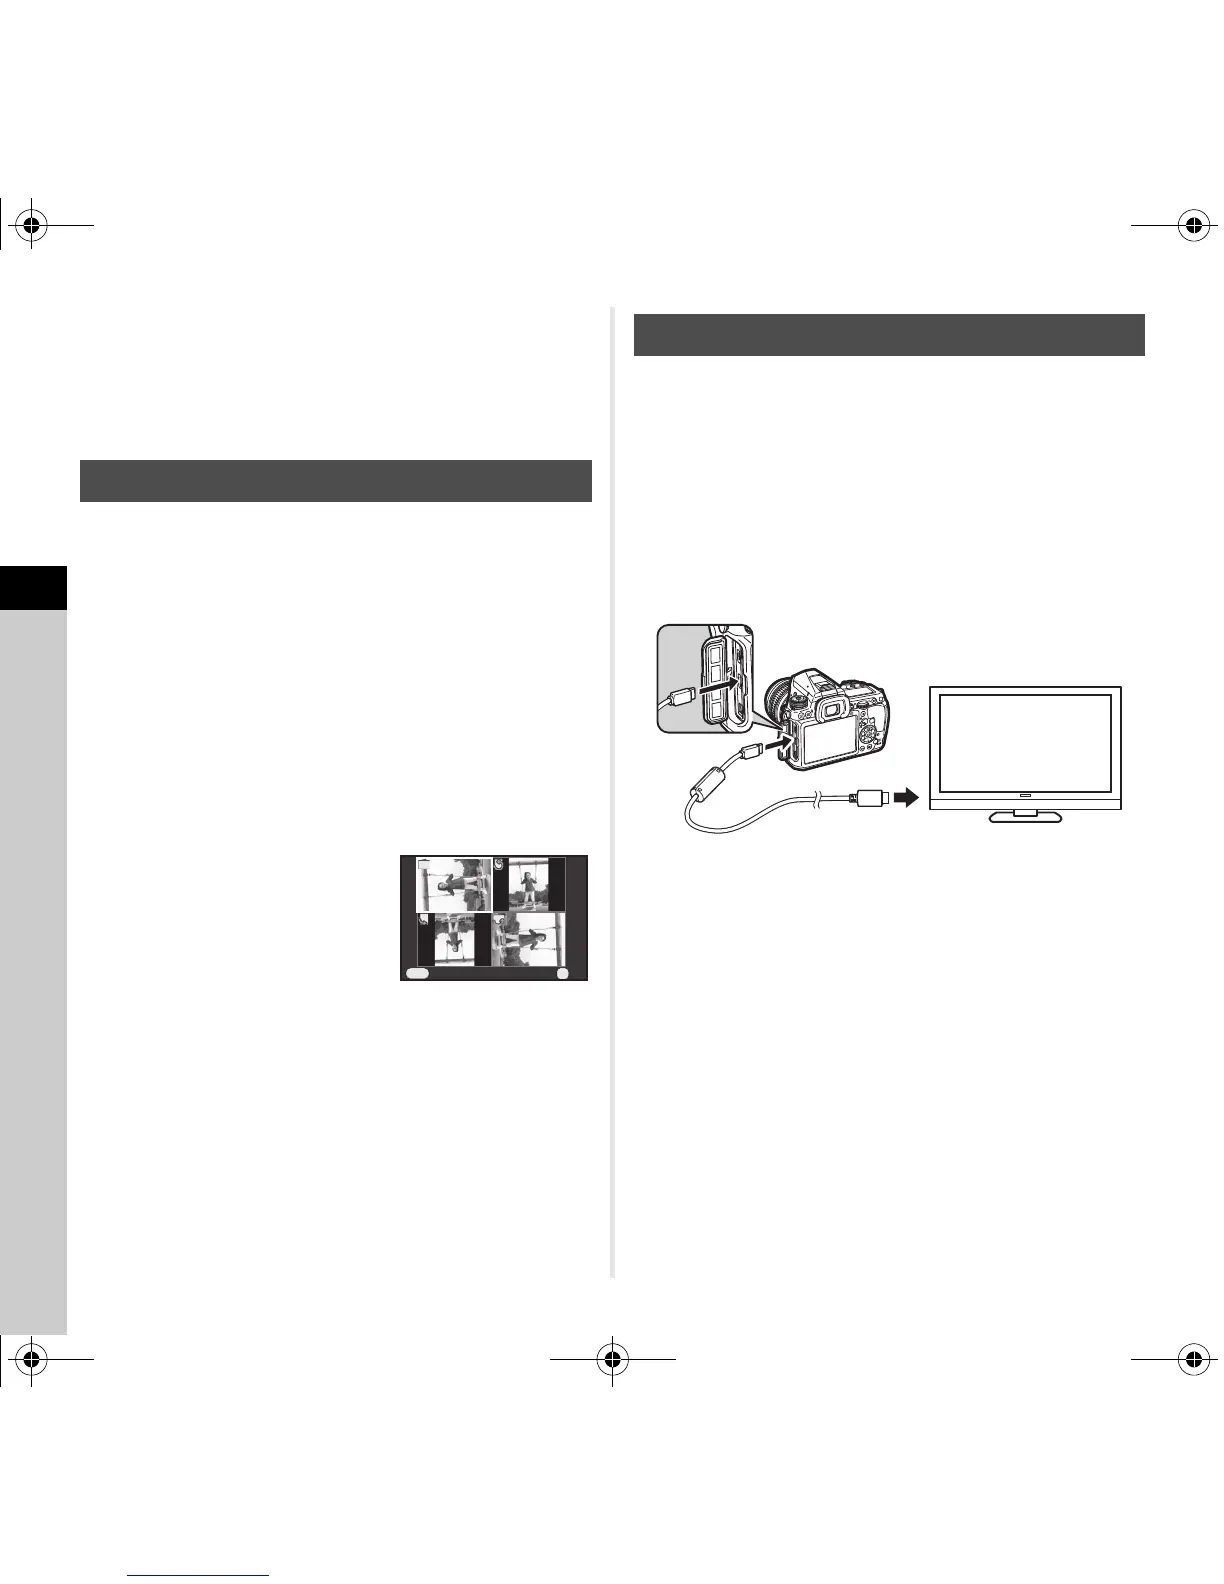
1 Display the image to edit in single image display.
2 Select S in the playback mode palette.
The selected image is rotated in 90° increments and the
four thumbnail images are displayed.
3 Use ABCD to select the
desired rotation direction and
press E.
The image rotation information
is saved.
u Caution
When [22. Save Rotation Info] is set to [Off] in the E4 menu,
image rotation information is not saved when shooting.
You cannot change image rotation information in the
following cases.
Protected images
Images without a rotation information tag
When [Auto Image Rotation] in the B1 menu is set
to S (Off)
Movie files cannot be rotated.
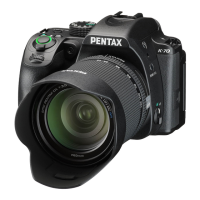
Connect to an AV device, such as a TV, equipped with an HDMI
terminal to display Live View images while shooting or to play
back images in playback mode.
Make sure to have a commercially available HDMI cable
equipped with an HDMI terminal (type D).
1 Turn the AV device and camera off.
2 Open the terminal cover of the camera, and connect
the cable to the HDMI terminal.
3 Connect the other end of the cable to the input
terminal on the AV device.
4 Turn the AV device and camera on.
The camera turns on in HDMI mode, and the camera
information is displayed on the screen of the connected
AV device.
u Caution
While the camera is connected to an AV device, nothing
is displayed on the camera monitor. Also, you cannot adjust
the sound volume on the camera. Adjust the volume on the
AV device.
Displaying Rotated Images
Cancel
Cancel
OK
OK
OK
MENU
Connecting the Camera to an AV Device
e_kb570_om.book Page 70 Friday, May 8, 2015 4:55 PM

Table of Contents

Questions and Answers:

Ricoh Pentax K-3 II Specifications

General IconGeneral
Sensor TypeCMOS
Sensor Size23.5 x 15.6 mm
Effective Pixels24.35 MP
Max Resolution6016 x 4000
Image Ratio w:h3:2
ISO Range100 - 51200
Lens MountPentax KAF2
Focal Length Mult.1.5x
Autofocus Points27
Continuous Shooting Speed8.3 fps
Viewfinder TypeOptical (Pentaprism)
LCD Screen Size3.2"
Screen Dots1, 037, 000
Articulated LCDNo
Max Shutter Speed1/8000 sec
Video Resolution1920 x 1080
Battery Life720 shots
Weight800 g (1.76 lb)
Camera TypeDigital SLR
FormatJPEG, RAW
Storage TypesSD/SDHC/SDXC
USBUSB 2.0

Summary

How to Use This Manual

Names and Functions of the Working Parts

Identifies and describes all external and internal camera components and their purposes.

How to Change Function Settings

Details methods to adjust camera functions via direct keys, control panel, and menus.

Getting Started

Attaching a Lens

Instructions for correctly mounting and removing camera lenses, ensuring proper alignment.

Using the Battery and Charger

Guide on charging the camera's lithium-ion battery and safe handling of the charger.

Inserting a Memory Card

Instructions for inserting SD, SDHC, SDXC, Eye-Fi, and Flucards into the camera.

Initial Settings

Covers turning the camera on and performing essential initial configurations like language and date.

Basic Shooting Operation

Explains fundamental steps for taking pictures in the default Green mode.

Shooting

Configuring the Capture Settings

Settings for memory cards, image capture, and movie capture parameters like format and pixels.

Taking Still Pictures

Guide to selecting suitable exposure modes (P, S, A, M) for still photography.

Recording Movies

Step-by-step instructions for recording video, including focus and sound options.

Playback

Settings

Appendix

Related product manuals