6.
Replace the shield angle clamps and mounting screws
on
the rear subpanel. Tighten the two hex-head screws
inside the rear of the
CRT
shield.
7.
Replace the graticule lights and securing
nuts.
8.
Replace the
CRT
socket.
9.
Re·connect
the anode connector. Align the jack on the
CRT
and then plug
in
the connector and press
firmly
on the
insulated cover to snap the plug into place.
10.
Reconnect the trace-rotation and y-axis leads.
11.
Reconnect the deflection-plate connectors. Correct
location
is
indicated on the
CRT
shield.
12.
Adjust the
High
Voltage,
TRACE
ROTATION,
ASTIG,
Y-Axis
Align and Geometry adjustment. Adjustment proce-
dure
is
given
in
the Calibration section.
Also
check the basic
vertical and horizontal gain.
Transistor Replacement. Transistors should not be
re-
placed
unless
actually defective. If removed
from
their
sockets during routine maintenance, return them to their
original sockets. Unnecessary replacement of transistors
may affect the calibration of
this
instrument. When trans-
istors
are
replaced, check the operation of that part of the
instrument
which
may
be·
affected.
CAUTION
POWER
switch must
be
turned
off
before
removing
or replacing transistors.
Replacement transistors should be of the original type
or a direct replacement.
Fig.
4-2
shows the lead configura-
tion of the transistors used
in
this
instrument. Some plastic
case transistors have lead configurations which do not agree
with
those shown here.
If
a transistor
is
replaced
by
a
transistor
which
is
made
by
a different manufacturer than
the original, check the manufacturer's basing diagram for
correct basing.
All
transistor sockets
in
this
instrument are
wired for the basing used for metal-case transistors. Trans-
istors
which
have heat radiators or are mounted
on
the
chassis
use
silicone grease to increase heat transfer. Replace
the silicone grease when replacing these transistors.
WARNING
Handle
silicone
grease
with
care.
Avoid
getting
silicone
grease
in
the
mouth
or
eyes.
Wash
hands
thoroughly
after
use.
Two
transistors
in
both the Channel l and Channel 2
Pre-
amp circuit (Vertical Preamp circuit board) are permanently
mounted
in
special temperature compensation blocks. These
transistors (along
with
the temperature compensation
block)
must
be replaced as a
unit.
When replacing the
unit,
place
it
so
the reference information faces the left side of the
instrument and the
PNP
transistor (labeled
on
side of
unit)
is
toward the front of the instrument.
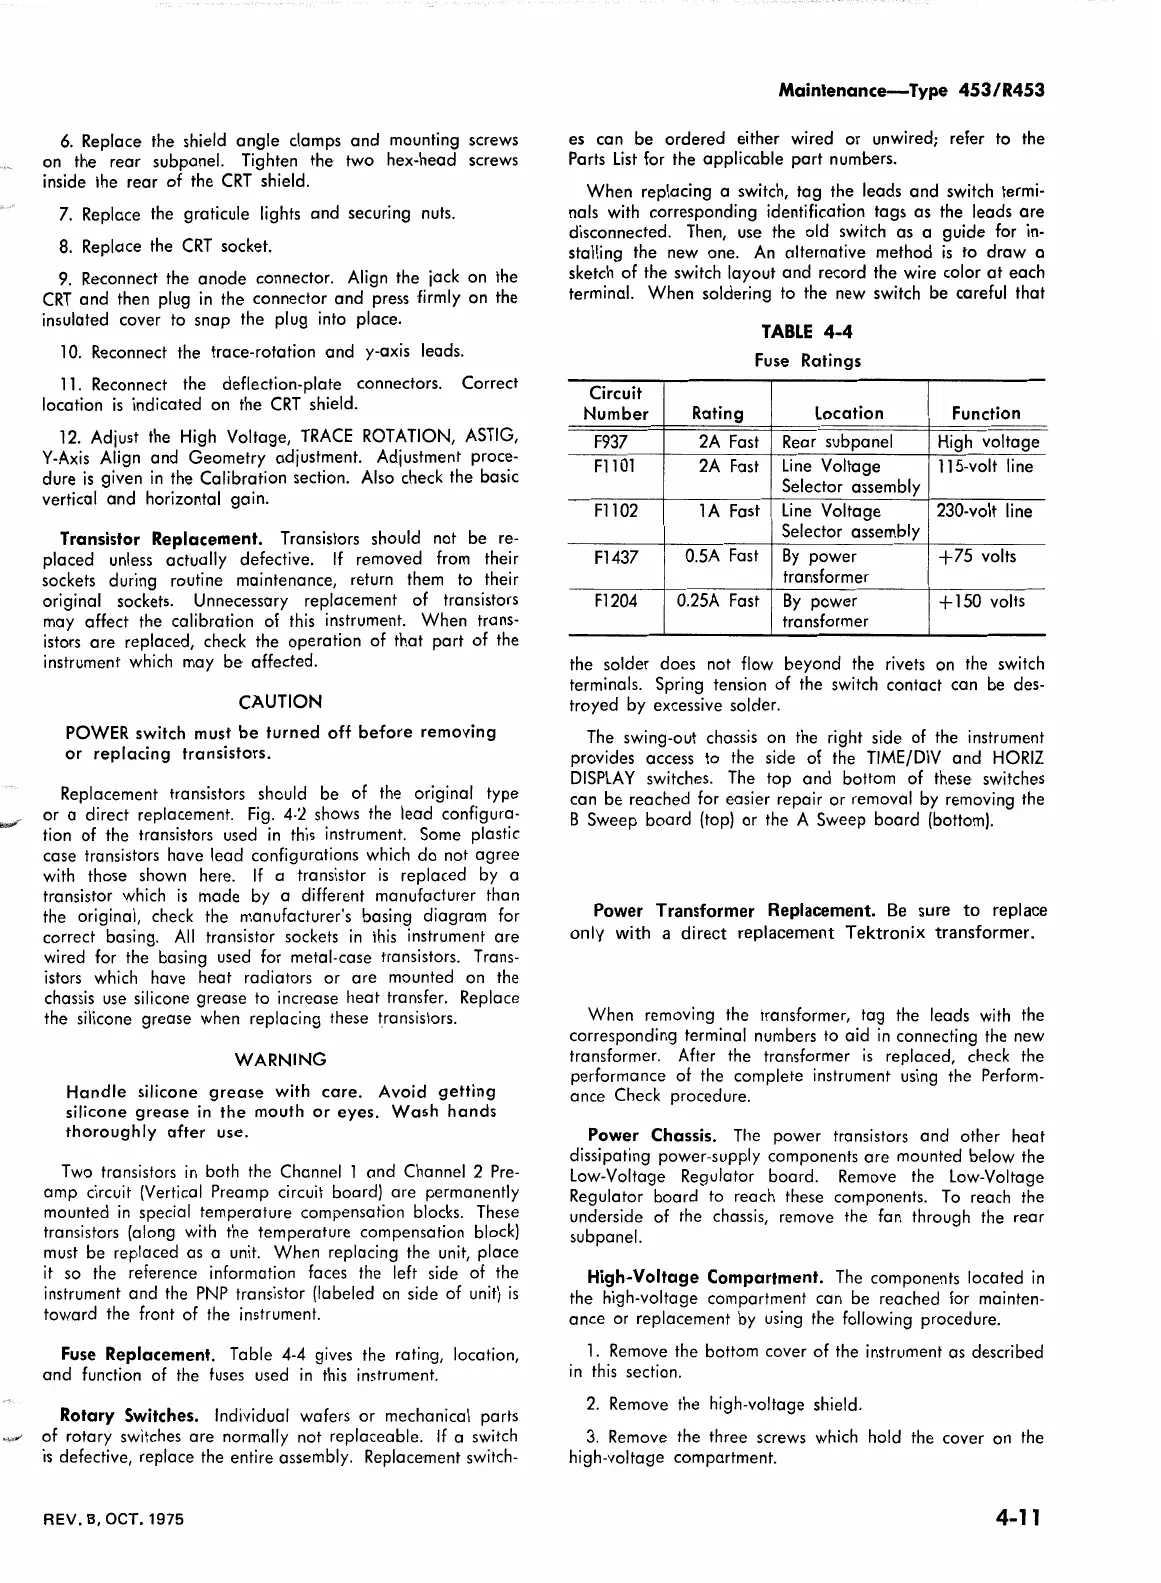
Fuse Replacement. Table
4-4
gives the rating, location,
and function of the
fuses
used
in
this
instrument.
Rotary Switches. Individual wafers or mechanical parts
of rotary switches are normally not replaceable.
If
a switch
is
defective, replace the entire assembly. Replacement switch-
REV.
B, OCT. 1975
Maintenance-Type
453/
R453
es can be ordered either wired or unwired; refer to the
Parts
List
for the applicable part numbers.
When replacing a switch, tag the leads and switch termi-
nals
with
corresponding identification tags as the leads
are
disconnected.
Then,
use
the old switch as a guide for
in-
stalling the new one.
An
alternative method
is
to draw a
sketch of the switch layout and record the wire color
at
each
terminal. When soldering to the new switch be careful that
Circuit
Number
F937
Fl
101
Fl
102
F1437
Fl204
TABLE
4-4
Fuse Ratings
Rating Location
2A
Fast Rear subpanel
2A
Fast
Line
Voltage
Selector assembly
l A Fast
Line
Voltage
Selector assembly
0.5A
Fast
By
power
transformer
0.25A
Fast
By
power
transformer
Function
High
voltage
115-volt line
230-volt
line
+75
volts
+
150
volts
the solder does not
flow
beyond the rivets
on
the switch
terminals. Spring tension of the switch contact can be des-
troyed by excessive solder.
The
swing-out chassis
on
the right side of the instrument
provides access
to
the side of the
TIME/DIV
and
HORIZ
DISPLAY
switches.
The
top and bottom of these switches
can be reached for easier repair or removal
by
removing the
B Sweep board
(top)
or the A Sweep board
(bottom}.
Power Transformer Replacement.
Be
sure
to
replace
only with a direct replacement Tektronix transformer.
When removing the transformer, tag the leads
with
the
corresponding terminal numbers
to
aid
in
connecting the new
transformer. After the transformer
is
replaced, check the
performance of the complete instrument
using
the
Perform-
ance Check procedure.
Power
Chassis.
The
power transistors and other heat
dissipating power-supply components are mounted below the
Low-Voltage Regulator board.
Remove
the Low-Voltage
Regulator board
to
reach these components.
To
reach the
underside of the chassis, remove the fan through the rear
subpanel.
High-Voltage Compartment.
The
components located
in
the high-voltage compartment can be reached
for
mainten-
ance or replacement
by
using
the following procedure.
1.
Remove
the bottom cover of the instrument as described
in
this
section.
2.
Remove
the high-voltage shield.
3.
Remove
the three screws which hold the cover
on
the
high-voltage compartment.
4-11
 Loading...


