87
Recording a Pattern
Recording
Parameter
Value Explanation
<REC EVENT>
Lets you select the performance data that is recorded during
realtime recording.
NOTE Note messages
CONTROL
CHANGE
Control change messages
PITCH BEND Pitch bend messages
CHANNEL
AFTER
Channel aftertouch messages
POLY AFTER Polyphonic aftertouch messages
[E5] CLICK OFF, ON Turns the click (metronome) on/off.
Tempo [E4] knob
=5–300
Specifies the tempo.
Length [E3]
knob
1–32 Specifies the length of the pattern.
3.
Make TRACK/PATTERN settings.
Recording
Parameter
Value Explanation
NEW/MIX
MIX
Overdub-record onto the pattern of the selected
track.
NEW
Newly record onto an empty pattern of the selected
track.
TRACK 1–16 Indicates the track to record.
PATTERN A–H Indicates the pattern of the track to record.
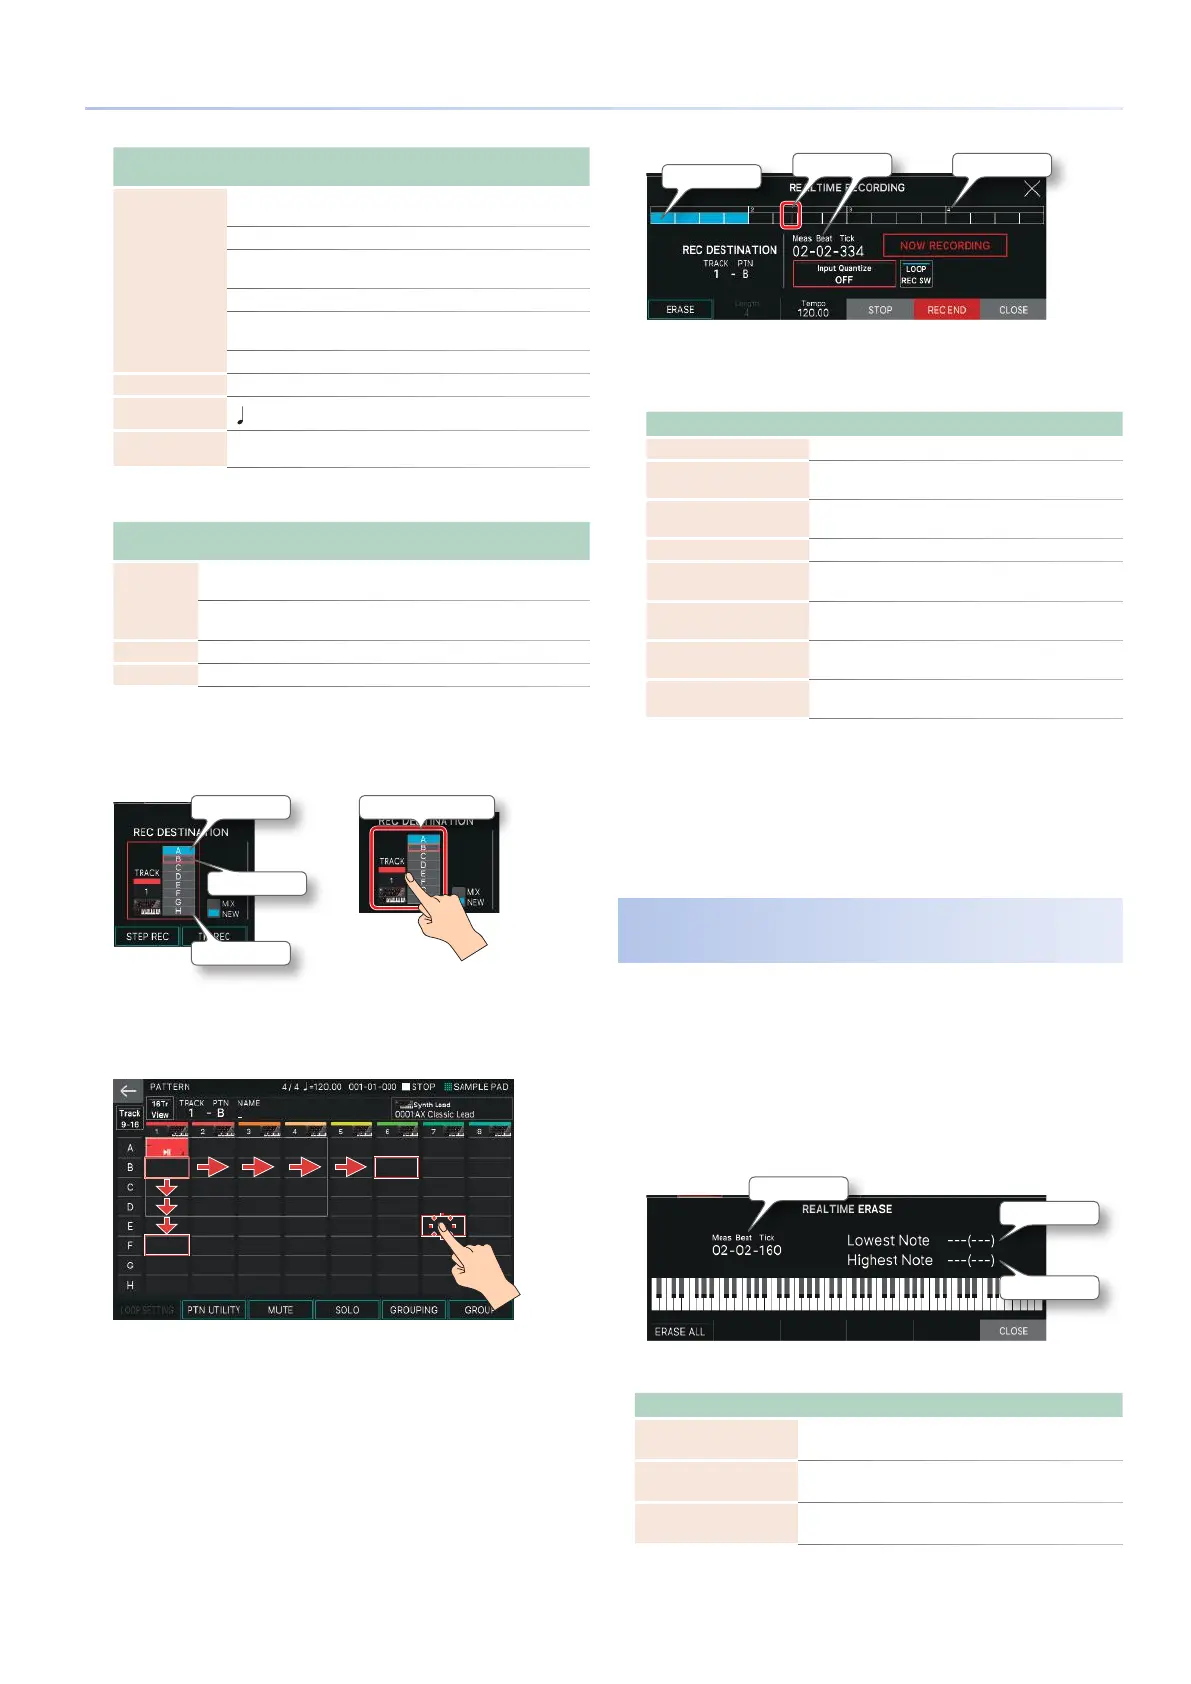
In the example shown in the illustration below, TRACK 1-B is
selected. Of patterns A–H, the selected pattern is enclosed by a
red frame.
Already-recorded patterns are solid blue.
<TRACK/PATTERN>
Recorded pattern
Select TRACK 1-B
Empty Pattern
When you touch <TRACK/PATTERN>, you move to the PATTERN
screen, where you can select the track (1–16) and pattern (A–H)
to record. You can select the track and pattern by using the [H]
[I] [K] [J] buttons to move the red frame, or by directly touching
a vacant area in the screen.
Since zones and tracks correspond with each other, using the
ZONE SELECT buttons to switch the current zone also changes
the recording-destination track in tandem. If you change the
recording-destination track, the zone played by the track also
changes in tandem.
(Example) Zone 2 (Bass): Track 20Zone 10 (Drum): Track 10
4.
Press the [7REC] button.
5.
Press the [APLAY] button to start recording.
You can also start recording by touching <START>.
The REALTIME RECORDING screen appears.
Measure indication
Recorded data exists
Playback position
indicator
6.
Play the keyboard.
Knob and controller operations are also recorded.
You can use the following functions while recording.
Menu Explanation
ERASE [E1] Accesses the realtime erase screen.
Length [E2]
Indicates the length of the pattern. This value
cannot be changed.
Tempo [E3] knob
Lets you change the tempo during recording.
Tempo data is not recorded even if you change it.
STOP [E4] Stops recording and returns to the PATTERN screen.
REC END [E5]
Enters playback mode, and moves to the REC
STANDBY screen.
CLOSE [E6]
Returns to the previous screen while remaining in
recording mode.
<Input Quantize>
Lets you switch this function on/off or change its
settings during recording.
<LOOP REC SW>
Lets you switch this function on/off during
recording.
7.
Press the [9STOP] button to stop recording.
When you have finished recording, repeat steps 1–5 as necessary
to record variation patterns on the same track or to record on
another track.
When creating a group or song in the next section, it’s a good
idea to divide it into several tracks and create several patterns so
that the differences are easy to understand.
Removing Unwanted Data During
Recording
(Realtime Erase)
Realtime erase is a function lets you erase unwanted data
during realtime recording. In particular when LOOP REC SW is
“on,” you can use this to conveniently erase just an unwanted
portion while you continue recording.
1.
Start realtime recording (p. 86).
2.
In the REALTIME RECORDING screen, select
[E1] ERASE.
The REALTIME ERASE screen appears.
Lower limit key
Upper limit key
Playback position
indicator
3.
Erase unwanted data.
Operation Explanation
Erase all data
Press the [E1] knob <ERASE ALL>.
The data is erased while you hold down the button.
Erase notes of a specific
key
Press the corresponding key.
The data is erased while you hold down the key.
Erase notes of a specific
range of keys
Press the top and bottom key of the range.
The data is erased while you hold down the keys.
4.
Select [E6] CLOSE.
You return to the REALTIME RECORDING screen.

 Loading...