Enhanced Micro TDC 3000
User’s Manual 3-4 9/95
3.1.3
3.1.3 Color Monitor Check
1. Set the color monitor power switch to ON. On the front of the 20" monitor, beneath
the bezel, the pushbutton to your right is the Power ON/OFF switch. The left
pushbutton is for degaussing. The power switch on the 21" monitor is located at the
right front of the monitor, just below the display screen.
2. Adjust brightness for best resolution on the blinking character that appears on the upper
left side of the screen. On the front of the monitor, beneath the bezel, the left
thumbwheel is the Brightness control. The right thumbwheel is the Contrast control.
3. Position (tilt) the screen display for comfortable viewing.
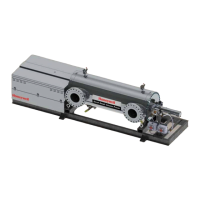
3.1.4 Printer Checks
These tests are only initiated when power is first turned on, therefore, always start the tests
with power
OFF. The power switch is at the rear of the printer, just above the line cord.
Run both of these printer tests after initial installation. Also run the self-test any time a new
ribbon or print head has been installed on the printer. Inspect the self-test printout carefully
to insure high quality print copy from your printer.
Run the user diagnostic test whenever you suspect a malfunction in the printer electronics.
Table 3-1 shows the states of the printer display while in normal operation and when the
tests are run. If these tests do not run satisfactorily or if the user diagnostic test does not
finish, consult Service, Section 6, in this manual.
3.1.4.1 Printer Self-Test
1. Ensure that there is ribbon and paper in the printer, and that the top cover is closed.
2. Press and hold the ON LINE button while setting the POWER switch to ON, then release
the ON LINE button.
3. The printer display first shows ASPI, then the printer begins its self-test, printing a full
line of characters, time-after-time, advancing one character at the beginning of each line
until the full character set is printed. While printing the self-test, the printer display
shows TEST. The test continues indefinitely.
4. Press the ON LINE button to stop printing. The printer shows WAIT. Press the ON LINE
button again and the printer displays LINE. It is then on-line.
 Loading...