
 Loading...
Do you have a question about the JUKI KE-2050 and is the answer not in the manual?
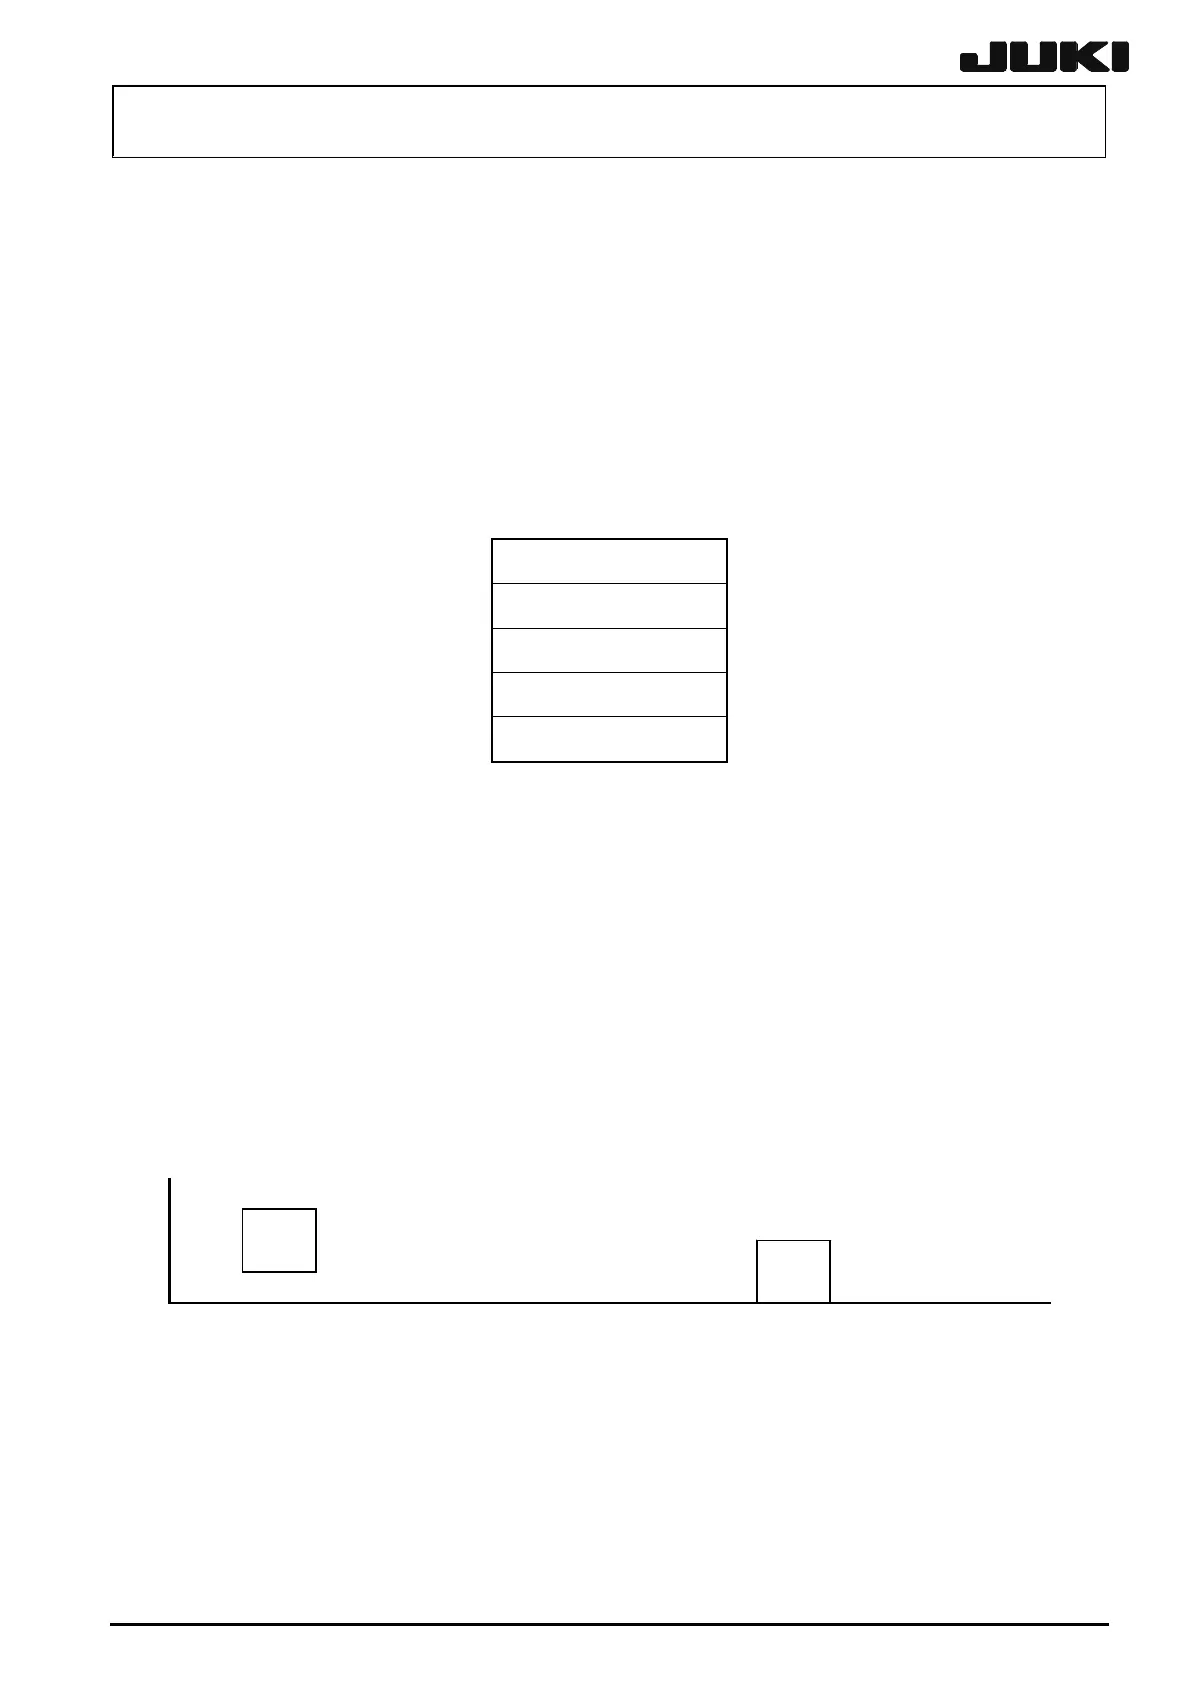
| Number of Nozzles | Up to 12 |
|---|---|
| Board Size | L 50 x W 50 mm to L 510 x W 460 mm |
| Power Supply | 200V AC, 3-phase, 50/60Hz |
| Air Supply | 0.5 MPa |
| Component Size | 0402 (0.4mm x 0.2mm) to 50mm x 50mm |
| Feeder Capacity | Up to 128 feeders (8mm tape) |
Procedure for replacing the XM timing belt, including side cover detachment and screw removal.
Steps for replacing the XB timing belt, including loosening screws and applying Loctite.
Procedure for replacing the YM timing belt, involving pulley cover detachment and motor assembly loosening.
Steps to replace the YB timing belt, including side cover detachment and pulley bracket loosening.
Procedure for replacing Pulley XA, referencing timing belt XM replacement steps.
Procedure for replacing Pulley XM, referencing timing belt XM replacement steps.
Procedure for replacing Pulley YA, referencing timing belt YM replacement steps.
Procedure for replacing Pulley YM, referencing timing belt YM replacement steps.
Procedure for replacing Pulley YB, referencing timing belt YB replacement steps.
Procedure for replacing the X-Motor, referencing timing belt XM replacement steps.
Procedure for replacing the Y-Motor, referencing timing belt YM replacement steps.
Procedure for affixing the X-axis and Y-axis magnescales using jigs.
Procedure for checking and adjusting the clearance between the magnescale and sensor head.
Procedure for checking and adjusting clearance between Y-axis sensor head and linear way.
Procedure for replacing X-axis limit and home position sensors, including adjustment.
Procedure for replacing Y-axis limit sensors, including adjustment based on linear way.
Procedure for adjusting Y-axis home position sensor for correct squareness and mounting accuracy.
Steps for replacing the X-axis plastic rail, including cable management.
Steps for replacing the Y-axis plastic rail, focusing on proper cable arrangement.
Procedure for detaching the head cover and removing the X cable tie-up band.
Instructions for placing reference marks on the 40002233 and 40002234 cables.
Steps for greasing the cable bearer and placing cables in the X-axis bearer.
Procedure for separating fusion-bonded cable parts with a cutter at a 90-degree angle.
Steps for disconnecting binding and detaching the Y cable bearer cover to remove the cable.
Procedure for placing marks on the 40002232 (40002346) cables.
Steps for placing and fixing 40002232 cables in the Y-axis cable bearer, aligning connectors.
Guidance for clamping and routing cables around the head, including tie-up bands.
Procedure for replacing the MNLA head, involving cover and board removal, and reassembly.
Procedure for replacing the FMLA head, including top cover and Z motor cover support removal.
Procedure for replacing the Z-Motor (MNLA Head), including motor cover detachment and belt loosening.
Procedure for replacing the θ-Motor (MNLA Head), including motor cover detachment and belt loosening.
Procedure for replacing the ICZ-Motor (FMLA Head), involving motor cover detachment and belt loosening.
Procedure for replacing the IC θ-Motor (FMLA Head), including cover detachment and screw removal.
Procedure for replacing the Z-Sensor on the MNLA Head, including peripheral component removal.
Procedure for replacing the Z-Sensor on the FMLA Head, including peripheral component removal.
Procedure for replacing the MNLA laser sensor, involving connector and screw removal.
Procedure for replacing the FMLA laser sensor, involving diffuser base and sensor mounting screw removal.
Procedure for replacing the head up SP on the MNLA Head, including cover and set collar removal.
Procedure for replacing the head up SPIC on the FMLA Head, from the Z-sensor dog.
Procedure for replacing timing belts Z and θ on the MNLA Head, including motor mounting screw tightening.
Procedure for replacing the timing belt ICZ on the FMLA Head, including motor mounting screw tightening.
Procedure for assembling the sensor, securing the fiber, and mounting the zoom lens.
Procedure for adjusting sensor height by moving the bad mark sensor and tightening SEMS cap bolts.
Information on the amplifier component, with reference to mounting diagrams.
Procedure for inserting the fiber unit into the amplifier, ensuring correct LED alignment and connector seating.
Guidance on setting the switches on the bad mark sensor assembly to factory default settings.
Procedure for replacing the HMS Head, involving mounting hole positions for different component heights.
Instructions for mounting the amplifier and checking its stability by moving it.
Instruction to stick the label after degreasing the surface.
Procedure for mounting the height sensor board 2 assembly onto the head main board.
Procedure for adjusting HMS sensor height using calibration block and checking indicators.
Procedure for replacing the head main board, followed by vacuum level adjustment.
Instructions for replacing the OCC Relay Board Assembly.
Instructions for replacing the Sensor Relay Board Assembly.
Procedure for replacing the offset placement light, requiring adjustment of light and OCC light.
Procedure for adjusting the light quantity of the offset placement light and OCC light.
Details on Transport Pulley A assembly, including part numbers and quantity.
Details on Transport Pulley B assembly, including part numbers and quantity.
Procedure for replacing the fiber in the WAIT sensor, including amplifier unit mounting.
Procedure for mounting the amplifier unit and adjusting its gain using mode setting and tuning buttons.
Procedure for adjusting the gap between the torque supporter and support table motor to 1.1 mm.
Procedure for adjusting timing belt tension using a sonic belt tension meter, specifying values.
Procedure for checking and adjusting support table flatness using a lever dial and adjustment screws.
Procedure for replacing transmission and coaxial light boards, ensuring cable reconnection.
Procedure for replacing downward and side light boards, ensuring cable reconnection.
Procedure for replacing the cover open switch main unit, involving connector disconnection and tie-up band cutting.
Procedure for replacing the operation key, requiring mounting screw removal and specific orientation.
Procedure for replacing sensor in FSD bracket assembly, checking confirmation LEDs.
Procedure for adjusting the height of FSD bracket and sensors for proper alignment.
Procedure for adjusting the height of FS bracket and sensors for proper alignment.
Procedure for adjusting the light axis of sensors, checking LEDs for correct light axis alignment.
Procedure for adjusting the volume of the feeder float sensor after other adjustments are complete.
Safety precautions for backlight replacement, including power off, cable handling, and static electricity.
Procedure for replacing backlight of KE-2050R/2055R/2060R, involving cable disconnection and rear panel removal.
Procedure for replacing backlight, involving inside cable removal and LCD module detachment.
Procedure for replacing backlight unit, loosening screws, sliding unit, and aligning locking lugs.
Procedure to check if the BIOS correctly recognizes the HDD, displaying a 'No bootable device' message.
Procedure for setting up network communication with HLC, starting with Control Panel and Network icon.
Procedure for setting up a shared folder for network communication in Windows XP, selecting Network icon.
Procedure for registering a user name and password in KE2000 for HLC PC access in Windows NT.
Procedure for installing KE2000 Main Unit System Disks by running setup.exe from the floppy disk.
Procedure for installing FlexlineDB System Disks by running setup.exe and selecting destination location.
Procedure for inputting Product ID from Certificate of Authenticity and saving confirmation.
Procedure for setting up touch panel for KE-2050/60 (Win NT) via Control Panel.
Procedure for setting COM device and line control for apci-8302/6J, checking Device 0 and CH1 settings.
Procedure for enabling device status in Device Properties and deleting registered ports in Ports window.
Procedure for creating and renaming a shortcut for the touch panel driver.
Procedure for cutting and pasting touch panel shortcut to startup folder and restarting the system.
Procedure for verifying UPSilon_2000 monitoring power supply and checking setup.
Procedure for checking COM3 settings and restarting the system if touch panel does not function.
Procedure for running touch panel calibration program and saving settings.
Procedure for checking calibration status and confirming touch points in the calibration screen.
List of part names and their corresponding numbers for electrical components shown in front and rear views.
List of part names for components on the base frame top view.
Description of the power supply unit structure, composed of DC supplies, relays, and protectors.
Block diagram illustrating the DC power supply unit connections and components.
Parts list for the DC Power Supply Unit, including part numbers, names, quantity, and remarks.
Connection diagram showing power supply unit connections to various boards and components (part 1/2).
Connection diagram showing power supply unit connections to various boards and components (part 2/2).
Connection diagram for the Zθ Power Supply Board, detailing component interconnections.
Connection diagram for the power supply board (part 1/2), showing interconnections for various units.
Illustrates the board layout of the control unit for KE-2050/2050R models.
Illustrates the board layout of the control unit for KE-2060/2055R/2060R models.
Explanation of connector markers on the control unit, linking board indications to connector numbers.
Description of the CPU board functions, connections, jumper settings, LEDs, and replacement procedures.
Diagrams showing jumper settings for the safety board for different machine types.
Diagrams showing jumper settings for the safety board for different machine types (KE-2060 EN).
Description of Z-θ Unit structure, including AC servo drivers and blank panels.
Explanation of LED indications on Z/θ driver board, showing operating status and alarm codes.
Description of X-Y Unit structure, including AC servo drivers and magnescale interpolator.
Explanation of LED indications on the XY driver board for alarms and axis status.
Diagrams showing DIP switch settings for MODE and OPTION switches on the magnescale.
Description of Z-θ Unit structure, including AC servo drivers and blank panels.
Explanation of LED indications on Z/θ driver board, showing operating status and alarm codes.
Structure of transport unit, detailing CARRY board, stepping drivers, and cable connections for motors and sensors.
Instructions for adjusting jumper and DIP switch settings on the CARRY relay board for sensor delay times.
Procedure for adjusting drive current of transport stepping motor by measuring voltage and setting DIP switches.
Procedure for setting up support table/auto width adjustment motor driver by adjusting rotary and DIP switches.
Procedure for checking encoder connection by verifying count value and polarity of motor axes.
List of boards used on the head unit, including head main board, sensor relay board, and OCC relay.
Instructions for checking and setting switches (DSW1-DSW4) on the head main board assembly.
Procedure for adjusting head vacuum level by adjusting reference voltage and vacuum input voltage.
Description of the operation unit structure, composed of operation and switch boards.
Instructions for checking and setting jumper switches on operation boards for different machine types.
Configuration and switch components for mounting push-button switches on operation switch boards for KE-2050/2060.
Configuration and switch components for mounting push-button switches on operation switch boards for KE-2050/2060 (Rear).
Configuration and switch components for mounting push-button switches on operation switch boards for KE-2050/2060 (EN Front).
Procedure for mounting ORIGIN, STOP, START, ONLINE, 1 CYCLE switches, including bezel fitting.
Procedure for mounting the servo free switch, similar to other switches but with a cover.
Procedure for mounting the maintenance key switch, including key cover, actuator, and bezel assembly.
Procedure for mounting keyboard ON and feeder switches, including bezel and fixing nut.
Configuration details for mounting pushbutton switches on operation SW board (KE-2050R/2055R/2060R Front).
Configuration details for mounting pushbutton switches on operation SW board (KE-2050R/2055R/2060R Rear).
Configuration details for mounting pushbutton switches on operation SW board (EN Front).
Procedure for mounting switches, including bezel fitting and actuator insertion.
Procedure for mounting maintenance key switch, including key cover, actuator, and bezel assembly.
Procedure for mounting CONSOLE SELECT and BANK ENABLE switches, including bezel and fixing nut.
Procedure for checking UPS battery voltage, including power off and cable removal.
Procedure for detaching the UPS, involving connector disconnection and metallic screw removal.
Procedure for replacing the UPS battery, including screw removal and front cover detachment.
Procedure for drawing out the battery and connecting leads to the new battery, observing polarity.
Procedure for mounting AWC bracket assembly for M-Size (Front Reference) machine.
Procedure for mounting AWC bracket assembly for L- and E-Size machines, including belt tension adjustment.
Procedure for mounting the B/U Pin Detection Sensor, involving sensor bracket fixing and optical axis alignment.
Procedure for bundling cables for B/U Pin Detection Sensor (M-Size), showing cable routing.
Procedure for bundling cables for B/U Pin Detection Sensor (L- and E-Size), showing cable routing.
List of jigs with part numbers, names, purpose, figures, and remarks for KE2000/2000R series.
List of jigs with part numbers, names, purpose, figures, and remarks for VCS and nozzle assembly.
List of jigs with part numbers, names, purpose, figures, and remarks for CSP jig plate and CAL piece.


