34
Leica mojo3D, Running the mojo3D for the First Time
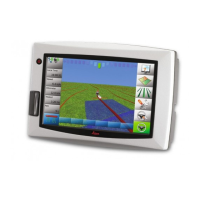
3.2 Setting the Screen Calibration
General informa-
tion
Differences may exist between different devices, and so the screen calibration must
be set before operation.
Setting the screen
size, step-by-step
1. Tap - with your finger, not an object - the middle of the screen calibration
icon, which is in the top left-hand corner of the screen. The icon will appear in
another position. Continue to tap the middle of each icon until the corners and
centre of the screen are defined. You will need to tap the screen five times.
2. The Initial Setup Wizard appears on the screen. Tap at the bottom of the
screen to continue with the initial setup.
If required, Screen Calibration can be updated anytime while the mojo3D is powered
on by holding the power button for 8 seconds, release the power button to display
the screen calibration screen. If the power button is held for more than 15 seconds
the mojo3D will turn off.
 Loading...