l-32 Chapter 1 Tune-up and routine maintenance
41.5 On models with a PCV valve, pull off the hose and use a
wrench to unscrew the PCV valve from the valve cover
41.6 With the engine running, suction should be felt at the
threaded end of the PCV valve
.~ * *r*---;;i-
plug on the side of the block; on V6 engines there are two plugs, located on
each side of the block). Remove the plug(s) and allow the coolant in the
block to drain.
6 While the coolant is draining, check the condition of the radiator
hoses, heater hoses and clamps (refer to Section 9 if necessary).
7 Replace any damaged clamps or hoses.
8 Once the system is completely drained, flush the radiator with fresh
water from a garden hose until it runs clear at the drain. The flushing action
of the water will remove sediments from the radiator but will not remove
rust and scale from the engine and cooling tube surfaces.
9 These deposits can be removed with a chemical cleaner. Follow the
procedure outlined in the manufacturer’s instructions. If the radiatdr is se-
verely corroded, damaged or leaking, it should be removed (Chapter 3)
and taken to a radiator repair shop.
10 Remove the overflow hose from the coolant recovery reservoir. Drain
the reservoir and flush it with clean water, then reconnect the hose.
11 Reinstall and tighten the radiator drain plug. Install and tighten the
block drain plug(s).
12 Slowly add new coolant (a 50/50 mixture of water and antifreeze) to
the radiator until it’s full. Add coolant to the reservoir up to the lower mark.
13 Leave the radiator cap off and run the engine in a well-ventilated area
until the thermostat opens (coolant will begin flowing through the radiator
and the upper radiator hose will become hot).
14 Turn the engine off and let it cool. Add more coolant mixture to bring
the level back up to the lip on the radiator filler neck.
15 Squeeze the upper radiator hose to expel air, then add more coolant
mixture if necessary. Replace the radiator cap.
16 Start the engine, allow it to reach normal operating temperature and
check for leaks.
41 Positlve Crankcase Ventilation (PCV) system check
Refer to illustrations 4 1.5 and 4 1.6
1
The Positive Crankcase Ventilation (PCV) system directs blowby
gases from the crankcase back into the intake manifold so they can be
burned in the engine.
2 Rough idling or high idle speed and stalling are symptoms of faults in
the PCV system.
3 The system on these models consists of a hose leading from the valve
cover to the intake manifold and a fresh air hose between the air cleaner
assembly and the valve cover. Gases from the crankcase are carried by
the hose through a PCV valve or orifice in the hose into the intake man-
ifold.
4 Check the system hoses for cracks, leaks and clogging. On orifice-
type systems, check the orifice carefully for clogging. Clean the hoses if
they are clogged and replace any which are damaged.
5 On models with a PCV valve, remove the valve
(see illustration).
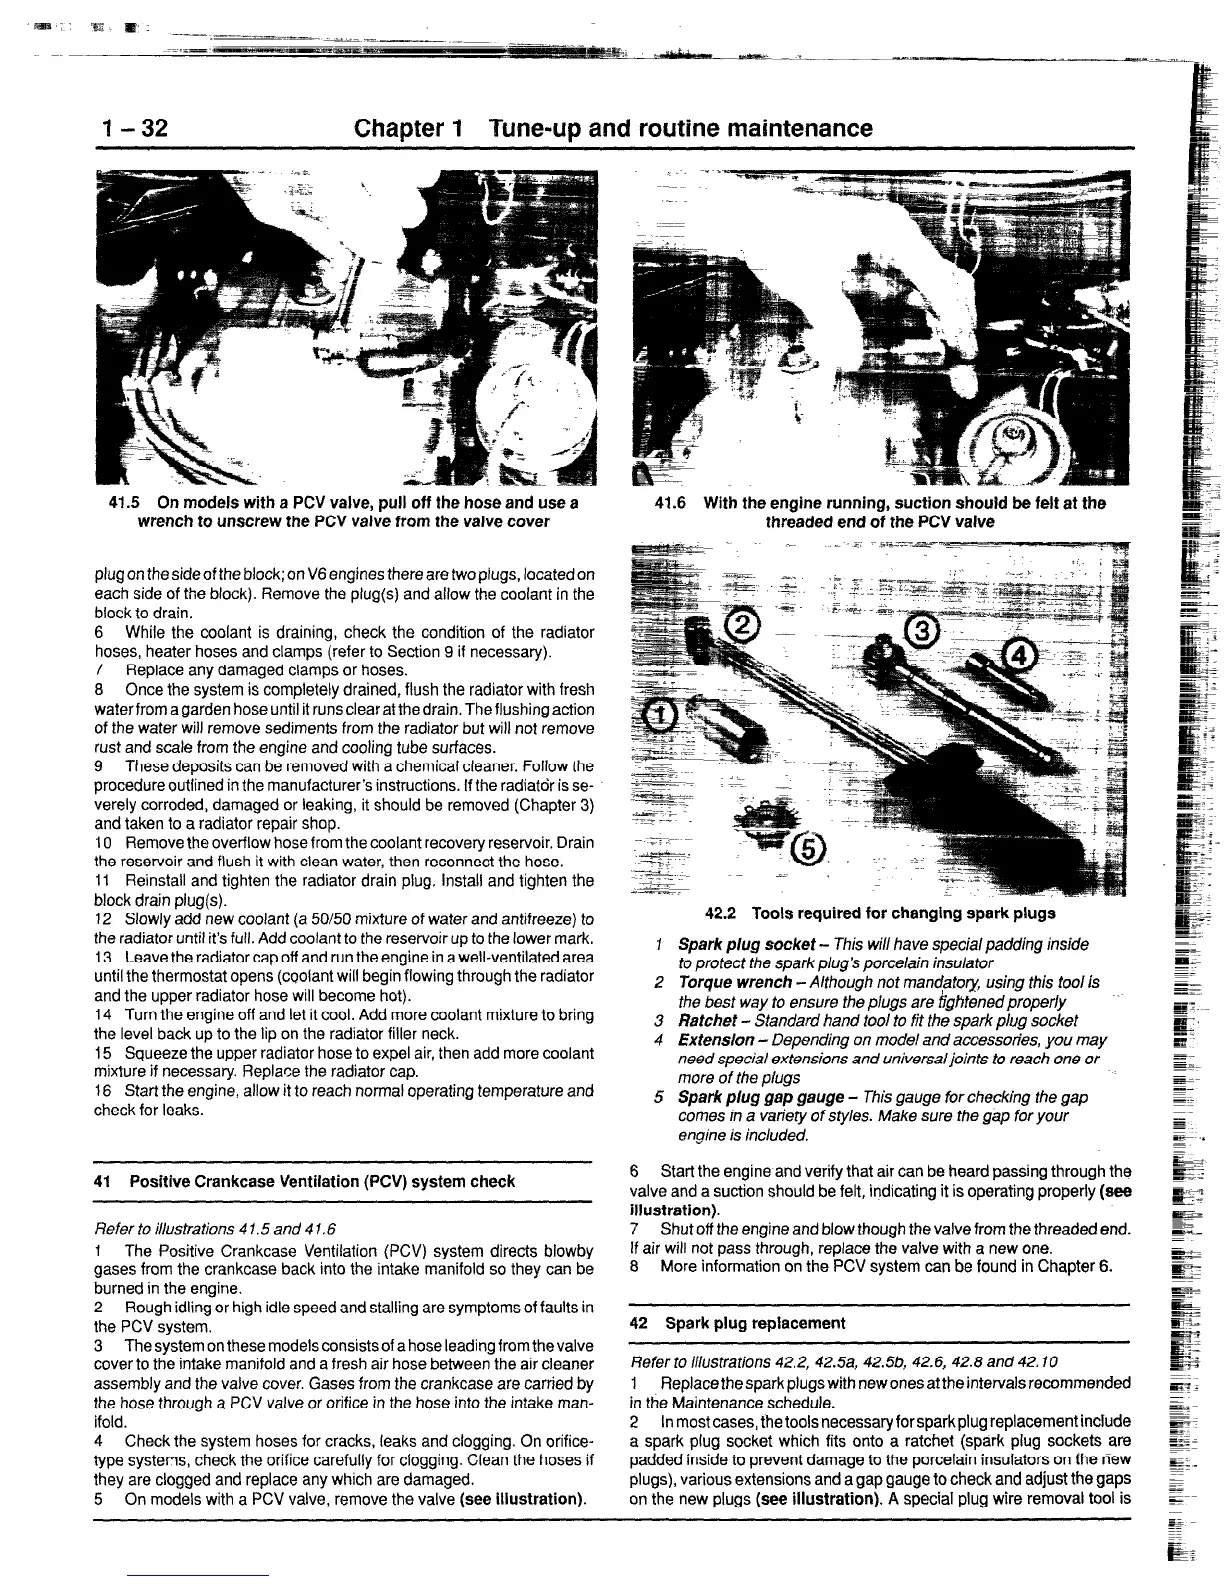
42.2
Tools required for changing spark plugs
1
Spark plug socket
- This will have special padding inside
to protect the spark plug’s porcelain insulator
2 Torque wrench
- Although not mandator)l, using this tool is
the best way to ensure the plugs are ~ghtenedproperiy
3 Ratchet
- Standard hand tool to fit the spark plug socket
4 Extension
- Depending on model and accessories, you may
need special extensions and universal joints to reach one or
more of the plugs
5 Spark plug gap gauge -
This gauge for checking fhe gap
comes in a variety of styles. Make sure the gap for your
engine is included.
6 Start the engine and verify that air can be heard passing through the
valve and a suction should be felt, indicating it is operating properly (see
illustration).
7 Shut off the engine and blow though the valve from the threaded end.
If air will not pass through, replace the valve with a new one.
8 More information on the PCV system can be found in Chapter 6.
42 Spark plug replacement
Refer to illusfrafions 42.2, 42.5a, 42.5b, 42.6, 42.8 and 42. IO
1 Replace the spark plugs with new onesat the intervals recommended
in the Maintenance schedule.
2 In most cases, the tools necessary for sparkplug replacement include
a spark plug socket which fits onto a ratchet (spark plug sockets are
padded inside to prevent damage to the porcelain insulators on the new
plugs), various extensions and a gap gauge to check and adjust the gaps
on the new plugs
(see illustration).
A special plug wire removal tool is
 Loading...


