7B-2
Chapter 7 Part B Automatic transmission
.
8
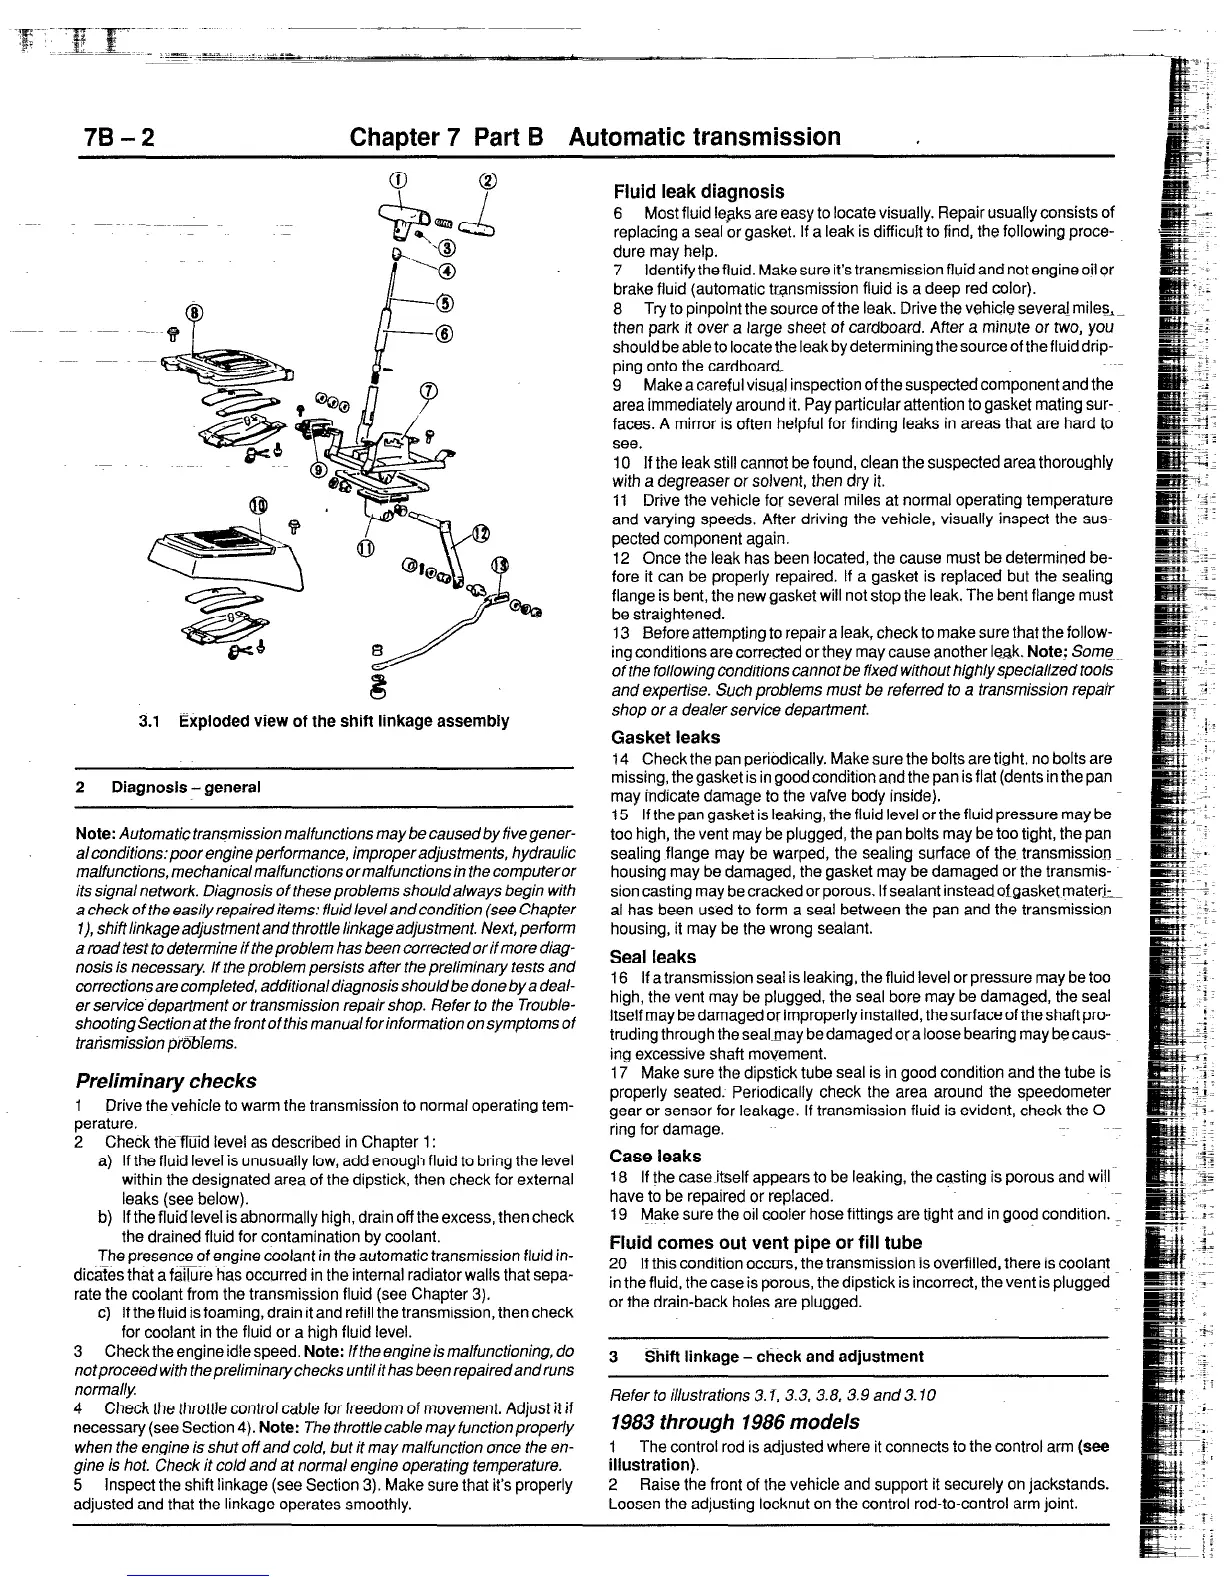
3.1 Exploded view of the shift linkage assembly
2 Diagnosis - general
Note:
Automatic transmission malfunctions may be caused by five gener-
al conditions: poor engine performance, improper adjustments, hydraulic
malfunctions, mechanical malfunctions ormalfunctions in the computeror
its signal network. Diagnosis of these problems should always begin with
a check of the easily repaireditems: fluid leveland condition (see Chapter
l), shift linkage adjustment and throttle linkage adjustment. Next, perform
a road test to determine if the problem has been corrected or if more diag
nosis is necessary. If the problem persists after the preliminary tests and
corrections are completed, additionaldiagnosis should be done by a deal-
er service.department or transmission repair shop. Refer to the Trouble-
shootingSectionat the frontofthis manualforinformationonsymptoms of
tratismission prbblems.
Preliminary checks
1 Drive the vehicle to warm the transmission to normal operating tem-
perature.
2 Check thNUid level as described in Chapter 1:
a) If the fluid level is unusually low, add enough fluid to bring the level
within the designated area of the dipstick, then check for external
leaks (see below).
b) If the fluid level is abnormally high, drain off the excess, then check
the drained fluid for contamination by coolant.
The presence of engine coolant in the automatic transmission fluid in-
ditties that a failure has occurred in the internal radiator walls that sepa-
rate the coolant from the transmission fluid (see Chapter 3).
c) If the fluid is foaming, drain it and refill the transmission, then check
for coolant in the fluid or a high fluid level.
3 Check the engine idle speed.
Note:
lfthe engineismalfunctioning, do
notproceed with the preliminary checks untilit has been repairedand runs
normally
4 Check the throttle control cable for freedom of movement. Adjust it if
necessary (see Section 4).
Note:
The thrott/e cab/e may function properly
when
the engine is shut off and co/d, but it may malfunction once the en-
gine is hot. Check it cold and at normal engine operating temperature.
5 Inspect the shift linkage (see Section 3). Make sure that it’s properly
adjusted and that the linkage operates smoothly.
Fluid leak diagnosis
6 Most fluid legks are easy to locate visually. Repair usually consists of
replacing
a seal or gasket.
If a leak is difficult to find, the following proce-
dure may help.
7 Identify the fluid. Make sure it’s transmission fluid and not engine oil or
brake fluid (automatic transmission fluid is a deep red color).
8 Try to pinpoint the source of the leak. Drive the vehicle several milesA;,_
then park it over a large sheet of cardboard. After a minute or two, you
should be able to locate the leak by determining the source of the fluid drip-
ping onto the cardboard
9 Make a careful visual inspection of the suspected component and the
area immediately around it. Pay particular attention to gasket mating sur-
faces. A mirror is often helpful for finding leaks in areas that are hard to
see.
10 If the leak still cannot be found, clean the suspected area thoroughly
with a degreaser or solvent, then dry it.
11 Drive the vehicle for several miles at normal operating temperature
and varying speeds. After driving the vehicle, visually inspect the sus-
pected component again.
12 Once the leak has been located, the cause must be determined be-
fore it can be properly repaired. If a gasket is replaced but the sealing
flange is bent, the new gasket will not stop the leak. The bent flange must
be straightened.
13
Before attempting to repair a leak, check to make sure that the follow-
ing conditions are corrected or they may cause another leak.
Note;
Some
of the following conditions cannot be fixed without high&specialized tools
and expertise, Such problems must be referred to a transmission repair
shop or a dealer service department.
Gasket leaks
14 Check the pan periodically. Make sure the bolts are tight, no bolts are
missing, the gasket is in good condition and the pan is flat (dents in the pan
may indicate damage to the vafve body inside).
15 If the pan gasket is leaking, the fluid level or the fluid pressure may be
too high, the vent may be plugged, the pan bolts may be too tight, the pan
sealing flange may be warped, the sealing surface of the transmission
housing may be damaged, the gasket may be damaged or the transmis-
sion casting may be cracked or porous, If sealant instead otgasket materi:-
al has been used to form a seal between the pan and the transmission
housing, it may be the wrong sealant.
Seal leaks
16 If a transmission
seal
is leaking, the fluid level or pressure may be too
high, the vent may be plugged, the seal bore may be damaged, the seal
itself may be damaged or improperly installed, the surface of the shaft pro-
truding through the seal~may be damaged or a loose bearing may be caus-
ing excessive shaft movement.
17
Make sure the dipstick tube seal is in good condition and the tube is
properly seated. Periodically check the area around the speedometer
gear or sensor for leakage. If transmission fluid is evident, check the O-
ring for damage.
Case leaks
18 If the case~itself appears to be leaking, the casting is porous and will
have to be repaired or replaced.
19 &lake sure the oil cooler hose fittings are tight and in good condition.
Fluid comes out vent pipe or fill tube
20 If this condition occurs, the transmission is overfilled, there is coolant
in the fluid, the case is porous, the dipstick is incorrect, the vent is plugged
or the drain-back holes are plugged.
3 Shift linkage - check and adjustment
Refer to illustrations 3. I, 3.3. 3.8, 3.9 and 3.10
1983 through 1986 models
1 The control rod is adjusted where it connects to the control arm (see
illustration).
2 Raise the front of the vehicle and support it securely on jackstands.
Loosen the adjusting locknut on the control rod-to-control arm joint.
 Loading...


