2A-10 Chapter 2 Part A
2.6L four-cylinder engine
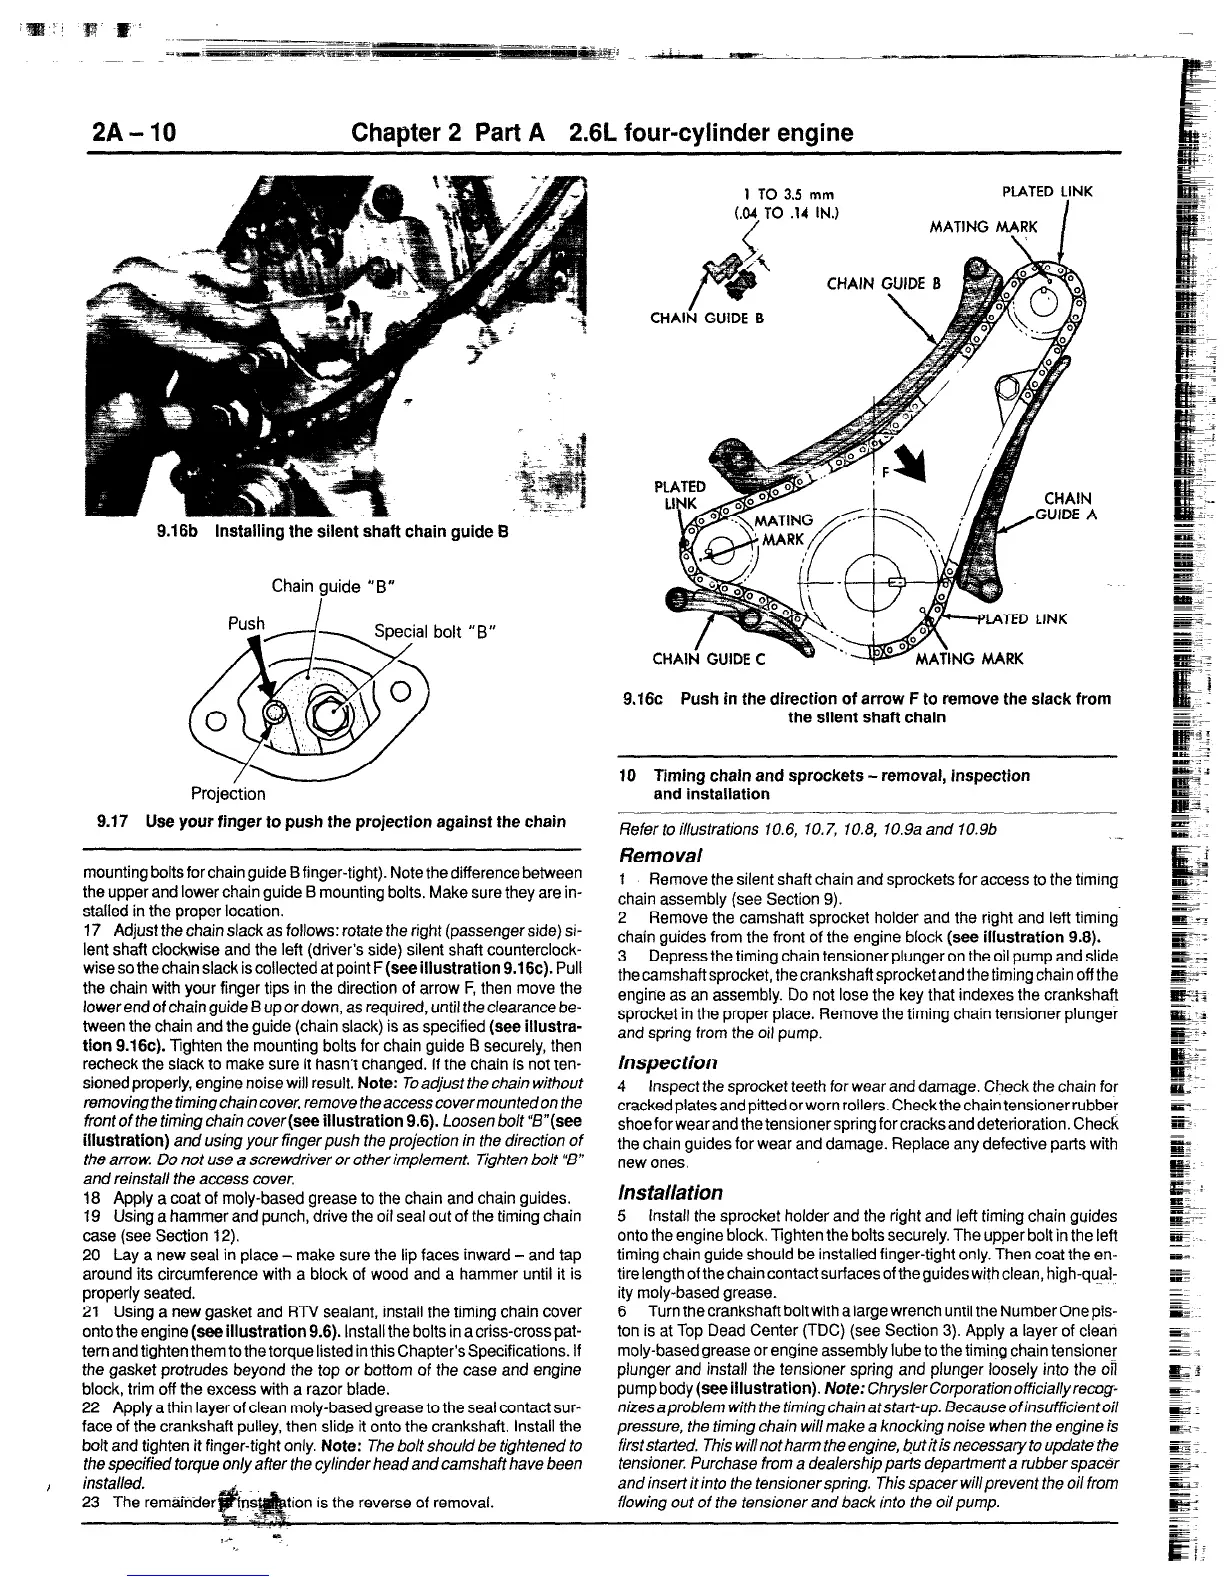
Q.16b Installing the silent shaft chain guide B
Chain guide “B”
Special bolt “B”
Projection
9.17 Use your finger to push the projection against the chain
mounting bolts for chain guide B finger-tight). Note the difference between
the upper and lower chain guide B mounting bolts. Make sure they are in-
stalled in the proper location.
17 Adjust the chain slack as follows: rotate the right (passenger side) si-
lent shaft clockwise and the left (driver’s side) silent shaft counterclock-
wise so the chain slack is collected at point F
(see illustration 9.16~).
Pull
the chain with your finger tips in the direction of arrow F, then move the
lowerend of chain guide 8 up or down, as required, until the clearance be-
tween the chain and the guide (chain slack) is as specified
(see illustra-
tion 9.16~).
Tighten the mounting bolts for chain guide B securely, then
recheck the slack to make sure it hasn’t changed. If the chain is not ten-
sioned properly, engine noise will result.
Note: Toad$/sf the
chain without
removing the timingchaincover, remove theaccesscovermountedon the
front of the timing
chain
cover(see
illustration 9.6).
Loosen bolt ‘B”(see
illustration)
and using your finger push the projection in the direction of
the arrow Do not use a screwdriver or other implement.
Tighten bolt ‘8”
and reinstall the access cover.
18
Apply a coat of moly-based grease to the chain and chain guides.
19 Using a hammer and punch, drive the oil seal out of the timing chain
case (see Section 12).
20 Lay a new seal in place - make sure the lip faces inward - and tap
around its circumference with a block of wood and a hammer until it is
properly seated.
21 Using a new gasket and RTV sealant, install the timing chain cover
onto the engine
(sse illustration
9.6). Install the bolts in acriss-cross pat-
tern and tighten them to the torque listed in this Chapter’s Specifications. If
the gasket protrudes beyond the top or bottom of the case and engine
block, trim off the excess with a razor blade.
22 Apply a thin layer of clean moly-based grease to the seal contact sur-
face of the crankshaft pulley, then slide it onto the crankshaft. Install the
bolt and tighten it finger-tight only.
Note:
The bolt should be tightened to
the specified torque on/y after the cylinder head and camshaft have been
installed.
23 The remtinder
tion is the reverse of removal.
1
TO 3.5 mm
PLATED LINK
LO4 TO .14 IN.)
9.16~ Push in the direction of arrow F to remove the slack from
the silent shaft chain
10 Timing chain and sprockets - removal, inspection
and installation
Refer to illustrations 10.6, 10.7, 10.8, 10.9a and 10.9b
Removal
-
1 Remove the silent shaft chain and sprockets for access to the timing
chain assembly (see Section 9).
2 Remove the camshaft sprocket holder and the right and left timing-
chain guides from the front of the engine block
(see illustration 9.8).
3 Depress the timing chain tensioner plunger on the oil pump and slide
the camshaft sprocket, the crankshaft sprocket and the timing chain off the
engine as an assembly. Do not lose the key that indexes the crankshaft
sprocket in the proper place. Remove the timing chain tensioner plunger
and spring from the oil pump.
lnspec tion
4 inspect the sprocket teeth for wear and damage. Check the chain for
cracked plates and pitted or worn rollers. Checkthe chain tensioner rubber
shoe for wear and the tensioner spring for cracks and deterioration. Check
the chain guides for wear and damage. Replace any defective parts with
new ones.
Ins talla tion
5 Install the sprocket holder and the right and left timing chain guides
onto the engine block. Tighten the bolts securely. The upper bolt in the left
timing chain guide should be installed finger-tight only. Then coat the en-
tire length of the chain contact surfaces of the guides with clean, high-quai-
ity moly-based grease.
6 Turn the crankshaftboltwith alarge wrench until the NumberOnepis-
ton is at Top Dead Center (TDC) (see Section 3). Apply a layer of clean
moly-based grease or engine assembly lube to the timing chain tensioner
plunger and install the tensioner spring and plunger loosely into the 02
pumpbody(seeillustration).
Note: ChryslerCorporationofficiaNyrecog-
nizesaprobiem with the timingchainatstart-up. Becauseofinsufficientoii
pressure, the timing chain will make a knocking noise when the engine is
first started. This willnot harm the engine, but it is necessary to update the
tensioner. Purchase from a dealership parts department a rubber spacer
and insert it into the tensioner spring. This spacer will prevent the oil from
flowing out of the tensioner and back into the oil pump.
 Loading...


