Calibration—434
n. Position the top of the display to the bottom grati
cule line.
o. CHECK—CRT display fo r aberrations typically less
than +4%, —4%, or a total of 6% peak to peak.
p. Connect the negative-going fast-rise output of the
Square-Wave Generator to the CH 2 input connector.
q. Adjust the Square-Wave Generator for a six division
display.
r. Set TRIGGER SLOPE to — and obtain a stable dis
play.
s. Position the bottom of the display to the top of the
graticule.
t. CHECK—CRT display for aberrations typically less
then +4%. —4%, or a total of 6% peak to peak.
u. Remove the Square-Wave Generator signal from the
CH 2 input connector and connect it to the CH 1 input
connector.
v. Set the Vertical Mode to CH 1 and position the
bottom of the display to the top of the graticule.
w. CHECK—CRT display for aberrations typically less
than +4%, —4%, or a total of 6% peak to peak.
x. Reconnect the positive-going fast-rise output from
the Square-Wave Generator to the CH 1 input connector
and set the TRIGGER SLOPE switch to +.
y. Set the CH 1 V O LTS/DIV switch to 5 mV.
z. Adjust the Square-Wave Generator for a six-division
display.
aa. V ertically center the display using the CH 1 POSI
TION control.
ab. CHECK—CRT display in 1 mV, 2 mV, and 5 mV
positions of the CH 1 and CH 2 V O LTS/DIV switches.
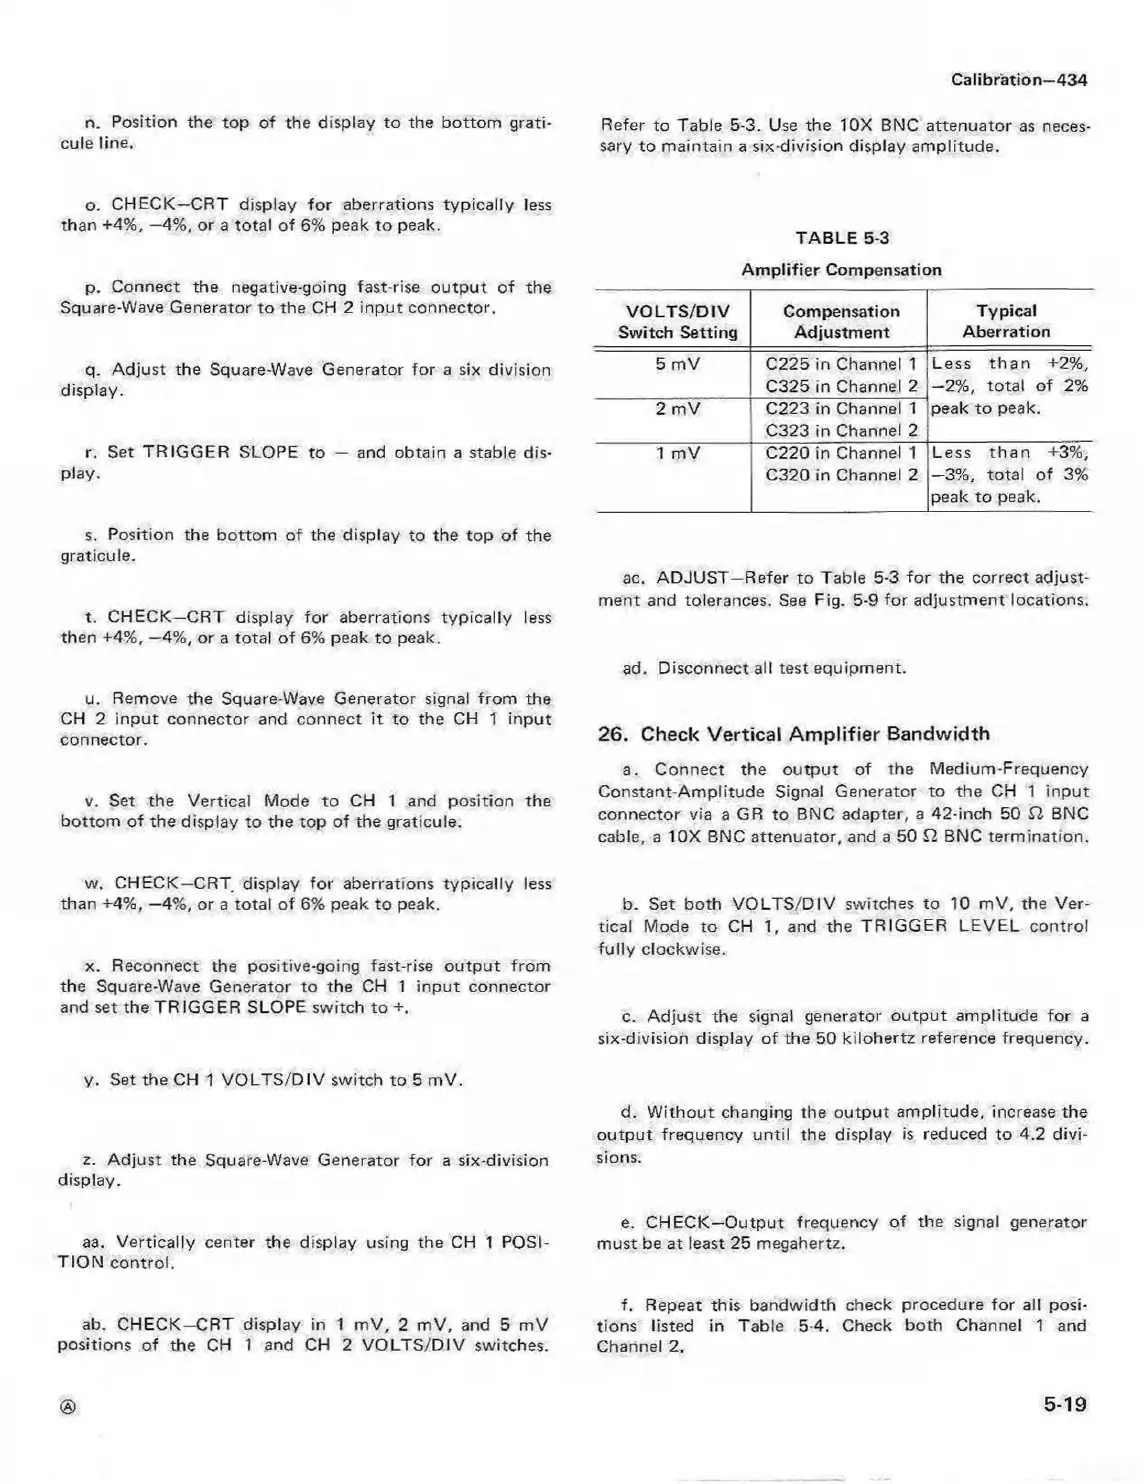
Refer to Table 5-3. Use the 10X BNC attenuator as neces
sary to maintain a six-division display amplitude.
TABLE 5-3
Amplifier Compensation
VOLTS/DIV
Switch Setting
Compensation
Adjustment
Typical
Aberration
5 mV C225 in Channel 1
C325 in Channel 2
Less th a n +2%,
-2 % , total of 2%
peak to peak.
2 mV
C223 in Channel 1
C323 in Channel 2
1 mV
C220 in Channel 1
C320 in Channel 2
Less th a n +3%,
-3 % , total of 3%
peak to peak.
ac. ADJUST—Refer to Table 5-3 fo r the correct adjust
ment and tolerances. See Fig. 5-9 for adjustment locations.
ad. Disconnect all test equipment.
26. Check Vertical A m plifier Bandwidth
a. Connect the output of the Medium-Frequency
Constant-Am plitude Signal Generator to the CH 1 input
connector via a GR to BNC adapter, a 42-inch 50 Ei BNC
cable, a 10X BNC attenuator, and a 50 £2 BNC termination.
b. Set both V O LTS/D IV switches to 10 mV, the Ver
tical Mode to CH 1, and the TRIGGER LEVEL control
fu lly clockwise.
c. Adjust the signal generator output am plitude for a
six-division display of the 50 kilohertz reference frequency.
d. W ithout changing the output amplitude, increase the
output frequency until the display is reduced to 4.2 divi
sions.
e. CHECK—Output frequency of the signal generator
must be at least 25 megahertz.
f. Repeat this bandwidth check procedure for all posi
tions listed in Table 5-4. Check both Channel 1 and
Channel 2.
®
5-19
 Loading...


