2
Press.
or
T
to
select
the
~
icon
and
press
@
to
open
the
setup
menus.
3
Press.
or
T
to
select
[DATE/
TIME
SETUP]
and
press
@.
4
Press.
or
T
to
select
[T.ZONE/
DST]
and
press
@.
The default setting is New York.
To
SET
THE
HOME
TIME
ZONE
5
Make
sure
that
the
*
time
zone
is
selected.
6 Press
....
or
~
to
select
the
area
that
corresponds
to
your
local
time
zone
and
press
@.
To
adjust for daylight saving time,
select the area name marked with a
.:,;
.
7 Press IFUNC·I
to
close
the
menu.
WHEN
YOU
TRAVEL
Select the time zone
to
match the local
time at your destination.
5 Press
T
to
move
the
orange
selection
frame
to
the
1'.
time
zone.
6 Press
....
or
~
to
select
the
area
that
corresponds
to
the
local
time
at
your
destination
and
press
@.
• Refer
to
the changing date and
time displayed on the screen.
•
To
adjust for daylight saving time,
select the area name marked with
a
-*.
7 Press IFUNC·I
to
close
the
menu.
I 'I
Getting
Ready
to
Start
Recording
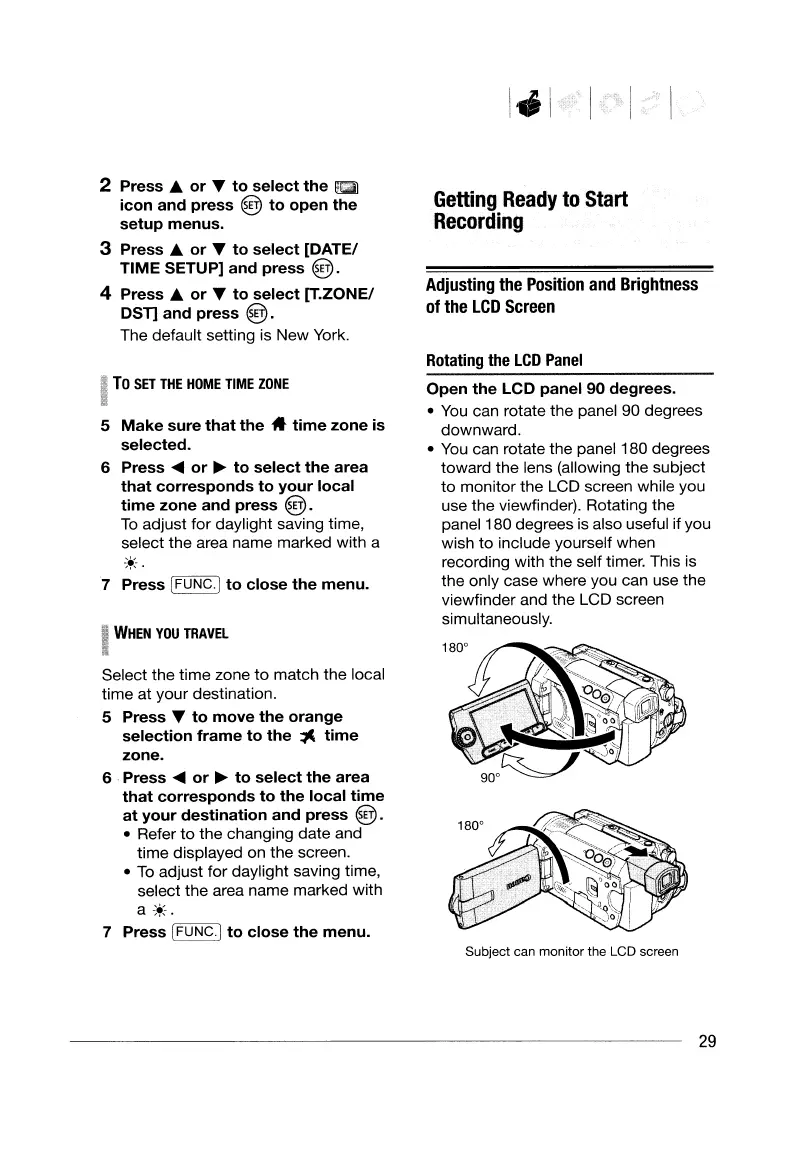
Adjusting
the
Position
and
Brightness
of
the
LCD
Screen
Rotating
the
LCD
Panel
Open
the
LCD
panel
90
degrees
.
•
You
can rotate the panel 90 degrees
downward.
•
You
can rotate the panel 180 degrees
toward the lens (allowing the subject
to
monitor the LCD screen while you
use the viewfinder). Rotating the
panel 180 degrees
is
also useful ifyou
wish to include yourself when
recording with the self timer. This is
the only case where you can use the
viewfinder and the LCD screen
simultaneously.
Subject can monitor the LCD screen
29
2
Press.
or
T
to
select
the
~
icon
and
press
@
to
open
the
setup
menus.
3
Press.
or
T
to
select
[DATE/
TIME
SETUP]
and
press
@.
4
Press.
or
T
to
select
[T.ZONE/
DST]
and
press
@.
The default setting is New York.
To
SET
THE
HOME
TIME
ZONE
5
Make
sure
that
the
*
time
zone
is
selected.
6 Press
....
or
~
to
select
the
area
that
corresponds
to
your
local
time
zone
and
press
@.
To
adjust for daylight saving time,
select the area name marked with a
.:,;
.
7 Press IFUNC·I
to
close
the
menu.
WHEN
YOU
TRAVEL
Select the time zone
to
match the local
time at your destination.
5 Press
T
to
move
the
orange
selection
frame
to
the
1'.
time
zone.
6 Press
....
or
~
to
select
the
area
that
corresponds
to
the
local
time
at
your
destination
and
press
@.
• Refer
to
the changing date and
time displayed on the screen.
•
To
adjust for daylight saving time,
select the area name marked with
a
-*.
7 Press IFUNC·I
to
close
the
menu.
I 'I
Getting
Ready
to
Start
Recording
Adjusting
the
Position
and
Brightness
of
the
LCD
Screen
Rotating
the
LCD
Panel
Open
the
LCD
panel
90
degrees
.
•
You
can rotate the panel 90 degrees
downward.
•
You
can rotate the panel 180 degrees
toward the lens (allowing the subject
to
monitor the LCD screen while you
use the viewfinder). Rotating the
panel 180 degrees
is
also useful ifyou
wish to include yourself when
recording with the self timer. This is
the only case where you can use the
viewfinder and the LCD screen
simultaneously.
Subject can monitor the LCD screen
29
 Loading...