I~I
Connecting
to
a
Computer
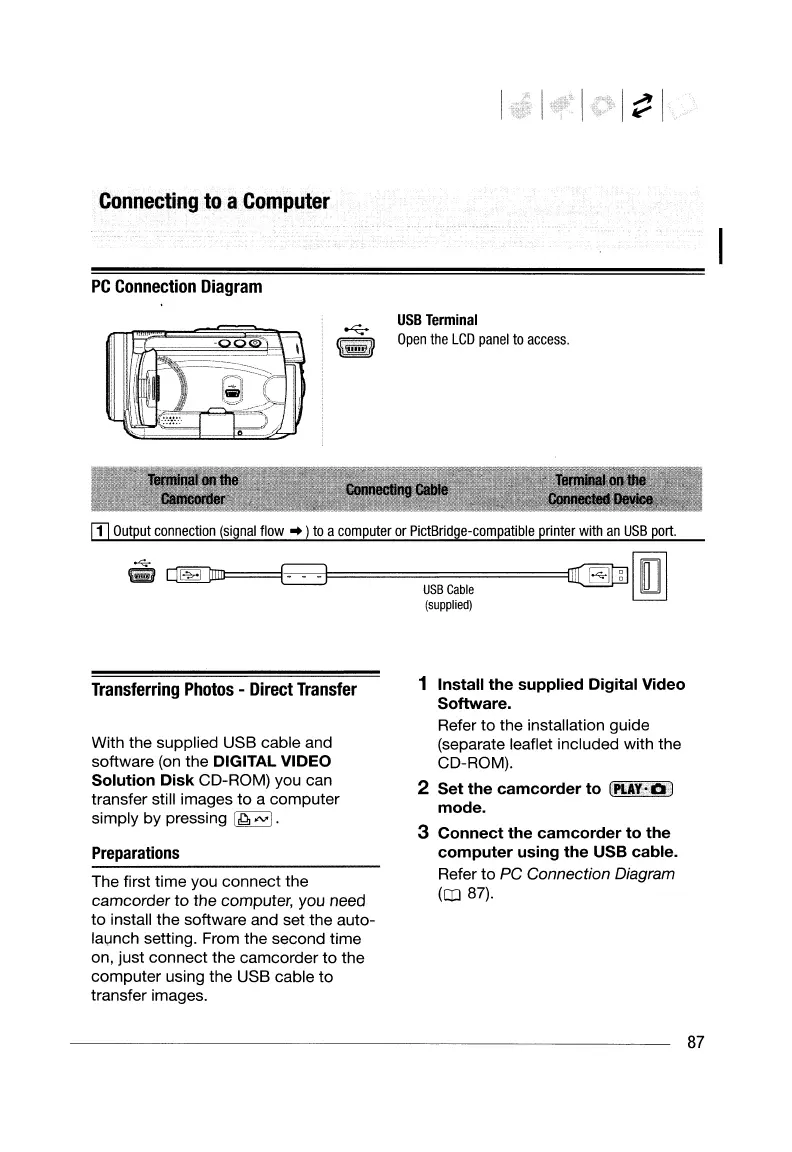
PC
Connection
Diagram
USB
Terminal
Open
the
LCD
panel
to
access.
IT]
Output
connection
(signal
flow"
)
to
a
computer
or
PictBridge-compatible
printer
with
an
USB
port.
~
~==jEJ~~-
~-
=======ImrEUJrml
USB
Cable
~
(supplied)
Transferring
Photos
-
Direct
Transfer
With the supplied USB cable and
software (on the
DIGITAL VIDEO
Solution Disk CD-ROM) you can
transfer still images
to
a
computer
simply by pressing
[,Q,
""'I.
Preparations
The first time you connect the
camcorder
to
the computer, you need
to
install the software and set the auto-
lal,Jnch
setting. From the second time
on, just connect the camcorder
to
the
computer
using the USB cable to
transfer images.
1 Install the supplied Digital Video
Software.
Refer
to
the installation guide
(separate leaflet included with the
CD-ROM).
2 Set the camcorder to
[pl.n·O)
mode.
3 Connect the camcorder to the
computer using the USB cable.
Refer
to
PC
Connection Diagram
(OJ 87).
87
I~I
Connecting
to
a
Computer
PC
Connection
Diagram
USB
Terminal
Open
the
LCD
panel
to
access.
IT]
Output
connection
(signal
flow"
)
to
a
computer
or
PictBridge-compatible
printer
with
an
USB
port.
~
~==jEJ~~-
~-
=======ImrEUJrml
USB
Cable
~
(supplied)
Transferring
Photos
-
Direct
Transfer
With the supplied USB cable and
software (on the
DIGITAL VIDEO
Solution Disk CD-ROM) you can
transfer still images
to
a
computer
simply by pressing
[,Q,
""'I.
Preparations
The first time you connect the
camcorder
to
the computer, you need
to
install the software and set the auto-
lal,Jnch
setting. From the second time
on, just connect the camcorder
to
the
computer
using the USB cable to
transfer images.
1 Install the supplied Digital Video
Software.
Refer
to
the installation guide
(separate leaflet included with the
CD-ROM).
2 Set the camcorder to
[pl.n·O)
mode.
3 Connect the camcorder to the
computer using the USB cable.
Refer
to
PC
Connection Diagram
(OJ 87).
87
 Loading...