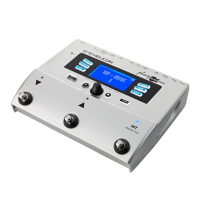
Getting to know VL3X
VL3X – Reference manual (updated 2015-07-16) 73
Backing Track Import
Let’s now tackle the very first step in working
with Backing Tracks: Getting them into your
VL3X. For working with Backing Tracks, see “Us-
ing Backing Tracks”.
First, you will need to get your hands on a USB
flash drive (also called a USB memory stick or
thumb drive). An external hard disk drive should
work too, but please note that there is no official
support for using external hard disk drives.
Supported USB flash
drive file systems
The USB flash drive needs to be formatted us-
ing the FAT32 file system. NTFS, HFS+ (the OSX
file system) or other file systems cannot be read
by VL3X.
Instructions for formatting a USB flash drive with
FAT32 can be found here:
wikihow.com/Format-FAT32
Next, you need to copy some Backing Tracks to
the USB flash drive.
Copying audio tracks to
your USB flash drive
VL3X can only import MP3 or WAV audio files.
► Insert the USB flash stick into your computer
and drag/drop your Backing Tracks onto the
drive. You can also use a file manager appli-
cation.
► Make sure to copy all audio files to the root
directory of the flash drive. That means you
should not put audio files into folders or sub-
folders. VL3X will not find these files.
► Insert the USB flash drive stick into the USB
Host Port on VL3X.
► VL3X will recognize all valid audio files in the
root directory of the flash drive and make
them available for import.
► Press the Store button once.
► Use the arrow buttons below the Control Knob
to navigate to the TRACK IMPORT tab.
Backing Track Import
► You will see a list of available Backing Tracks
to import.
 Loading...