Home
Yanmar
Excavators
SV26
Yanmar SV26 User Manual
5
of 1
of 1 rating
205 pages
Give review
Manual
Specs
To Next Page
To Next Page
To Previous Page
To Previous Page
Loading...
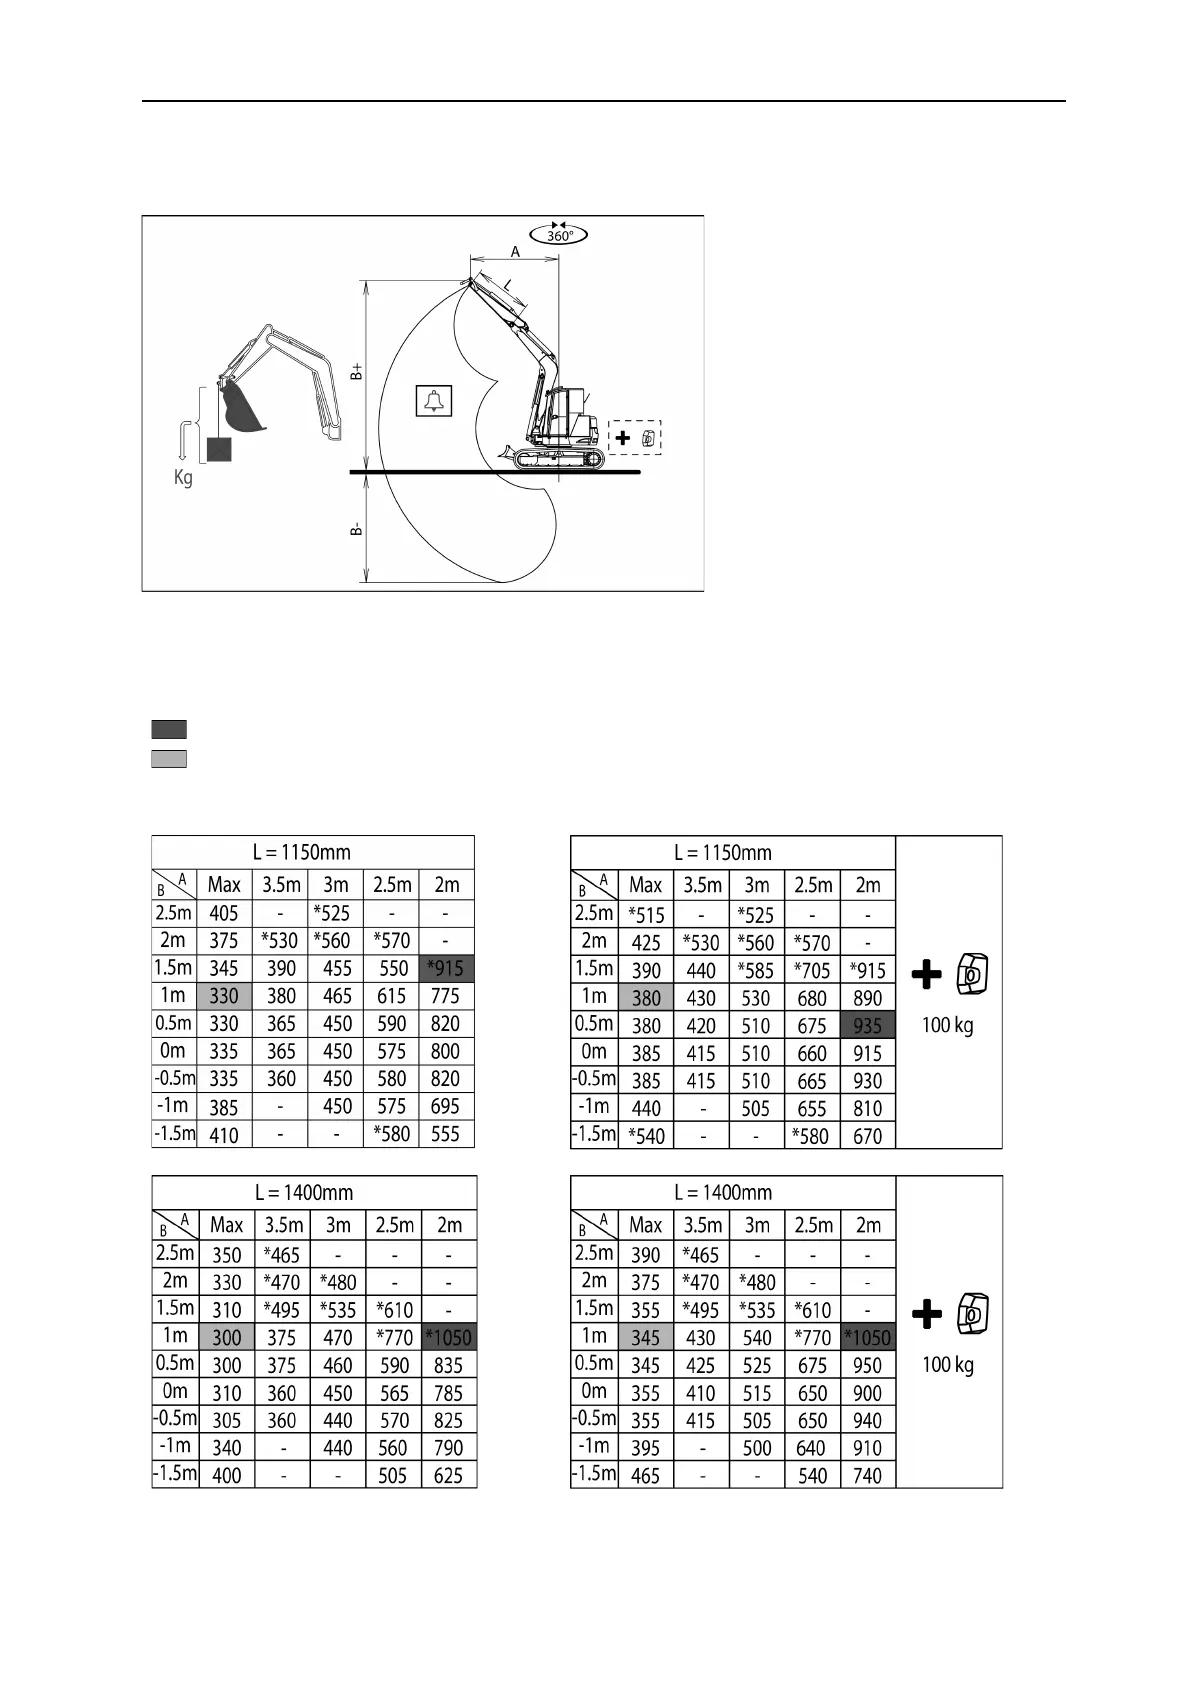
172
2
L
IFTING
SV26
C
ANOPY
Machine
with
canopy
and
rubber
tracks.
A
=
T
ilt
from
the
rotation
axis
B
=
Attachment
point
height
(compared
to
the
tracks)
C
=
Load
weight
=
Maximum
load
raised
by
the
machine
=
Housing
overload
alarm
value
setting
*
=
Hydraulic
capacity
limits
of
the
lifting
force
188
190
Table of Contents
Table of Contents
11
A Description and Illustration of the Machine
18
Applications and Regulations
20
Applications
20
Warranty
20
Driving Permits
20
Lifting
20
Iidentification Plates
21
Machine Serial Number Plate
21
Engine Serial Number Plate
21
EPA Information Plate
21
Spare Parts Order and Intervention Request
22
Warning Labels
24
Location of the Warning Adhesive Labels
24
Explanation of the Warning Adhesive Labels
26
Identification of Important Parts
29
General View of the Machine
29
Commands and Switches
30
Description of the Driving Position
31
Operator Display Station
31
Indicator Lights
31
Diesel Gauge
33
Cooling Fluid Temperature Indicator
33
Time Counter
33
Navigation Keys
34
Information and Error Icons
34
Switches
35
Start Key
35
Headlight Switch
36
Cigar Lighter
36
Horn
37
Windscreen Wiper Switch and Windscreen Wiper
37
Ventilation Switch
37
Interior Lighting Switch
38
Boom Rotation Selection Switch / PTO 1
38
2Nd Gear Switch
38
Joysticks and Pedals
39
Locking Lever
40
Right Command Lever
40
3Rd Hydraulic Circuit Control (P.T.O. 1)
41
Left Command Lever
41
Travel Levers and Pedals
42
Blade Lever
44
Power Socket
44
Driver's Seat
45
Location for the Tools and User Manual
45
Toolkit
45
User Manual
46
Fuses
46
Fusebox
47
Ash Tray
48
Cabin
49
Cab Side Door
49
Upper Windscreen
50
Right Hand Cab Window
51
Headlights
52
Heating Valve
53
Options
54
Long Arm
54
3Rd Hydraulic Circuit
54
PTO Line 2
55
Automatic Engine Idle
56
Additional Counterweights
57
Lifting Kit
57
Lifting Ring
58
Safety Valves
58
Overload Box
58
Lifting Tables
59
Movement Alarm
59
Protection of Cylinder
59
Plug-In Flashing Light
60
Keypad Immobilizer
60
The Immobilizer Key Is Coded
61
Anti-Starter with Key
61
Fleet Management System MTECH
62
Bio Oil
62
Radio
63
Quick Coupler
63
Centralized Greasing System
64
Mechanical Quick Coupler
65
Mechanical Quick Coupler RETROMATIC MORIN
67
Mechanical Quick Coupler ARDEN EQUIPMENT
68
Mechanical Quick Coupler CSERI
68
Quick Hydraulic Attachment CSERI
69
Dismantling the Accessory
70
Mounting the Accessory
70
Covers
72
Bonnet
72
Cover B
73
Circuit Breaker
73
B Operating Instructions
74
Basic Precautions
76
Comply with Your Workplace's Safety Rules
76
Put the Safety Mechanisms in Place
76
Wear Suitable Clothing and Protective Equipment
76
Do Not Drive under the Influence of Alcohol, Drugs or Medication
77
Provide Adequate Ventilation When Working in an Enclosed Space
77
Protect Plants from Hot Air and Exhaust Fumes
77
Keep Fuel and Oil Away from Sparks
77
Avoid Removing the Caps When the Temperatures Are High
78
Have an Extinguisher and a First Aid Kit
78
Avoid any Unauthorised Modifications
78
Precautions for Optional Parts and Tools
79
Warning Concerning the Cab Windows
79
Cabin's Emergency Exit
79
Usage Precautions
80
Precautions before Starting the Engine
80
Make Sure that Your Workplace Is Safe
80
Clean the Machine
80
Check the Safety Structures
81
Check the Position of the Blade
82
Accessing the Machine
82
Movement Precautions
83
Fasten Your Safety Belt and Adjust the Rearview Mirror(S)
83
Machine's Danger Zone
83
Movement and Accessories
84
Driving the Machine on a Slope
84
Working Precautions
86
Precautions for Using the Equipment
86
Dangerous Tasks
88
Working Near Electricity Lines
89
Working Near Obstacles
89
Emergency Stop and Securing the Machine
89
Working on a Slope
90
Working in an Area Covered with Snow
90
Working on Unstable Ground
91
Working in a Submerged Area
91
Working in a Muddy Area
92
Working in an Area with Reduced Visibility
92
Parking Precautions
93
Parking Location
93
Stopping the Engine
93
Precautions for the Accessories
94
Precautions for Using Optional Accessories
94
Precautions for the Battery
95
Precautions for the Engine
96
Checks before Starting the Machine
97
Overall Visual Inspection
97
Checking and Topping up the Level of Cooling Fluid
98
Checking and Topping up the Engine Oil Level
99
Checking and Topping up the Fuel Level
100
Checking and Topping up the Hydraulic Oil Level
102
Checks after Start-Up
105
Checks after Use
106
Operator LCD Display Station Interfaces
107
Indication of Functions
107
User Interface
108
Maintenance Interface
108
Machine Usage Management Interface
108
Configuration Interface
109
Using the Machine in Cold Weather
110
Preparation for Use in Cold Weather
110
Starting in Cold Weather
110
Precautions after Use
111
When Cold Weather Is over
111
Rubber Tracks
112
Correct Use of Rubber Tracks
112
Comparison between Rubber Tracks / Steel Tracks
112
Rubber Track Warranty
112
Precautions for Using Rubber Tracks
112
Track Maintenance
114
Track Replacement
115
Handling the Bucket
116
Machine Stability When Using with a Bucket or an Accessory
116
Compatible Accessories
118
Operation of the Retro Bucket
120
Digging Trenches
120
Loading
121
Handling of Accessories
122
Hydraulic Hammer SOCOMEC
122
Accessory Change by Direct Coupling
124
Dismantling the Accessory
124
Mounting the Accessory
125
Loading Bucket
126
Load Lifting
128
Implementing the 3Rd Hydraulic Circuit
129
Description
129
3Rd Circuit Selector
129
Mounting the Accessory
130
Precautions for Using the Accessory
130
Transporting the Machine
131
Loading/Unloading the Machine
131
Precautions for Loading/Unloading the Machine
131
Procedure
131
Immobilising the Machine on the Truck
132
Tying down the Machine
132
Slinging the Machine
134
Detecting Anomalies
136
Phenomena that Do Not Constitute Faults
136
Engine
137
Electrical Equipment
138
Machine Structure
139
If the Battery Is Discharged
140
Precautions for Connecting and Disconnecting the Starter Cables
140
Connecting the Starter Cables
141
Starting the Engine
141
Disconnecting the Starter Cables
141
Charging the Battery
142
Towing the Machine
143
C Periodic Maintenance Programme
144
Periodic Inspections and Upkeeps
146
Maintenance Precautions
148
Precautions before Maintenance
148
Stop the Engine
148
Removing the Residual Pressure
148
Place a Warning Label
149
Establish a Safety Perimeter
149
Keep the Machine Clean
149
Precautions During Maintenance
150
Oil and Grease
150
Tools
150
Parts
150
Dismantling the Accessory
151
Working under the Machine
151
Lighting
151
Battery
152
Hoses
152
Radiator Ventilator
152
Soldering
152
Waste Processing
153
Recommended Greases and Fluids
154
First Maintenance
155
After the First 50 Hours of Service
155
After the First 250Hours of Service
155
List of Periodic Inspections and Maintenance Operations
156
Maintenance by the Operator
159
Daily Maintenance
159
Checking the Machine before Use
159
Checks after Using the Machine
159
Checking the Commands
159
Checking the Seat
159
Greasing Points
160
Using the Centralized Greasing System
161
Cleaning the Separator/Decanter
162
Purging the Fuel Tank
163
Checking the Hydraulic Hoses
163
Visual Inspection of the Fuel Hoses
163
Greasing the Pin and Rotation Crown
163
Non Periodic Maintenance
164
Fuse Replacement
164
Top up the Windscreen Washer Fluid. ( for Cab )
164
Replacing the Windscreen Wiper ( for Cab )
164
Accessory State Check
164
Maintenance Every 50 Hours
165
Rubber Track Maintenance
165
Checking the Condition of the Tracks
165
Track Replacement
166
Tension Check
166
Increasing the Tension
167
Releasing the Tension
168
Steel Track Maintenance
169
Checking the Condition of the Tracks
169
Track Replacement
169
Tension Check
169
Increasing the Tension
170
Releasing the Tension
171
Maintenance by the Dealer
172
D Conservation and Storage
174
Conservation
176
Storage
176
Recommissioning
178
E Technical Data
180
Specifications
182
Working Dimensions
183
Noise Emitted by the Machine
184
Vibrations Emitted by the Machine
185
F Lifting Capacities
186
Lifting SV26 Cabin
188
Lifting SV26 Canopy
189
Appendices
190
A List of Error Codes Displayed on the Operator Display Station
191
B Control Sheets to be Photocopied
194
C Notes
200
D Lashing Record
201
Index
202
5
Based on 1 rating
Ask a question
Give review
Questions and Answers:
Need help?
Do you have a question about the Yanmar SV26 and is the answer not in the manual?
Ask a question
Yanmar SV26 Specifications
General
Brand
Yanmar
Model
SV26
Category
Excavators
Language
English
Related product manuals
Yanmar B95W
310 pages
Yanmar ViO 27-5
240 pages
Yanmar ViO38-6
202 pages
Yanmar ViO80-1A
215 pages

 Loading...