Home
AudioCodes
Adapter
MP-20 Series
AudioCodes MP-20 Series User Manual
5
of 1
of 1 rating
346 pages
Give review
Manual
Specs
To Next Page
To Next Page
To Previous Page
To Previous Page
Loading...
User's
Manual
294
Docum
ent #: LTRT
-
50614
MP
-
20x Multim
edia Hom
e Gateway
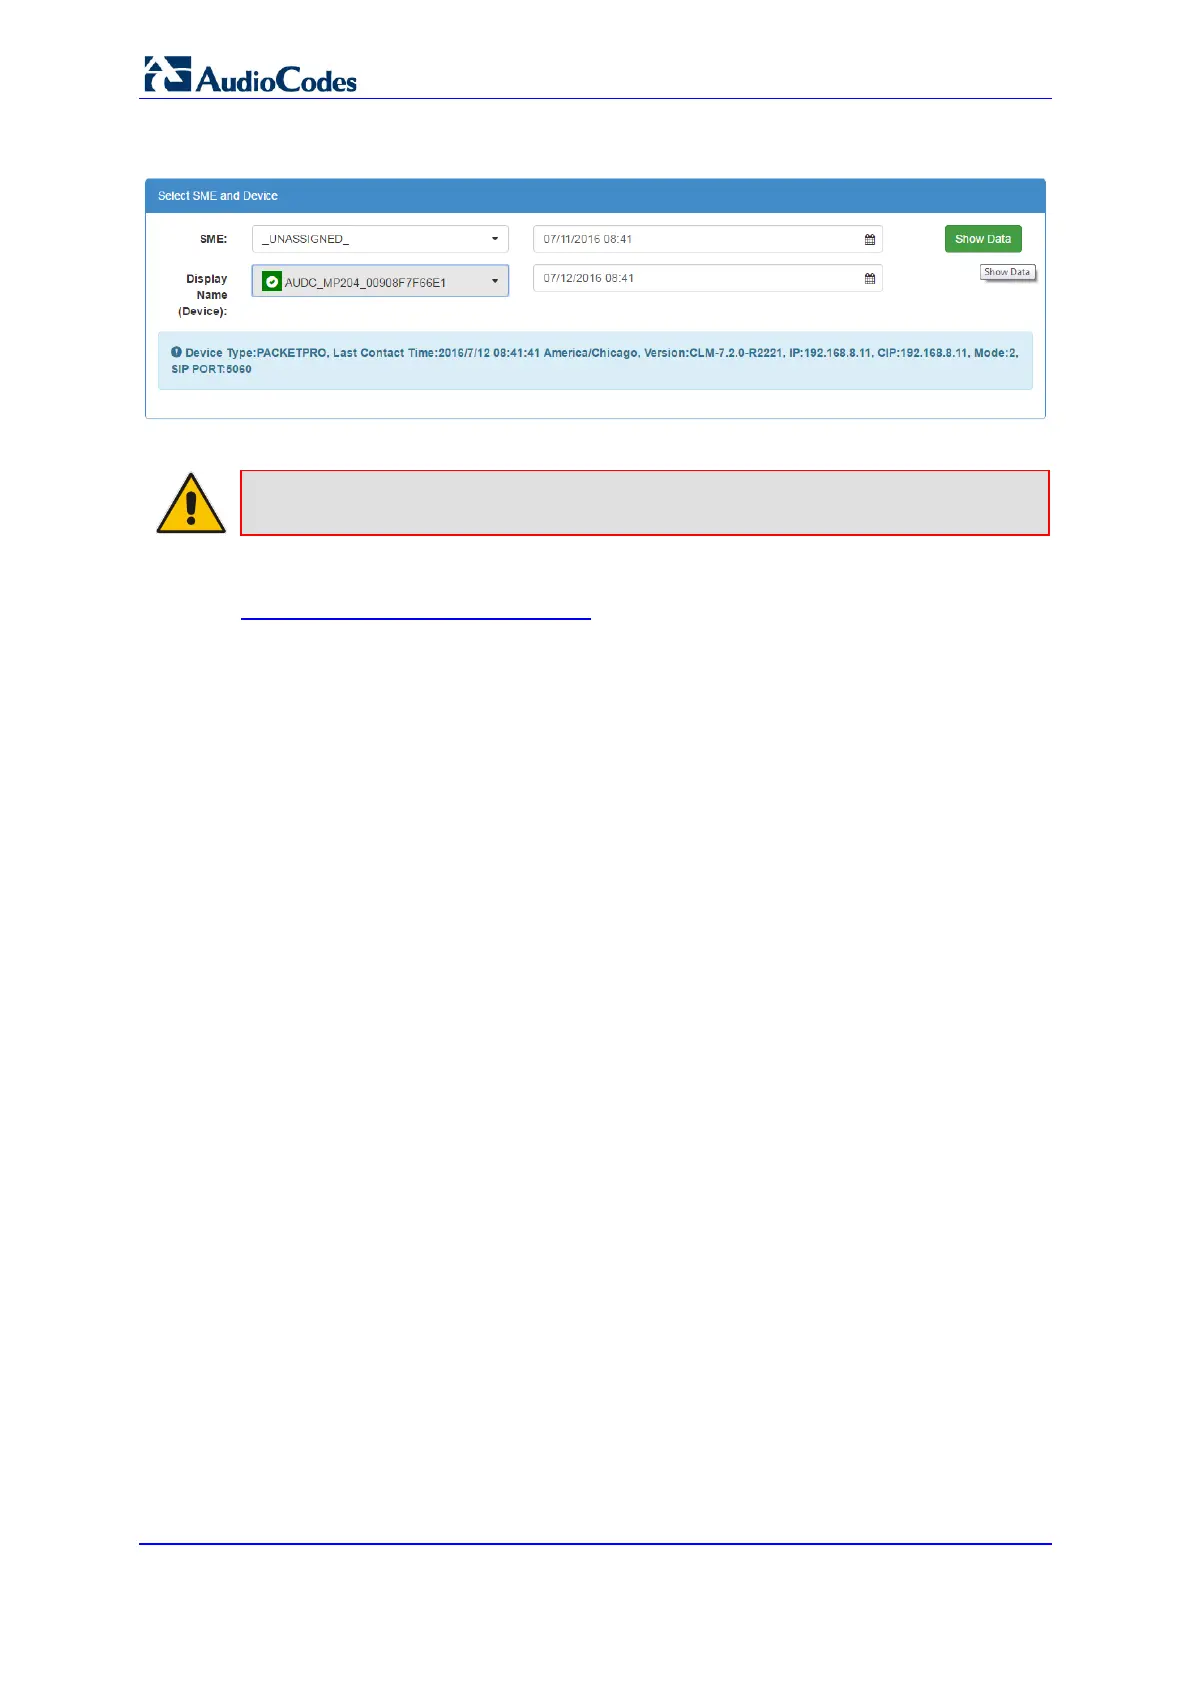
Figure
18
-4
:
Pack
etSma
rt Web Po
rtal
–
Sel
ecting
the Device
Note:
Active de
vices are in
dicated with
a green t
ick.
For m
ore inform
ation, visit t
he Pack
etSmar
t Help website:
https://p
acketsm
art.broads
oft.com
/help/
293
295
Table of Contents
Default Chapter
3
Table of Contents
3
Abbreviations and Terminology
15
Customer Support
15
Documentation Feedback
16
1 Introduction
17
Figure 1-1: Rear Panel MP-20Xb Models
17
Table 1-1: MP-20X Models
17
2 Cabling the MP-20X Telephone Adapter
19
Figure 2-1: Cabling the Device (Example Using MP-204B)
19
Table 2-1: MP-204B Leds Description
20
3 Setting up a Network Connection
21
Defining Your Pc's Network Connection
21
Windows XP
22
Linux
22
Figure 3-1: IP and DNS Configuration
22
Configuring the MP-20X's Network Connection
23
Logging in to MP-20X Web Interface
23
Figure 3-2: Logging in
23
Configuring 'Quick Setup' Screen Parameters
24
Configuring Your Internet Connection
24
Figure 3-3: Quick Setup Screen
24
Figure 3-4: Internet Connection - Automatic IP Address Ethernet Connection
25
Figure 3-5: Internet Connection - Manual IP Address Ethernet Connection
26
Figure 3-6: Internet Connection - Pppoe
27
Figure 3-7: Internet Connection - Point-To-Point Tunneling Protocol
27
Figure 3-8: Layer 2 Tunneling Protocol
28
Figure 3-9: Internet Connection - no Internet Connection
28
Configuring 3G/LTE USB Modem
29
Figure 3-10: WAN 3G USB Modem
29
Figure 3-11: WAN 3G USB Modem Properties
29
Figure 3-12: WAN 3G USB Modem Properties - Settings
30
Configuring Automatic Internet Dialer Detection
31
4 Device Quick Setup
33
Preparing Initial Configuration
33
Figure 4-1: Login Screen
33
Table 4-1: Login Parameters Description
33
Configuring SIP Signaling Protocol
34
Figure 4-2: Signaling Protocol
34
Figure 4-3: Line Settings
34
Figure 4-4: Line Settings
35
5 Getting Started with the Web Interface
37
Logging into the Web Interface
37
Figure 5-1: Login Screen
37
Menu Bar Description
38
Table 5-1: Menu Description
38
Managing Tables
41
Figure 5-2: Typical Table Structure
41
Table 5-2: Table Action Icons Description
41
Configuring Users
42
Figure 5-3: Users Screen
42
Figure 5-4: Users Settings Screen
43
Web User Permissions
45
Figure 5-5: Group Settings Screen
45
Print Commands
45
Set Commands
54
Associated Elements
55
Configuring Scheduler Rules
55
Figure 5-6: Scheduler Rules Screen
55
Figure 5-7: Edit Scheduler Rule Screen
55
Figure 5-8: Edit Time Segment Screen
56
Figure 5-9: Edit Hour Range Screen
56
Configuring Network Objects
57
Figure 5-10: Network Objects Screen
57
Figure 5-11: Edit Network Objects Screen
57
Figure 5-12: Edit Item Screen
57
Configuring Protocols
59
Figure 5-13: Advanced - Protocols
59
Logging out the Web Interface
60
Figure 5-14: Advanced - Protocols - Edit Service
60
Figure 5-15: Advanced - Protocols - Edit Service - Server Ports
60
6 Viewing a Graphical Display of the Device's Network
61
Figure 6-1: Map View Screen
61
Table 6-1: Map View Icon Description
62
7 Configuring Computers for Connecting to Device's Network
63
Wired Computers
63
Configuring Computers Running on Windows 7
63
Configuring Computers Running on Linux
64
Figure 7-1: Internet Protocol (TCP/IP) Properties Dialog Box
64
8 Setting up Your Device
65
Setting up an Internet Connection Using the Web Interface
65
Figure 8-1: Internet Connection
65
WAN Ethernet
66
Figure 8-2: WAN Ethernet - Manual IP Address Ethernet Connection
66
Manual IP Address Ethernet Connection
66
Automatic IP Address Ethernet Connection
67
Figure 8-3: Automatic IP Address WAN Ethernet Connection
67
Figure 8-4: Pppoe WAN Ethernet Connection
67
Pppoe
67
Figure 8-5: PPTP WAN Ethernet Connection
68
Pptp
68
Figure 8-6: L2TP WAN Ethernet Connection
69
L2Tp
69
Using the Automatic Dialer for Internet Connection
70
Recommended Configuration
70
Setting up and Starting the Automatic Dialer
71
Quitting Automatic Dialer for Manual Configuration
71
9 Configuring Voip Parameters
73
Configuring the SIP Signaling Protocol
74
Figure 9-1: Signaling Protocol Tab Screen
74
Table 9-1: Signaling Protocol Tab Parameters Description
74
Configuring Proxy Redundancy
79
Figure 9-2: Configuring Proxy Redundancy
80
Configuring Dialing Parameters
82
Figure 9-3: Dialing Tab Screen
82
Table 9-2: Dialing Tab Parameters Description
83
Syntax for Digit Maps and Dial Plans
86
Table 9-3: Dial Plan (for Left of '=' Sign) and Digit Map Syntax
86
Table 9-4: Digit Map Example
87
Configuring Media Streaming
88
Figure 9-4: Media Streaming Tab Screen
88
Configuring Codecs
89
Supported Codecs
89
Table 9-5: Media Streaming Tab Parameters Description
89
Packetization Time
90
Configuring Voice and Fax
91
Figure 9-5: Voice and Fax Tab Screen
91
Table 9-6: Voice and Fax Tab Parameters Description
91
Configuring Supplementary Services
96
Figure 9-6: Services Tab Screen
96
Table 9-7: Services Tab Parameters Description
97
Voice Menu Guidance
100
Configuring Voice Menu
100
Configuring Voice Menu through the CLI
100
Configuring Voice Menu through the Web Interface
100
Voice Menu Configuration Parameters
100
Configuring Micro PBX Line Settings
102
Figure 9-7: Line Settings Tab Screen
102
Figure 9-8: Line Settings Screen for a New Line
103
Configuring Line Extensions
105
Figure 9-9: Extension Settings Tab Screen
105
Figure 9-10: Extension Settings Screen
105
Configuring Speed Dialing
107
Figure 9-11: Speed Dial Tab Screen
107
Figure 9-12: Speed Dial Settings Screen (Proxy Destination)
107
Figure 9-13: Speed Dial Settings Screen (Local Line Destination)
108
Figure 9-14: Speed Dial Settings Screen (Direct Call Destination)
108
Enabling Polarity Reversal
109
Figure 9-15: Telephone Interface Tab Screen
109
10 Making Voip Calls with Your Analog Telephones
111
Making a Call
111
Answering a Waiting Call
111
Putting a Call on Hold
112
Transferring a Call
112
Forwarding Calls to Another Phone
113
Establishing a 3-Way Conference Call
114
11 Quality of Service
115
Qos Wizard
116
Figure 11-1: Qos Wizard Tab Screen
116
Configuring Traffic Shaping
117
Configuring Traffic Shaping
118
Figure 11-4: Edit Device Traffic Shaping Screen
119
Configuring Shaping Classes
120
Class Rules
121
Configuring Traffic Priority
123
Figure 11-7: Traffic Priority Screen
124
Figure 11-8: Add Traffic Priority Rule Screen
125
Configuring DSCP Mapping
127
Figure 11-10: Edit DSCP Settings
128
Configuring 802.1P Mapping
129
Configuring Class Statistics
130
Configuring Basic Voip Qos Example
131
Figure 11-14: Qos - Edit Device Traffic Shaping - Submitting the Configuration
132
12 Network Connections
133
Configuring a WAN Connection
133
Figure 12-1: Network Connections Screen
134
WAN Ethernet Connections
135
External DSL Modem Using Pppoe
135
Figure 12-4: Internet Connection – External DSL Modem
136
External Cable Modem/Fiber Transceiver Without Authentication
137
Figure 12-8: Internet Connection – External Cable Modem
138
Figure 12-10: Ethernet Connection Summary
139
External Cable Modem/Fiber Transceiver with L2TP
140
Figure 12-13: Internet Cable Modem Connection - L2TP
141
Figure 12-15: L2TP Connection Summary
142
Dhcp
143
Manual IP Address
144
Figure 12-20: Internet Connection – Ethernet Connection
145
Figure 12-22: Manual IP Address Configuration Screen
146
LAN Connection
147
LAN Ethernet
147
General Tab
148
Settings Tab
148
Advanced Tab
150
Routing Tab
150
WAN Connection
151
General Tab
151
Settings Tab
152
Internet Protocol Settings
153
Table 12-1: Settings Tab - Parameter Descriptions
153
Figure 12-32: Manually Defining DNS Server
154
Figure 12-33: IP Address Distribution - DHCP Server
155
Routing Tab
156
Table 12-2: Routing Parameters
156
Figure 12-37: Route Settings Screen
157
PPP Tab
158
Table 12-3: PPP Tab Parameter Descriptions
158
PPTP Tab
160
Table 12-4: PPTP Tab Parameter Descriptions
160
Advanced Tab
161
VLAN Settings
162
Figure 12-43: Advanced Connection
163
Figure 12-45: Connection Summary
164
Settings Tab
165
Table 12-5: VLAN Interface - General Communication Parameters
165
IP Address Distribution
166
Table 12-6: IP Address Distribution Parameters
166
Table 12-7: DHCP Relay
166
Figure 12-47: IP Address Distribution - DHCP Relay
167
Table 12-8: Assigning Static IP Addresses to Network Computers
167
Routing Tab
168
Table 12-9: Routing Parameters
168
Advanced Tab
169
LAN-WAN Bridge Settings
170
Figure 12-54: Adding New Network Bridging
171
Editing LAN-WAN Bridging
172
Figure 12-57: VLAN Settings Screen
173
13 Add-On Servers and Disk Management
175
External File Server
175
Automatic File Sharing
176
Figure 13-3: User Screen
177
Print Server
178
Connecting and Setting up a Printer on Windows
179
Print Protocols
180
Table 13-1: IPP, Samba, and LPD Specifications
180
Internet Printing Protocol
181
Figure 13-10: Specify a Printer
182
Figure 13-11: Printer Screen – IPP URL (Linux)
183
Figure 13-13: Add Printer
184
Figure 13-15: Printing Protocol
185
Figure 13-17: Print & Fax
186
Figure 13-18: Printer Browser – IP Printer
187
Figure 13-19: Print & Fax – New IPP Printer
188
Microsoft Shared Printing (Samba)
189
Figure 13-21: Printer Browser – Default Browser
190
Figure 13-23: Printer Browser – MP264
191
Line Printer Daemon (LPD)
192
Figure 13-26: Local Printer
193
Figure 13-28: Add Port
194
Figure 13-30: Printer Port Monitor Configuration
195
Figure 13-31: Add Printer Wizard
196
Figure 13-32: Print & Fax
197
Figure 13-33: Printer Browser – LPD Printer
198
Figure 13-34: Print & Fax – New LPD Printer
199
Storing and Using Printer Drivers
200
14 Remote Device Management
201
Overview
201
Remote Configuration
201
Table 14-1: Main Configuration Parameter Groups
202
Figure 14-1: Remote Management Interfaces
202
Remote Management
203
Firmware Upgrade
203
Status and Performance Monitoring
204
Table 14-2: Status and Performance Monitoring Parameters
204
Alarms, Notifications and Logging
205
Table 14-3: Notifications and Logged Events
205
Table 14-4: Severity of Logged Events
205
Enabling Remote Management
206
Figure 14-2: Remote Administration Screen
207
Securing Remote Management with Certificates
209
Figure 14-4: Create Self Signed X509 Certificate Screen
210
Figure 14-7: File Download Window
211
Figure 14-9: Ca's Certificates
212
Remote Configuration and Management Interfaces
213
Embedded Web Server
213
Table 14-5: Operations Per Configuration/Management Interface
213
And TR-104 CPE WAN Management Protocol
214
Configuring the Device Via TR-069 and TR-104
215
Table 14-6: Internetgatewaydevice.wandevice.I.wanconnectiondevice.I.wanipconnection.I
215
Table 14-7: Internetgatewaydevice.landevice.I.lanethernetinterfaceconfig
217
Table 14-8: Internetgatewaydevice.landevice.I.lanhostconfigmanagement
217
Table 14-9: Internetgatewaydevice.services.voiceservice.I.capabilities
218
Table 14-10: Internetgatewaydevice.services.voiceservice.I.capabilities.codecs
221
Table 14-11: Internetgatewaydevice.services.voiceservice.I.voiceprofile
221
Table 14-12: Internetgatewaydevice.services.voiceservice.I.voiceprofile.I.sip
222
Monitoring the Device Status Via TR-069 and TR-104
223
Table 14-13: Internetgatewaydevice.deviceinfo
223
Table 14-14: Internetgatewaydevice.wandevice.I.wanconnectiondevice.I
224
Wanipconnection.I.stats
224
Table 14-15: Internetgatewaydevice.landevice.I.lanethernetinterfaceconfig.I.stats
225
Table 14-16: Internetgatewaydevice.services.voiceservice.I.voiceprofile.I.line.I.stats
225
Security Concerns and Measures
227
Snmp
227
Enabling SNMP in the Web Interface
228
Configuring the Device Via SNMP
229
Status Monitoring of System and Network Interfaces Via SNMP
229
Table 14-17: Table 3-13: Information Elements Available Via MIB-II
229
Security Concerns and Measures
230
Automatic File Download
231
Configuration File Download
231
Firmware File Download
231
Syslog
231
Redirect Server
232
Security Concerns and Measures
232
Telnet CLI
232
Figure 14-14: Redirect Server Configuration Process
233
Broadsoft Broadworks DMS Provisioning
234
Default Behavior
234
Disabling DHCP Options 66 and 67
234
Provisioning Using DHCP Options 66/67 and TFTP
234
Table 14-18: DHCP Options 66/67 Descriptions
234
15 Security
237
General Security Level Settings
238
Table 15-1: Behavior for the Three Security Levels
239
Configuring Access Control
240
Configuring Port Forwarding
242
Figure 15-5: Port Forwarding Screen
243
Figure 15-8: Specifying Public IP Address
244
Figure 15-9: Select Check Box of Port Forwarding Rule (Active)
245
Configuring a DMZ Host
246
Configuring Port Triggering
247
Figure 15-12: Adding Port Triggering Rules
248
Figure 15-15: Edit Service Opened Ports
249
Configuring Website Restrictions
250
Figure 15-19: Add a Specific Host
251
Configuring NAT
253
Figure 15-23: Adding NAT/NAPT Rule
254
Viewing Current Connections
256
Configuring Advanced Filtering
257
Figure 15-26: Add Advanced Filter
258
Figure 15-27: Add a Specific Host
259
Viewing the Security Log
261
Figure 15-30: Security Log Settings
262
16 Advanced Networking Features
265
IP Address Distribution
265
Figure 16-1: DHCP Server Summary
266
Configuring the DHCP Server
267
Configuring DHCP Relay
268
Viewing DHCP Clients
269
Configuring Static DHCP Clients
270
Configuring a DNS Server
271
Configuring Dynamic DNS
273
Figure 16-10: Personal Domain Name (Dynamic DNS) - Adding
274
Configuring Routing Rules
276
Managing Routing Table Rules
277
Configuring Routing Protocols
278
Enabling Pppoe Relay
279
Selecting Regional Settings for Analog Lines
280
Installation Wizard
281
17 Home Media
283
Universal Plug and Play
283
Enabling Universal Plug and Play on the Device
283
Adding Upnp-Enabled PC to Home Network
284
Monitoring Connection between the Device and Internet
285
Making Local Services Available to Pcs on Internet
286
Figure 17-5: Advanced Settings
287
Figure 17-7: Service Settings – Add Service
288
18 Configuring the Device for Packetsmart
289
Configuring Packetsmart through the Web Interface
289
Figure 18-2: Packetsmart Configuration
290
Table 18-1: Packetsmart Configuration Parameters Description
291
Configuring Packetsmart through the CLI
292
Accessing the Packetsmart Web Portal
293
Figure 18-4: Packetsmart Web Portal – Selecting the Device
294
19 Media Sharing
295
Share Music, Pictures and Video on My Local Network
296
Automatically Share Media in All Folders
297
Figure 19-4: Shared Partitions
298
20 Maintenance
299
Enabling the Feature Key
299
Figure 20-2: Reboot Screen
300
Viewing the Device Software Version
301
Configuring Date and Time
302
Figure 20-5: Daylight Saving Time
303
Figure 20-7: Time Server Settings Screen
304
Configuration File
305
Uploading Configuration File from PC on the Network
307
Figure 20-11: Successful Configuration File Uploading
308
Uploading Configuration File from a Remote Server
309
Encrypting the Configuration File Using CLI
312
Automatic Upload Using SIP NOTIFY Message
313
Firmware Upgrade
314
Upgrading the Device from a Computer on the Network
315
Figure 20-14: Firmware Upgrade Screen – Check Disabled
316
Figure 20-16: Confirming Firmware Upgrade Screen
317
Upgrading the Device from the Internet
318
Configuring System Settings
320
Rebooting the Device
323
Restoring Factory Settings
324
21 Diagnostics and Performance Monitoring
325
Running Diagnostics
325
Running the Ping Test
326
Running the ARP Test
326
Running a Traceroute
327
Running Debug
328
Running Packet Recording
329
Running SIP Debug Log
330
Running Tcpdump
331
Running Tcpdump with Destination Port 7555
331
Updating Wireshark
331
Defining a Different Destination Port (Other than Port 7555)
332
Running Generic Commands
333
Commands Output and Report
334
Figure 21-12: Report Commands Example - Download
335
Figure 21-15: Report Commands Example – Winzip Report
336
System Monitoring
337
Viewing Network Connections Status
337
Viewing the System Log
338
Viewing CPU Statistics
339
Viewing Voip Traffic Statistics
340
Viewing Internet Connection Utilization
341
A Technical Specifications
343
Device Gateway Specifications
343
Table A-1: MP-20X Telephone Adapter Software Specifications
343
Other manuals for AudioCodes MP-20 Series
Frequently Asked Questions
20 pages
Release Notes
22 pages
5
Based on 1 rating
Ask a question
Give review
Questions and Answers:
Need help?
Do you have a question about the AudioCodes MP-20 Series and is the answer not in the manual?
Ask a question
AudioCodes MP-20 Series Specifications
General
Brand
AudioCodes
Model
MP-20 Series
Category
Adapter
Language
English
Related product manuals
AudioCodes MP-20x
270 pages
AudioCodes MP-202
206 pages
AudioCodes MewdiaPack MP-202
14 pages
 Loading...