•
•
•
8-301. Battery Pack Troubleshooting
8-302. Troubleshooting the battery pack
is
accom-
plished by
performing
various tests and by using Table
8-8, Battery
Pack
Troubleshooting.
8-303. Battery Charger Board Troubleshooting
8-304. Problems
on
the
Battery Charger Board can
be
isolated
to
either
the
charging
or
discharging
portion.
A
fault
in
the
charging circuits
will
affect
the
battery charge capability. A fault
in
discharge
circuitry
will
affect
proper
instrument
operation
in the battery
mode.
8-305. The charging
portion
of
the
Battery Charger
Board consists
of:
a.
10
mA
constant
current
source.
b.
500
mA
constant
current
charger.
c.
Charge
control
circuit.
8-306. The discharging
portion
of
the
Battery
Charger Board consists
of:
a.
Power-up delay
circuit
(A3CR2 and A3C5)
b.
Disabling comparator
circuit
(U2D and associ-
ated components)
8-307. Charging Circuit Troubleshooting
Test
a.
Attach the
line
cord and set
the
counter
power
switch
to
STBY.
HP 5384A and
HP
5385A
Service
b.
Place
the
battery charger
in
the
fast charge
mode
by shorting A1U2(12)
to
ground.
Do
this by
placing a short across
A3R20.
8-308.
The voltage across
A3R1
should measure
approximately
0.025
volts (actual voltage
is
deter-
mined
by
the
setting
of
A3R25).
8-309. Battery Load Current
Test
8-310. The Battery Load
Current
Test
consists
of
measuring
the
battery discharge
current
during
counter
operation
to
detect
an
abnormal
condition.
Typically, the battery load
current
will
be
approxi-
mately
900
mA.
If
the
Option
004
Oven
Oscillator
is
installed, the load
current
will
increase. The load
current
will
increase by approximately
300
mA
if
the
oscillator
is
cold and
maximum
heating
current
is
being drawn. The load
current
will
increase by
150
mA
when
the
oven
is
warm and
the
temperature
has
stabilized. Measuring the load
current
may be
accomplished by any
one
of
the
three
following
methods.
a.
Couple
a de
current
probe
to
either
battery
lead.
b.
Substitute a de
power
supply in place
of
the
battery. The
power
supply must have
floating
(un-
grounded)
outputs,
provide
an
output
current
indi-
cation, and be capable
of
delivering
1-2 amps.
Set
the
de voltage
to
approximately
6.3
volts.
c.
Measure
the
voltage
drop
across
A3R1
and
calculate
current
flow
through
the resistor.
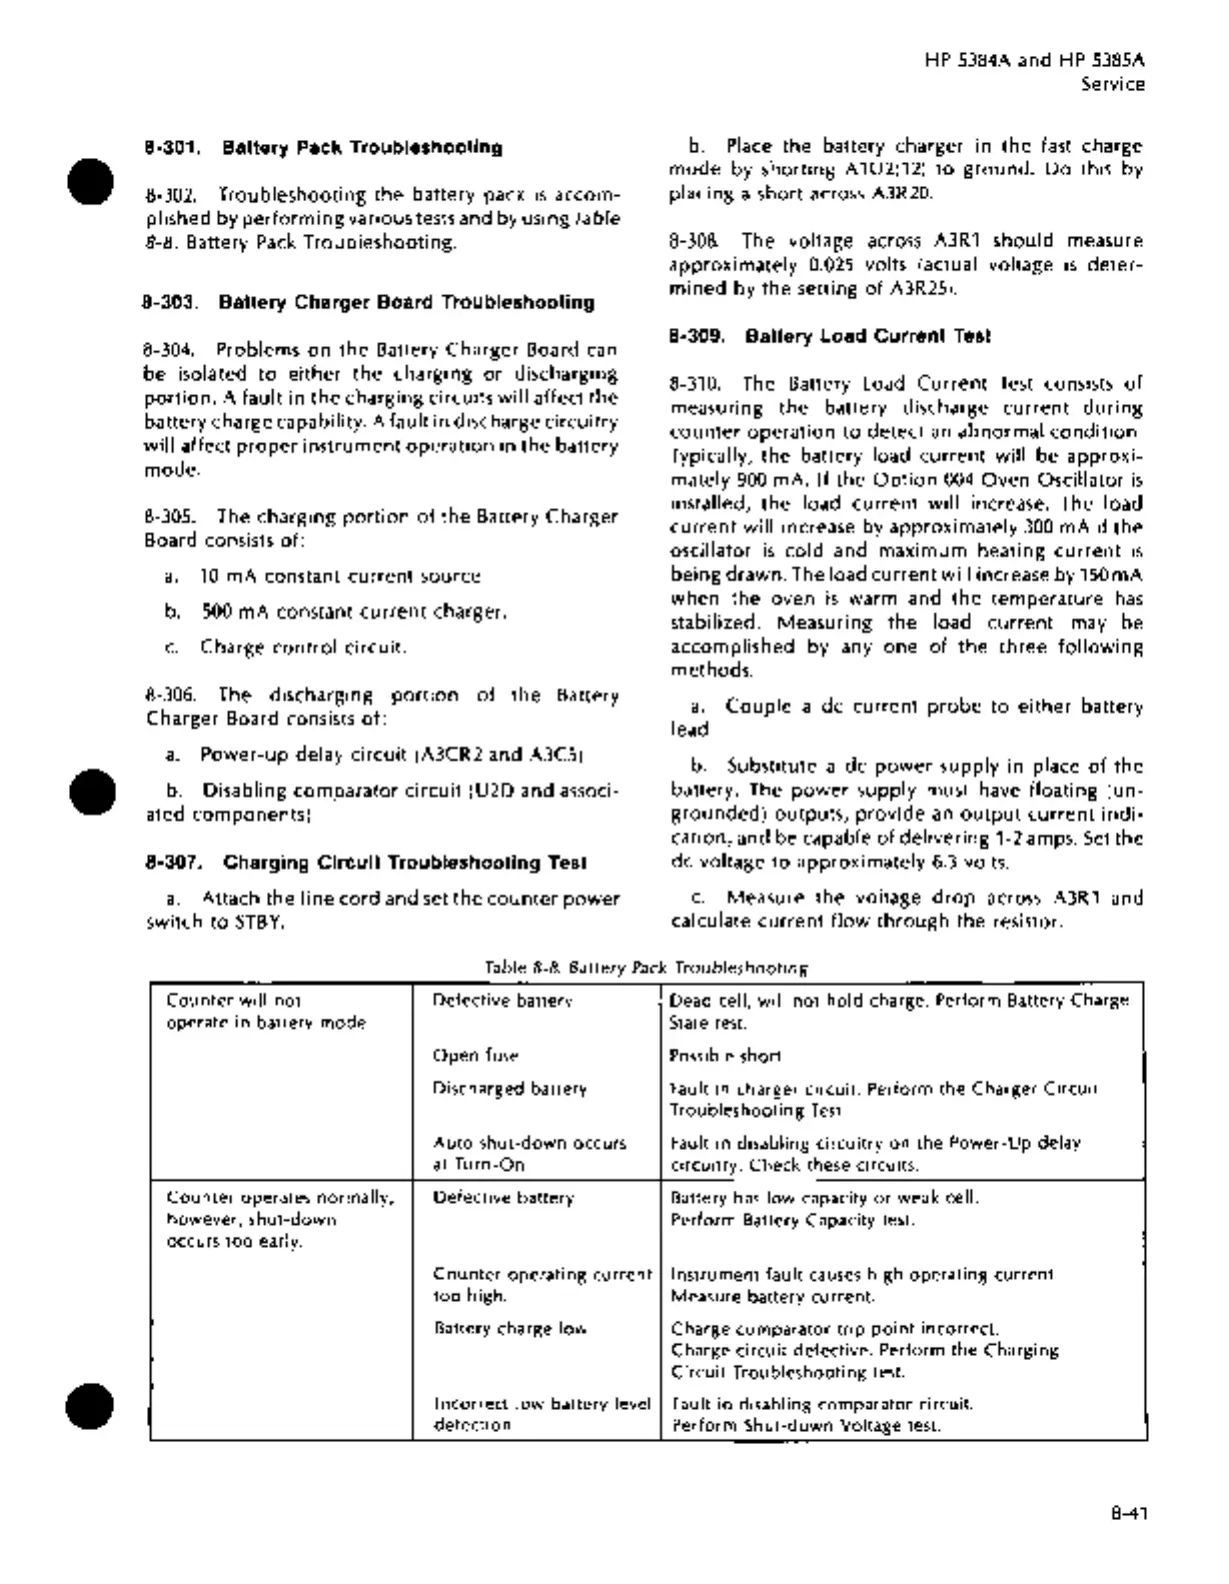
Table
8-8.
Battery
Pack
Troubleshooting
Counter
will
not
Defective battery Dead cell,
will
not
hold
charge. Perform Battery Charge
operate in battery
mode.
State test.
Open
fuse
Possible short.
Discharged battery
Fault
in
charger circuit. Perform
the
Charger
Circuit
Troubleshooting
Test.
Auto
shut-down
occurs Fault in disabling
circuitry
on
the
Power-Up
delay
at
Turn-On
circuitry. Check these circuits.
Counter
operates
normally,
Defective battery
Battery
has
low
capacity
or
weak cell.
however,
shut-down
Perform Battery Capacity test.
occurs
too
early.
Counter
operating
current
Instrument
fault causes
high
operating
current.
too
high.
Measure battery
current.
Battery charge
low
Charge
comparator
trip
point
incorrect.
Charge
circuit
defective. Perform
the
Charging
Circuit
Troubleshooting
test.
lncorred
low
battery level
Fault
in
disabling
comparator
circuit.
detection
Perform
Shut-down
Voltage test.
8-41

 Loading...


