7-17 ● Adjusting the Ink Stream Position
Eject the ink to verify that recovery is achieved.
● With the print head cover left removed, open the "Print description" or
"Maintenance menu" screen and sequentially press the Manual key and
Eject ink key to eject the ink.
● Perform this step with the end of the print head placed in a beaker.
● If the ink stream is not properly centered, make necessary adjustments as
directed in Section 7.7, Adjusting the Ink Stream Position.
● Check the printing and update it with an optimum excitation set value.
4
7.7 Adjusting the Ink Stream Position
● When checking the ink stream position, wear protectors (safety
goggles and mask).
● If the ink or makeup ink should enter your eyes or mouth,
immediately flush with warm or cold water and see a physician.
● Before ejecting the ink, ensure that there is no person in the
direction of ejection.
(The end of the print head must be placed in a beaker or the like.)
WARNING
The ink stream adjustment procedure set forth below is to be performed after nozzle
or orifice plate replacement. Under normal conditions, the ink stream needs no
adjustment.
● The ink stream position must be adjusted so that the ink ejected from the nozzle is
positioned at the center of the gutter.
● Adjustments must be made in both the horizontal direction and vertical direction.
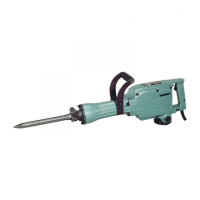
Loosen the screw and then take off the print head cover.
1
Open the "Circulation Control" screen.
Sequentially press the Ink stream adjustment key and
Start/Continue key.
● Perform this step with the end of the print head positioned in a beaker.
2
Loosen the screw.
Print head cover
P
u
l
l
o
u
t
.