Home
Image Access
Scanner
Bookeye 4
Image Access Bookeye 4 User Manual
4
of 1
of 1 rating
122 pages
Give review
Manual
Specs
To Next Page
To Next Page
To Previous Page
To Previous Page
Loading...
Operation Manu
al
Page 77
B.4
To
uchscreen –
I
mage Quality
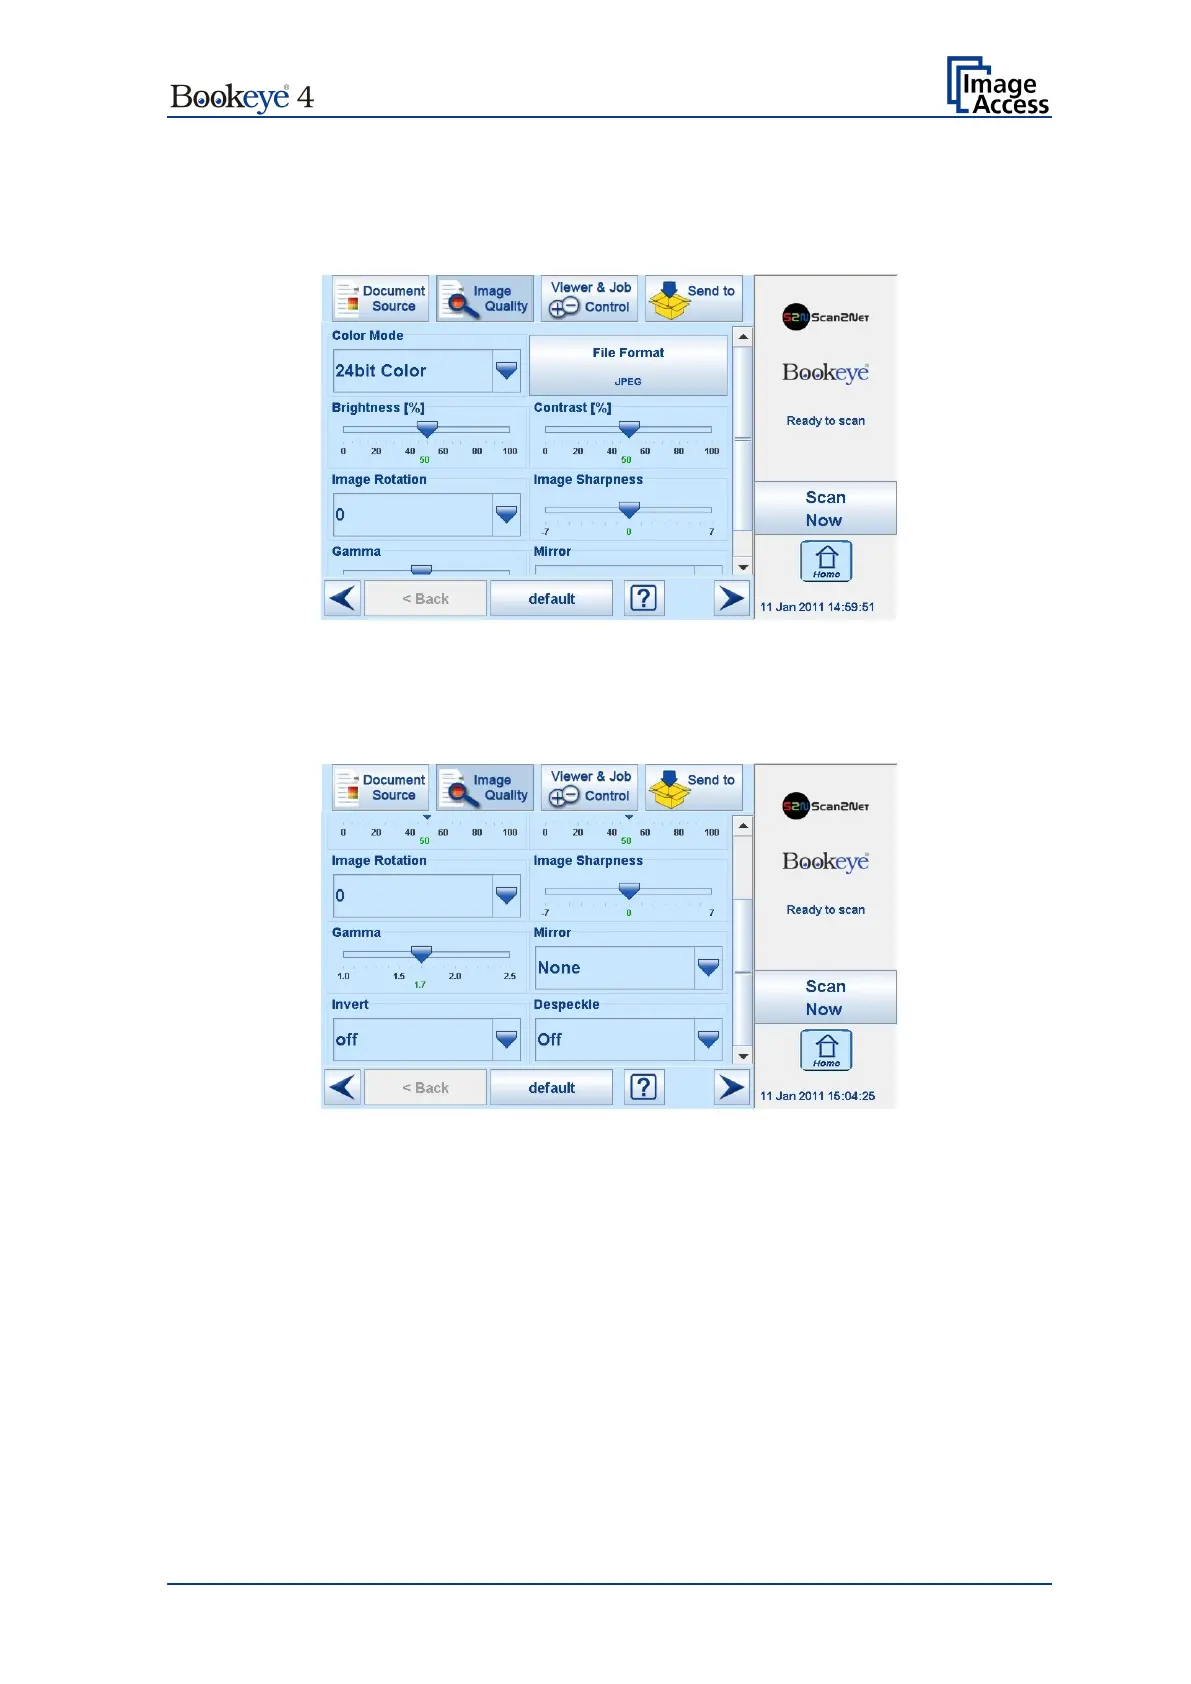
Th
e
Image Quali
ty
screen allow
s
setting
a wide range of image quality p
arameters.
Picture 52
: I
mage Quality 1
In color mode
Bi
nar
y
two additional menu items will be displayed.
These are
the menu items
Invert
and
Despeck
le
.
Picture 53
:
I
mage Qu
alit
y
2
76
78
Table of Contents
Table of Content, Part
2
Table of Content, Part
3
Table of Content, Part
4
Introduction
4
Starting the Bookeye
4
Mise en Marche du Bookeye
4
Table of Content, Part
5
About this Manual
5
Version History
6
Table of Contents
7
A Hardware
16
Safety Notes
16
Marking of Safety Notes
16
Laser Safety Note
16
F-A.1 Notes de Sécurité
17
Marquage des Notes de Sécurité
17
Marquage des Notes de Sécurité du Laser
17
Safety Precautions
18
A.2 Safety Precautions
18
F-A.2 Précautions de Sécurité
19
Certification
20
A.3 Certification
20
Device Location
21
Environment
21
Picture 1: Minimum Distance between Bookeye and Walls
21
A.4 Device Location
21
A.4.2 Ambient Light
22
Ambient Light
22
A.5 Content on Delivery
23
Content on Delivery
23
Maintenance
23
Touchscreen
23
Surfaces
23
Book Cradles
23
Repair
23
Device Overview
24
Picture 2: Elements of the Bookeye 4-V1A
24
A.8 Device Overview
24
Connectors on the Rear Side
25
Picture 3: Connectors on the Rear Side
25
F-A.3 Aperçu du Dispositif
26
F-A.3.1 Connecteurs Sur Le Côté Arrière
27
Connecting the Power Source
28
F-A.4 Raccordement À L'alimentation Électrique
29
Switching the Bookeye ® 4 to Standby Mode
30
Picture 4: Keyboard with Power Button
30
Commutation du Bookeye 4 Sur Le Mode de Veille
31
Book Cradles
32
Picture 5: Book Cradles in Flat Mode and Closed
32
Picture 6: Book Cradles in V Mode and Closed
32
Glass Plate Functionality
33
In General
33
Glass Plate Positions
33
A.11.2.1 Transport Lock Position
33
Picture 7: Loosen the Transport Locks
33
Picture 8: Transport Locks Opened
33
A.11.2.2 Fully up Position
34
Picture 9: Transport Locks and Rubber Bumpers
34
A.11.2.3 the 45 Degree Angled Position
35
Picture 10: Glass Plate Opened in 45 Degree Position
35
Operating the Motorized Book Cradle
36
The Cradle Lock Button
36
The Cradle up / Cradle down Buttons
36
Glass Plate Operating Modes
37
Setting the Operation Modes
37
Picture 11: Setting the Book Cradle Mode
37
Picture 12: Manual Operation
37
Picture 13: Automatic Operation
37
Manual Mode
38
Automatic Mode
38
A.13.3.1 Manual Adjustment of the Height of the Book Cradle Plates
38
Picture 14: Pushing One Side Lifts Other Side Simultaneously
38
A.13.2 Manual Mode
38
Working with the Book Cradle Plates
39
Picture 15: Book Cradle Plates Opened
39
Picture 16: Book Prepositioned at Book Cradle
39
A.13.4 Working with the Book Cradle Plates
39
Picture 17: Lowering the Book Cradle
40
Picture 18: Glass Plate Closed
41
A.14 the "Finger Removal" Function
42
Position of Document
42
Picture 19: Book at Book Cradle in Flat Position
42
Picture 20: Book at Book Cradle Opened in "V" Position
42
Finger Positions
43
Picture 21: Correct Finger Position
43
Picture 22: Minimum Vertical Distance
43
A.14.2 Finger Positions
43
A.14.3.1 Distance too Small
44
A.14.3.2 Finger Position too Steep
44
Wrong Finger Positions
44
A.14.3.3 Fingers Hold too Close to the Margin of the Document
45
A.14.4.1 Book Positioned at the Book Cradle
46
A.14.4.2 Single Finger Holds the Book
46
Examples of Finger Removal
46
A.14.4.3 Multiple Fingers Hold the Book
49
A.14.4.4 Small Books with Pattern at Margin
51
Splitting" Function with Two Separate Documents
52
The "Splitting" Function
52
Picture 23: Single Pages on Book Cradle Plates
52
Splitting" Function with a Single Document
53
Picture 24: Single Document on Book Cradle Plate
53
A.15.2 "Splitting" Function with a Single Document
53
Splitting" Function with Single Document at Middle of the Book Cradle Plates
54
Picture 25: Document Position on Book Cradle Plates
54
Picture 26: Splitting Result with Format = Crop and Deskew
54
A.15.3 "Splitting" Function with Single Document at Middle of the Book Cradle Plates
54
Picture 27: Splitting Result with Format = Auto
55
Splitting" Function with a Book
56
Picture 28: Book Cradle Plates Set to "V" Position
56
Picture 29: Large Book at Book Cradle in "V" Position
56
A.15.4 "Splitting" Function with a Book
56
Document Positions Which Can Result in Malfunction
57
Single Pages
57
A.15.5.2 Books
57
Picture 30: Wrong Position of Book Cradle and
57
Picture 31: Book in Bad Position for Splitting
57
A.15.5 Document Positions Which Can Result in Malfunction
57
B Touchscreen Operation
58
Select Application Screen
58
Picture 32: Start Screen after Start-Up
58
Start Screen of the Kiosk User Interface
59
Picture 33: Viewer & Job Control Screen
59
B.2 Start Screen of the Kiosk User Interface
59
Control Fields of the Touchscreen
60
Touchscreen - Document Source
61
Picture 34: Document Source Screen
61
B.3 Touchscreen – Document Source
61
Auto Mode
62
Document Mode
62
Picture 35: List of Document Modes
62
B.3.1 Document Mode
62
Document Position / Minimum Document Size
63
Table of Pictures, Part 2
63
Picture 36: Document Placed Correctly
63
Picture 37: Document Placed Incorrectly
63
B.3.1.1.1 Document Position / Minimum Document Size
63
Book Mode
64
Flat Mode
64
Folder Mode
64
V-Mode
64
Resolution
65
Picture 38: List of Resolutions
65
B.3.2 Resolution
65
Format
66
Picture 39: Selector for Format Settings
66
B.3.3 Format
66
Maximum
67
Picture 40: Parameters for Maximum Format
67
B.3.3.1 Maximum
67
Auto
68
Picture 41: Book Mode Formats
68
B.3.3.2 Auto
68
Finger Removal Mode
69
Crop and Deskew
70
Picture 42: Crop and Deskew Screen
70
Din
71
Picture 43: Format DIN (=ISO) Selected
71
B.3.3.4 Din
71
Ansi
72
Picture 44: List of ANSI Formats
72
B.3.3.5 Ansi
72
Splitting Image
73
Picture 45: Splitting Image
73
Picture 46: Selecting the „Splitting Start Page
73
B.3.4 Splitting Image
73
Scan Mode
74
Picture 47: Available Scan Modes
74
B.3.5 Scan Mode
74
Exposure
75
Picture 48: Exposure Modes
75
Picture 49: Numeric Key Pad to Set Threshold Value
75
B.3.6 Exposure
75
Auto Density [Binary]
76
Picture 50: Auto Density Slider
76
B.3.7 Auto Density [Binary]
76
Touchscreen - Image Quality
77
Picture 51: Image Quality 1
77
Picture 52: Image Quality 2
77
B.4 Touchscreen – Image Quality
77
Color Mode
78
File Format
78
Jpeg
78
Picture 53: List of Color Modes
78
Picture 54: Submenu File Format "Jpeg
78
B.4.1 Color Mode
78
Pdf
79
Pnm
79
Tiff
79
Picture 55: Submenu File Format TIFF
79
B.4.2.2 Tiff
79
Brightness
80
Contrast
80
Gamma
80
Image Sharpness
80
Picture 56: Brightness Slider
80
Picture 57: Contrast Slider
80
Picture 58: Gamma Slider
80
Picture 59: Image Sharpness
80
B.4.3 Brightness
80
Despeckle
81
Image Rotation
81
Invert
81
Mirror
81
Picture 60: Image Rotation
81
Picture 61: Mirror
81
Picture 62: Invert
81
Picture 63: Despeckle
81
B.4.7 Image Rotation
81
Touchscreen - Viewer & Job Control
82
Picture 64: Viewer & Job Control Screen
82
Picture 65: Scanned Image in Preview Area
82
B.5 Touchscreen – Viewer & Job Control
82
Zonal OCR
84
Picture 66: OCR Button Activated
84
Picture 67: OCR Touchscreen
84
B.5.1 Zonal OCR
84
Picture 68: Rectangle Defines the Area for OCR Function
85
Picture 69: Pre-Selection Area Selected
85
Table of Pictures, Part 3
86
Picture 70: Selected Area Magnified
86
Picture 71: OCR Result
86
Job Mode
87
Picture 72: Bottom Line with Status
87
Picture 73: TFT Flat Screen after Selecting "Job Mode
87
B.5.2 Job Mode
87
Picture 74: Disclaimer When Staring the Job Mode
88
Picture 75: Job Mode Start Screen
88
Navigating through the List of Images
89
Picture 76: Controller Circles Blanked out
89
B.5.2.1 Navigating through the List of Images
89
Adding an Image at an any Position to the List
90
Deleting an Image from the List
90
Moving an Image to Another Position
90
Rescan an Image
90
Finalizing the Job Mode
91
Job Mode Time out
91
Picture 77: Destination to Finalize Job Mode
91
Picture 78: Information When Time out Ends
91
B.5.2.6 Finalizing the Job Mode
91
Touchscreen - Send to
92
Picture 79: "Send To" Screen #1
92
Picture 80: "Send To" Screen #2
92
B.6 Touchscreen – Send to
92
Changing a File Name or Other Entries
93
Picture 81: Alphanumeric Keyboard
93
B.6.1 Changing a File Name or Other Entries
93
List of Suitable USB Storage Media
94
USB Options
94
Picture 82: Directory of Connected USB Data Carrier
94
B.6.2 USB Options
94
Copy Options
95
Printer Settings
95
Picture 83: Parameters of Copy Options
95
Picture 84: Printer Settings Window
95
B.6.3 Copy Options
95
FTP Options
96
Picture 85: Parameters of FTP Options
96
B.6.4 FTP Options
96
Network Options
97
Picture 86: Parameters of Network Options
97
B.6.5 Network Options
97
Mail Options
98
Picture 87: Parameters of Mail Options
98
B.6.6 Mail Options
98
Transaction Modes
99
Picture 88: Interactive Mode, Mail Options
99
B.6.6.1 Transaction Modes
99
C the Scanwizard User Interface
100
Picture 89: Scan2Net® Main Menu
100
The Scanwizard User Interface
101
Picture 90: Scanwizard Interface
101
Picture 91: Scanwizard Interface Layout
101
C.1 the Scanwizard User Interface
101
Picture 92: Online Help
102
Picture 93: "Exit" Returns to Scan2Net® Main Menu
102
Information
103
Picture 94: Information
103
C.2 Information
103
D the Setup Level
104
Picture 95: Login Screen
104
Access Level User
105
Picture 96: User Screen
105
D.1 Access Level User
105
Device Info
106
Picture 97: Device Info Screen
106
D.1.1 Device Info
106
Picture 98: Firmware Information
107
Operation Info
108
Picture 99: Operation Info Screen
108
D.1.2 Operation Info
108
User Settings
109
Picture 100: User Settings Start Screen
109
D.1.3 User Settings
109
Language Selector
110
Picture 101: Language Selector Screen
110
D.1.3.1 Language Selector
110
Power Saving
111
Picture 102: Power Saving
111
D.1.3.2 Power Saving
111
Volume
112
Picture 103: Volume Level
112
D.1.3.3 Volume
112
Foot Pedal
113
Picture 104: Foot Pedal Settings
113
D.1.3.4 Foot Pedal
113
Glass Plate
114
Picture 105: Setting for Automatic Mode
114
D.1.3.5 Glass Plate
114
Splitting Start Page
115
Picture 106: Splitting Start Page
115
D.1.3.6 Splitting Start
115
E Technical Data
116
Scanner Specifications
116
Electrical Specifications
117
Dimensions and Weight
118
Ambient Conditions
118
CE Declaration of Conformity
119
FCC Declaration of Conformity
121
Other manuals for Image Access Bookeye 4
Setup Manual
149 pages
4
Based on 1 rating
Ask a question
Give review
Questions and Answers:
Need help?
Do you have a question about the Image Access Bookeye 4 and is the answer not in the manual?
Ask a question
Image Access Bookeye 4 Specifications
General
Brand
Image Access
Model
Bookeye 4
Category
Scanner
Language
English
Related product manuals
Image Access bookeye 3
72 pages
Image Access Bookeye 5 V2
44 pages
Image Access Bookeye 5 V3
44 pages
Image Access widetek 44
129 pages
Image Access WideTEK 25
108 pages
Image Access WideTEK 36
124 pages
Image Access WideTEK 25-600
125 pages

 Loading...


