Home
Image Access
Scanner
WideTEK 36
Image Access WideTEK 36 User Manual
5
of 1
of 1 rating
124 pages
Give review
Manual
Specs
To Next Page
To Next Page
To Previous Page
To Previous Page
Loading...
Page 86
Manual
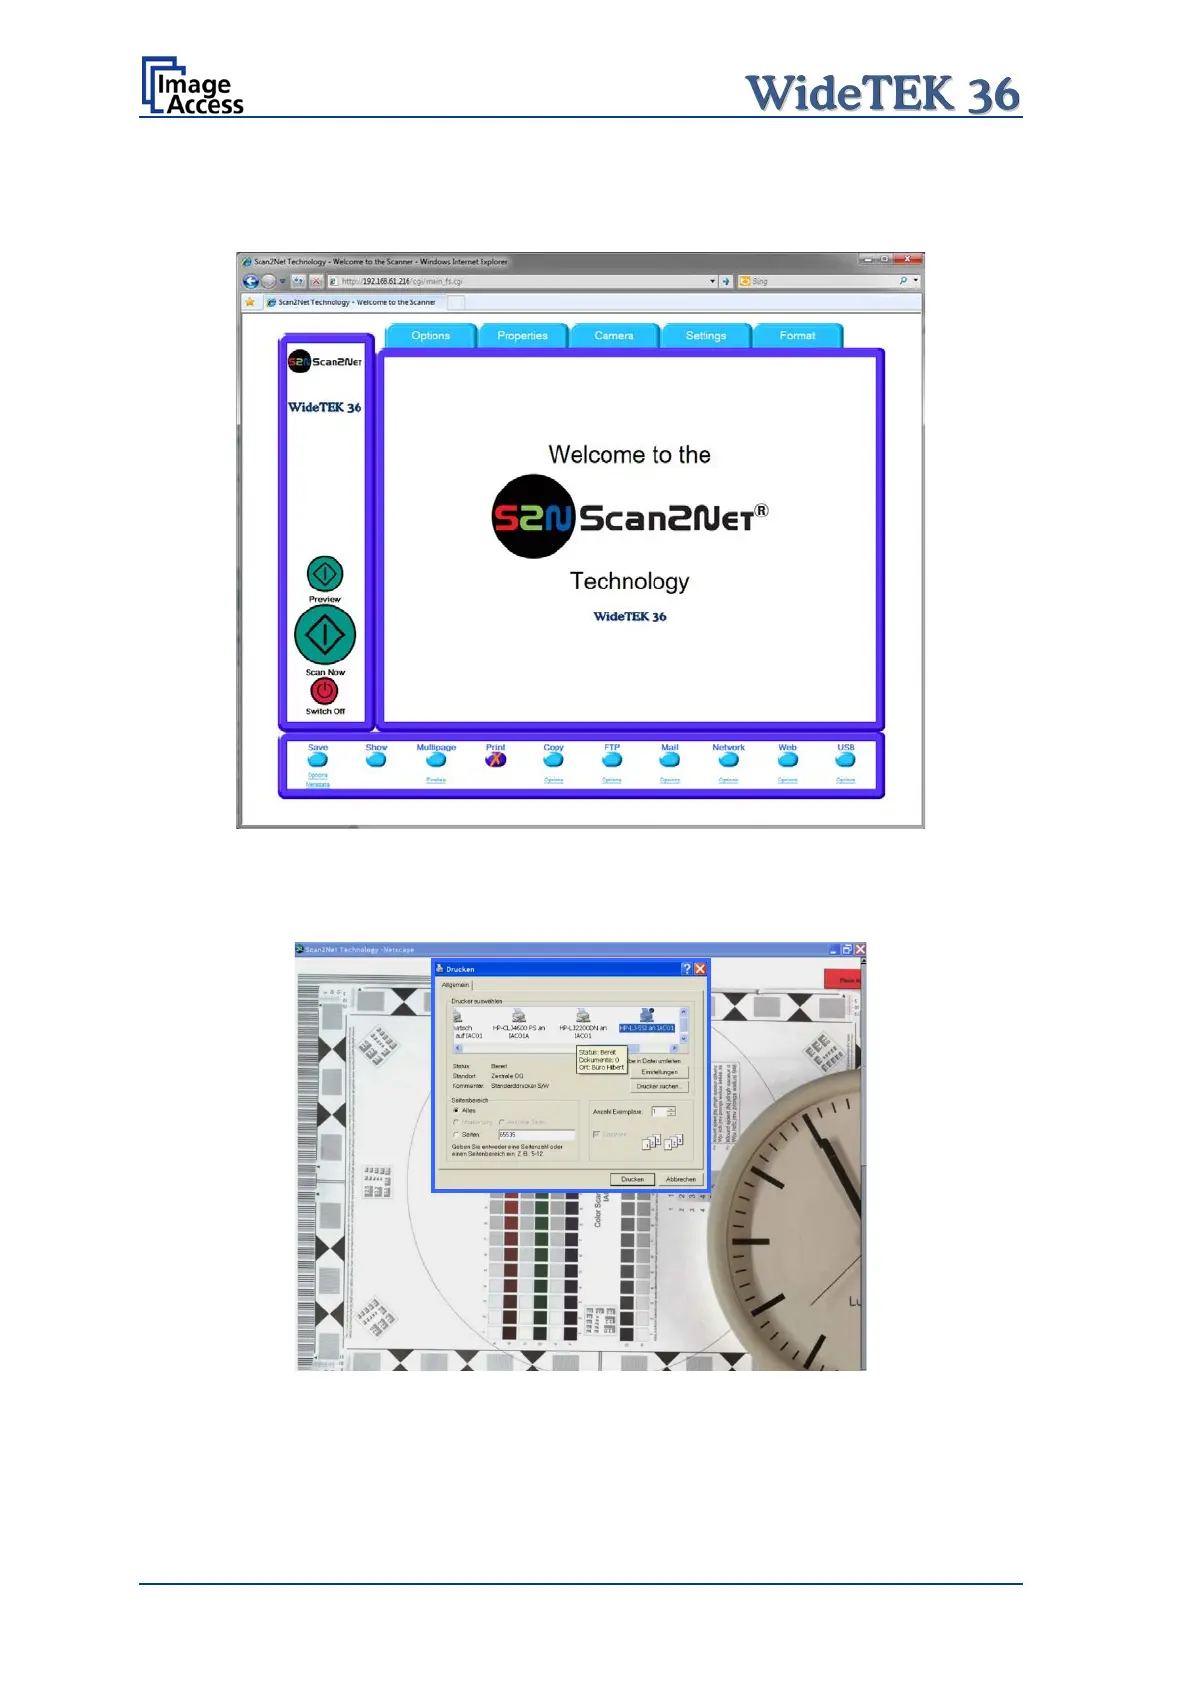
B.3.4
Output Opt
ion Print
This output option prints the image at a
locally con
fig
ured printer
.
Picture 93
: Output Option Print
After the scan is executed, the standar
d printer interface
opens
. The user can select
one
of the available printers.
Picture 94
:
Available
List of Printers for Opti
on Print
85
87
Table of Contents
Introduction
4
About this Manual
5
Version History
6
Table of Contents
7
About this Manual
7
Version History
7
Technical Data
10
Manual Page
11
Manual Page
13
A Hardware
14
Safety Notes
14
Marking of Safety Notes
14
Certification
14
General Notice
14
Safety Precautions
15
A.4 Safety Precautions
15
Connecting to the Power Source
16
Device Location
17
Picture 1: Minimum Distances to the Scanner
17
A.6 Device Location
17
Maintenance
18
Touchscreen
18
Surfaces
18
Glass Plate
18
Repair
18
A.7 Maintenance
18
Content on Delivery
19
Picture 2: Transport Box Opened
19
A.9 Content on Delivery
19
Connectors on the Scanner
20
Picture 3: Connectors at Widetek 36
20
A.11 Adjusting the Middle Guide Plate
21
Picture 4: Middle Guide Plate
21
Picture 5: allen Head Screw in Slot Hole
22
Picture 6: Removing the Middle Guide Plate
22
Picture 7: Self Locking Nut on the Bottom Side of Middle Guide Plate
23
Paper Transport Wings
24
Picture 8: Black Paper Transport Wing
24
Picture 9: Snap Lock on Left Side of the Housing
24
How to Insert the Paper Transport Wings
25
Picture 10: Bending the Paper Transport Wing
25
Picture 11: Inserting at the Front
25
Picture 12: Position of Paper Transport Wings
26
Picture 13: Position for Light Paper Weights
26
Position of the Paper Transport Wings
26
Scanning Documents on Light, Thin Paper Material
26
Picture 14: Inserting at the Back
27
Picture 15: Position for Normal and High Paper Weights
27
Scanning Documents on Normal or Heavier Paper
27
Connecting an External Monitor
28
Picture 16: Position of VGA Connector
28
Picture 17: VGA Connector Beside Gap
28
Picture 18: Guiding into the Scanner
28
Picture 19: Guiding the Cable to the Connector
29
Picture 20: VGA Connector Inserted
29
Powering up the Widetek 36
30
Widetek 36 Touch Panel
30
Starting the Widetek 36 from Stand-By Mode
30
Picture 21: Start Menu Screen
30
Turning-Off the Widetek 36
31
The Help Function
31
Picture 22: Touch Panel While Shut down in Progress
31
Navigating through the Screens
32
How to Enter or Change Values
32
Picture 23: Keyboard with Capital Letters
32
Picture 24: Keyboard with Lower Case Letters
32
Self Test Mode
33
Picture 25: Self Test 1
33
Picture 26: Self Test 2
33
A.17.1 IP Address
34
IP Address
34
Picture 27: Network Setup
34
Picture 28: Numeric Key Pad
34
Picture 29: Confirm Changes
34
A.17.2 White Balance
35
Picture 30: Insert Control Sheet
35
Picture 31: Results of White Balance
35
White Balance
35
A.17.5 Touch Adjust
36
Picture 32: Testing the Touch Screen
36
Manual Page
37
Picture 33: Stitch Test Screen
37
A.17.9 Sensor Test
38
Picture 34: Sensor Status
38
Picture 35: Start Menu Screen
39
Picture 36: Document Transport Controls
39
A.19 Output Control Screens
40
Picture 37: Output Control 1
40
Picture 38: Viewer Control
40
A.19.1.2 Email Address
41
Picture 39: E-Mail Address Parameters
41
A.19.1.3 FTP Server
42
Picture 40: Ftp Server 1
42
Picture 41: Ftp Server 2
43
A.19.1.4 Windows Network
44
Picture 42: Network Parameters
44
Picture 43: Input a Network Address
44
A.19.2 Output Control 2
45
Picture 44: Output Control 2
45
Picture 45: System Events and Sound Files
45
A.20 Image Control Screen
46
Picture 46: Image Control 1
46
A.20.1.4 Sharpness
47
A.20.2 Image Control 2
48
Picture 47: Image Control 2
48
A.20.2.4 Stitching
49
A.20.3 Image Control 3
50
Picture 48: Image Control 3
50
A.21 Format Control Screen
51
Picture 49: Format Control 1
51
A.21.2 Format Control 2
52
Picture 50: Format Control 2
52
A.21.3 Format Control 3
53
Picture 51: Format Control 3
53
A.22 File Control Screen
54
Picture 52: File Control
54
A.22.2 Tiff
55
A.22.4 Pdf
56
A.23 Transport Control Screen
57
Picture 53: Transport Control
57
A.23.4 Feeder Delay
58
A.24 Job
59
Picture 54: List of Available Jobs
59
Picture 55: Keyboard of Input Screen
59
Picture 56: Creating a Job
60
Picture 57: Entering the Password
60
Picture 58: Number of Password Elements
60
A.24.2 Selecting a Job
61
Picture 59: Selecting a Job from the List
61
Picture 60: Request for Password
61
A.24.3 Deleting a Job
62
Picture 61: Confirming to Delete the Job
62
Picture 62: Enter Password to Delete Job
62
A.25 Software Option: Scan2Vga
63
Picture 63: Touchpanel after Scanning
63
B Software
64
Picture 64: Start Screen
64
B.2 the Main Screen
65
Picture 65: Main Screen
65
Picture 66: Shutdown Confirmation
66
B.2.1 the Options Screen
67
Picture 67: Options Screen
67
B.2.2 the Properties Screen
69
Picture 68: Properties Screen
69
Picture 69: 24Bit Color, File Format: PNM
70
Picture 70: Binary, File Format: TIFF with G4 Compression
70
Picture 71: Format List
72
Picture 72: Additional Margin/Auto Density Slider
72
Picture 73: Set Deskew Angle
73
Picture 74: Document Edges
73
B.2.3 the Camera Screen
74
Picture 75: Camera Screen
74
Picture 76: Exposure Control Slider
75
B.2.3.1 Threshold Dynamic / Threshold Fixed
76
Picture 77: Threshold Method Selector
76
Picture 78: Despeckle Function
76
B.2.4 the Settings Screen
77
Picture 79: Settings Screen
77
Table of Pictures, Part 3
78
Picture 80: Available Skins
78
Picture 81: Scan Status Window
78
B.2.5 the Format Screen
79
Picture 82: Format Screen
79
Picture 83: Rectangle Dragged with Mouse
80
Picture 84: "Zoom In" Result
80
Picture 85: List of Available Clip Size Formats
80
B.3 Output Options
81
Picture 86: Output Options
81
Picture 87: Output Option Save
82
Picture 88: Example for File Name
82
Picture 89: Output Option Show
83
Picture 90: Output Options in Scan Window
83
Picture 91: Output Option Multipage
84
Picture 92: Pop-Up Window to Select Images for the "Container
85
Picture 93: Output Option Print
86
Picture 94: Available List of Printers for Option Print
86
Picture 95: Output Option Copy
87
B.3.5.2 Printing Enhancement
89
B.3.5.3 Accounting
90
B.3.5.4 Extended Print Parameters with Ipf Option Installed
91
B.3.5.5 Printing Enhancements with Ipf Option Installed
92
Picture 96: Output Option FTP Upload
93
Picture 97: Output Option Mail
95
Manual Page
97
Picture 98: Parameters for Transaction Mode "Interactive
97
Picture 99: Recipient Address List Opened
97
Picture 100: Output Option Network
98
B.3.8.1 SMB Configuration
99
Picture 101: Output Option Web
100
B.3.9.1 Web Service Configuration
101
Picture 102: Output Option USB
102
Picture 103: USB Stick Inserted in USB Connector
102
B.3.10.1 USB Storage Device
103
B.4 Information
104
Picture 104: Information
104
B.5 the Setup Screen
105
Picture 105: Login Screen
105
B.5.2 Access Level User
106
Picture 106: User Screen
106
Picture 107: Device Info Screen
107
Picture 108: Operation Info Screen
108
B.5.2.3 User Settings Screen
109
Picture 109: Available User Settings
109
B.5.2.3.1 Language Selector
110
Picture 110: Language Selector Screen
110
B.5.2.3.2 Power Saving
111
Picture 111: List of Power down Times
111
B.5.2.3.3 Volume
112
Picture 112: Volume Level
112
B.5.2.3.4 Foot Pedal
113
Picture 113: Foot Pedal Settings
113
Picture 114: Splitting Start Page
114
Picture 115: Guide Plate Middle
115
C Tests and Troubleshooting
116
C.2 Error Codes
117
C.3 Warnings
119
D Technical Data
120
D.3 Electrical Specifications
121
D.5 CE Declaration of Conformity
122
D.6 FCC Declaration of Conformity
123
Other manuals for Image Access WideTEK 36
Operation Manual
129 pages
Setup Instructions
76 pages
Setup And Assembly Manual
69 pages
5
Based on 1 rating
Ask a question
Give review
Questions and Answers:
Need help?
Do you have a question about the Image Access WideTEK 36 and is the answer not in the manual?
Ask a question
Image Access WideTEK 36 Specifications
General
Brand
Image Access
Model
WideTEK 36
Category
Scanner
Language
English
Related product manuals
Image Access widetek 44
129 pages
Image Access WideTEK 25
108 pages
Image Access WideTEK 25-600
125 pages
Image Access Bookeye 5 V2
44 pages
Image Access Bookeye 5 V3
44 pages
Image Access Bookeye 4
122 pages
Image Access bookeye 3
72 pages

 Loading...


