the lead color coding used at the DC power source and verify that the power source is connected to the
negative (–) terminal and to the positive (+) terminal on the power supply.
•
Ensure that the chassis ground is connected on the chassis before you begin installing the DC power
supply. Follow the steps provided in the “Attaching a Chassis Ground Connection” section on page 4-10
.
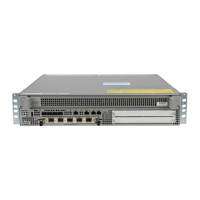
Wiring the DC Input Power Source
The Cisco ASR 1001-X Router DC power supply has a terminal block that is installed into the power supply
terminal block header.
Use the following steps to wire the DC input power source:
SUMMARY STEPS
1.
Turn off the circuit breaker from the power source.
2.
At the rear of the router, ensure that the power switch is in the Standby position.
3.
Use a wire-stripping tool to strip each of the two wires coming from the DC input power source and strip
the wires to approximately 0.39 inch (10 mm) + 0.02 inch (0.5 mm). Do not strip more than the
recommended length of wire because doing so could leave the wire exposed from the terminal block. The
below figure shows a stripped DC input power source wire.
4.
Identify the positive and negative feed positions for the terminal block connection. The wiring sequence
is:
5.
Insert the exposed wire into the terminal block. Ensure that you cannot see any wire lead outside the plastic
cover. Only wires with insulation should extend from the terminal block.
6.
Use a screwdriver to tighten the terminal block captive screws, as shown in the below figure.
7.
Repeat these steps for the remaining DC input power source wire as applicable.
8.
Use a tie wrap to secure the wires to the rack, so that the wires are not pulled from the terminal block by
casual contact.
9.
Turn on the circuit breaker at the power source.
10.
If you have changed the Standby switch to the standby position in step 1, turn the Standby switch to the
On position.
DETAILED STEPS
Step 1
Turn off the circuit breaker from the power source.
Step 2
At the rear of the router, ensure that the power switch is in the Standby position.
It is not required to place the power switch in the Standby position if you want to hot-swap a single power
supply.
Note
Step 3
Use a wire-stripping tool to strip each of the two wires coming from the DC input power source and strip the wires to
approximately 0.39 inch (10 mm) + 0.02 inch (0.5 mm). Do not strip more than the recommended length of wire because
Cisco ASR 1001-X Router Hardware Installation Guide
98
Removing and Replacing FRUs from the Cisco ASR 1001-X Router
Installing DC Input Power on the Cisco ASR 1001-X Router

 Loading...